High Protein Chicken Orzo

High Protein Chicken Orzo is a delightful dish that packs a punch with its rich flavors and wholesome ingredients. This recipe combines tender chicken with the delightful chewiness of orzo pasta, making it a perfect choice for family dinners or gatherings. Not only is it satisfying, but it’s also an excellent way to boost your protein intake while enjoying a comforting meal. Picture this: a warm bowl of savory goodness that both kids and adults will love, bringing everyone together around the table. Let’s dive into the steps to whip up this crowd-pleaser.

High Protein Chicken Orzo

Why You’ll Love High Protein Chicken Orzo

This dish stands out for many reasons. First, the combination of chicken and orzo not only makes for a great texture but also ensures that you are getting a good amount of protein in each serving. Additionally, the flavors meld beautifully, creating a satisfying taste that feels like a warm hug. It’s also a versatile recipe; you can easily add vegetables like spinach or bell peppers to enhance the nutritional value. If you’re looking for a quick meal that doesn’t sacrifice taste or nutrition, then this recipe is perfect for you.

Tips for success

To ensure your High Protein Chicken Orzo turns out perfectly, here are some tips to follow. First, make sure to sauté the chicken until it’s golden brown to seal in the flavors. Also, cook the orzo separately to avoid it becoming mushy if it’s added too early. When seasoning, feel free to experiment with herbs; adding fresh basil or thyme can elevate the flavor. Finally, for an extra layer of taste, consider finishing the dish with a sprinkle of parmesan cheese. If you’re interested in similar simple recipes, check out this quick and easy recipe for boiled chicken thighs.

High Protein Chicken Orzo

Serving Suggestions

This dish pairs wonderfully with a light salad or garlic bread. You can also serve it with a side of steamed vegetables, like broccoli or green beans, to round out the meal. For those looking for a heartier option, consider serving it alongside a creamy risotto or a fresh vegetable medley. No matter how you choose to enjoy it, this High Protein Chicken Orzo is sure to become a favorite.

FAQs

Can I prepare High Protein Chicken Orzo in advance?

Yes, you can prepare the ingredients in advance and store them separately. Just combine them when you’re ready to cook.

What type of chicken works best for this recipe?

Boneless, skinless chicken thighs or breasts work best as they remain juicy while cooking.

Can I swap orzo for another type of pasta?

Absolutely! If you prefer, you can use other small pasta shapes like ditalini or even quinoa for a gluten-free option.

High Protein Chicken Orzo

A delightful dish combining tender chicken with orzo pasta, perfect for boosting your protein intake while enjoying a comforting meal.

Main Ingredients

  • 2 cups orzo pasta (Cook separately to avoid mushiness.)
  • 1 lb boneless, skinless chicken thighs or breasts (Juicy when cooked.)
  • 1 tbsp olive oil (For sautéing chicken.)

Seasoning and Extras

  • to taste salt and pepper (For general seasoning.)
  • 1/4 cup grated parmesan cheese (Optional, for finishing the dish.)
  • 1 cup spinach or bell peppers (Optional, for added nutrition and flavor.)
  • 1 tbsp fresh basil or thyme (Optional, for enhancing flavor.)

Preparation

  1. Heat olive oil in a pan over medium heat.
  2. Sauté the chicken until golden brown and cooked through.
  3. While the chicken is cooking, boil the orzo according to package instructions.
  4. Add optional vegetables, such as spinach or bell peppers, during the last few minutes of cooking.
  5. Once cooked, drain orzo and set aside.

Assembly

  1. Combine the sautéed chicken with the orzo in the pan.
  2. Season with salt, pepper, and herbs to taste.
  3. If using, sprinkle with parmesan cheese before serving.

Prepare ingredients in advance and store them separately; combine when ready to cook. Experiment with herbs for different flavors.

Dinner, Main Course
American
Chicken Orzo, Comfort Food, Family Dinner, High Protein, Quick Meal

Chipotle Burrito Bowl (Copycat Recipe)

When you’re craving a satisfying meal that bursts with flavor, the Chipotle Burrito Bowl is a top choice. This copycat recipe lets you recreate that delicious bowl right in your kitchen, making it easier than ever to enjoy anytime! This recipe is a true crowd-pleaser, with tender proteins, fresh veggies, and zesty toppings that will have everyone asking for seconds. The best part? You can customize it to suit your own taste, which makes it super fun to prepare. So, let’s dive into how you can make this delicious bowl at home!

How to prepare Chipotle Burrito Bowl

Prepare to be amazed by how simple it is to whip up this burrito bowl. Start by cooking the rice according to package instructions, while browning your chosen protein in a skillet. Once everything is cooked, gather your favorite toppings like black beans, corn, diced tomatoes, and your choice of salsa. Arrange each component beautifully in a bowl, creating a colorful and enticing meal.

Chipotle Burrito Bowl (Copycat Recipe)

Why You’ll Love Chipotle Burrito Bowl

You will love the Chipotle Burrito Bowl for many reasons. It’s filled with fresh, vibrant ingredients that not only taste fantastic but also make you feel good. Plus, this recipe is portable, so you can pack it up for lunch or a picnic. Even better, it allows for creativity, as you can mix and match various toppings! If you’re also interested in trying out another flavorful dish, consider checking out this Bang Bang Chicken Bowl recipe.

Tips for success

  1. Use fresh ingredients: The freshness of veggies and herbs makes a huge difference in flavor.
  2. Prepare ahead: You can cook the rice and protein in advance to make assembly quicker during meal times.
  3. Customize it: Don’t shy away from adding your favorite toppings, whether it’s guacamole, jalapeños, or a drizzle of lime juice.

Chipotle Burrito Bowl (Copycat Recipe)

Serving Suggestions

Serve the burrito bowl warm, and consider adding a side of tortilla chips for some crunch. You can also pair it with a refreshing drink, such as iced tea or a fruit-infused water, to balance the bold flavors in the bowl.

FAQs

Can I make this burrito bowl vegetarian?

Absolutely! Just skip the meat and load up on extra beans and veggies for a hearty meal.

How long can I store leftovers?

You can store leftovers in an airtight container in the fridge for about 3 days.

What kind of protein can I use?

You can use chicken, beef, pork, or even tofu for a plant-based option.

Chipotle Burrito Bowl

A flavorful copycat recipe that allows you to recreate a delicious Chipotle-style burrito bowl at home, loaded with colorful ingredients and customizable toppings.

For the Base

  • 2 cups rice (Cook according to package instructions.)
  • 1 lb protein (chicken, beef, pork, or tofu) (Brown in a skillet.)

For the Toppings

  • 1 can black beans (Drained and rinsed.)
  • 1 cup corn (Fresh or frozen.)
  • 2 medium diced tomatoes (Fresh or canned.)
  • 1 cup salsa (Choose your favorite variety.)

Preparation

  1. Cook the rice according to the package instructions.
  2. In a skillet, brown your chosen protein.
  3. Gather your favorite toppings like black beans, corn, diced tomatoes, and salsa.

Assembly

  1. Arrange each component beautifully in a bowl to create a colorful and enticing meal.

Use fresh ingredients for better flavor. Prepare the rice and protein in advance for quicker assembly. Customize the bowl with additional toppings like guacamole and jalapeños.

Dinner, Main Course
Mexican, Tex-Mex
burrito bowl, Chipotle Burrito Bowl, copycat recipe, customizable meal, Meal Prep

Sausage and Tortellini and Crockpot

If you’re looking for a comforting and creamy dish that warms you from the inside out, Crockpot Tortellini & Sausage Soup is the answer. This delightful soup is an absolute crowd-pleaser, combining the savory taste of Italian sausage with the tender texture of tortellini. You can easily throw this together in your slow cooker for a delicious meal that everyone will love. Plus, it’s perfect for busy weeknights when you want something hearty without the fuss. With just a few ingredients, you’ll have a soul-soothing soup simmering away while you go about your day.

Why You’ll Love Sausage and Tortellini and Crockpot

The appeal of this soup lies not only in its creamy consistency but also in its rich flavor profile. The Italian sausage adds a zesty kick, while the tortellini provides a filling element that makes this dish satisfying. You can even customize it by adding your favorite vegetables or greens. For an alternative taste, you might also want to discover our Creamy Italian Sausage Gnocchi Soup, which offers a different yet equally delightful experience.

Tips for success

To ensure your crockpot soup turns out perfect every time, there are a few tips to keep in mind. First, you can opt for fresh tortellini rather than dried for a softer texture. Second, remember not to lift the lid during cooking, as this releases heat and can extend cooking time. Lastly, adding spinach or kale in the last 30 minutes keeps the greens vibrant and fresh. If you’re interested in more savory soups, check out our recipe for Creamy Italian Sausage Soup.

Crockpot Tortellini & Sausage Soup (Creamy & Delicious!)

Serving Suggestions

When serving your soup, consider pairing it with a crusty bread or a fresh green salad to complete the meal. A sprinkle of Parmesan cheese on top can also enhance the flavors, giving it an extra touch of creaminess. Enjoying this dish during colder months makes it even more comforting, so gather your loved ones around the table and dive into this warming bowl of goodness.

FAQs

Can I use frozen tortellini in this recipe?

Yes, you can use frozen tortellini. Just add it to the crockpot during the last 15 minutes of cooking to ensure it cooks through without becoming too soft.

How can I make this soup healthier?

You can use low-fat sausage or turkey sausage, and add more vegetables like zucchini or bell peppers to increase the nutritional value.

Can I prepare this soup in advance?

Absolutely! You can prep all ingredients the night before and just toss them in the crockpot in the morning for a quick dinner.

Crockpot Tortellini & Sausage Soup offers a wonderful blend of flavors and textures that truly warms the heart and satisfies the palate. For another delicious twist, you might also enjoy making a Slow Cooker Creamy Tortellini & Sausage Soup, perfect for cozy gatherings or just a simple dinner at home. Get ready to savor every bite!

Crockpot Tortellini & Sausage Soup

A comforting creamy soup combining Italian sausage and tender tortellini, perfect for busy weeknights.

Main Ingredients

  • 1 lb Italian sausage (You can use either mild or spicy sausage according to your preference.)
  • 1 package fresh or frozen tortellini (For a softer texture, use fresh tortellini. If using frozen, add during the last 15 minutes.)
  • 4 cups chicken broth
  • 1 cup heavy cream (This adds the creamy consistency.)
  • 2 cups fresh spinach or kale (Add in the last 30 minutes for vibrant greens.)

Preparation and Cooking

  1. In a large skillet, brown the Italian sausage over medium heat until fully cooked, then drain any excess fat.
  2. Transfer the cooked sausage to the crockpot and add the chicken broth.
  3. Cover and cook on low for 4 hours.
  4. Add the tortellini and heavy cream to the crockpot and stir gently.
  5. Cook on low for an additional 30 minutes until the tortellini is tender.
  6. Stir in the spinach or kale and cook for another 30 minutes.

Serve with crusty bread, a fresh green salad, or a sprinkle of Parmesan cheese for added flavor. Preferably enjoyed during colder months for maximum comfort.

Main Course, Soup
Italian
Comfort Food, Creamy Tortellini Soup, Crockpot Soup, Sausage Soup, Slow Cooker Recipes

Joanna Gaines Chicken Enchiladas

If you’re on the hunt for a dish that brings everyone together, look no further than Joanna Gaines Chicken Enchiladas. This delightful recipe is a true crowd-pleaser, packed with tender chicken, zesty flavors, and gooey cheese that melts beautifully in your mouth. The appeal of these enchiladas lies not just in their taste, but also in their cozy, homemade feel that makes any meal special. Plus, they are perfect for family dinners or casual get-togethers with friends. Get ready to bring some joy to your kitchen!

How to prepare Joanna Gaines Chicken Enchiladas

To start, gather all your ingredients, including shredded chicken, flour tortillas, enchilada sauce, and, of course, plenty of cheese. The magic begins when you fill the tortillas, roll them up, and place them in a baking dish. Once assembled, generously pour the enchilada sauce over the top, sprinkle with cheese, and bake until bubbling and golden. Your kitchen will be filled with an irresistible aroma.

Joanna Gaines Chicken Enchiladas

Why You’ll Love Joanna Gaines Chicken Enchiladas

These enchiladas are not only delicious, but they are also incredibly versatile. You can easily customize them with your favorite toppings, like sour cream, jalapeños, or fresh cilantro. Plus, they can be made ahead of time and frozen, which is a great time-saver for busy nights. If you enjoy flavor-packed meals, this recipe is sure to become a staple in your household.

Tips for success

To ensure your chicken enchiladas come out perfectly every time, always use fresh ingredients. If you want extra flavor, consider marinating the chicken before cooking. Also, ensure that you’re generous with the enchilada sauce to keep the tortillas from drying out. For an added kick, you can mix some spices into the filling, such as cumin or smoked paprika.

When you’re looking for another delicious recipe, you might want to try making air fryer Cajun chicken for a flavorful twist on your dinner lineup.

Serving Suggestions

These Chicken Enchiladas are fantastic on their own, but you can elevate your meal by serving them with a fresh salad or some Mexican rice. A side of guacamole or salsa adds a great touch too, making your dinner even more enjoyable.

FAQs

Can I use store-bought enchilada sauce?

Absolutely! Store-bought enchilada sauce saves time, but making your own can provide a deeper flavor.

What type of cheese works best?

Mexican cheese blends or Monterey Jack are excellent choices for enchiladas, as they melt nicely.

Can I freeze Chicken Enchiladas?

Yes, you can! Just make sure to wrap them tightly before freezing, and bake them straight from frozen, adding a few extra minutes to the cooking time.

Chicken Enchiladas

Delightful Chicken Enchiladas packed with tender chicken, zesty flavors, and gooey cheese, perfect for family dinners or casual get-togethers.

Main Ingredients

  • 3 cups shredded chicken (Cooked and shredded)
  • 8 large flour tortillas
  • 2 cups enchilada sauce (Store-bought or homemade)
  • 2 cups Mexican cheese blend (Or Monterey Jack, shredded)

Preparation

  1. Preheat your oven to 375°F (190°C).
  2. Gather all your ingredients including shredded chicken, flour tortillas, enchilada sauce, and cheese.
  3. Fill each tortilla with a portion of shredded chicken and roll them up tightly.
  4. Place the rolled tortillas seam-side down in a baking dish.

Assembly and Baking

  1. Pour the enchilada sauce generously over the rolled tortillas.
  2. Sprinkle the shredded cheese on top.
  3. Bake in the preheated oven for 25 minutes, or until the cheese is bubbly and golden.

Customize with your favorite toppings like sour cream, jalapeños, or fresh cilantro. Marinate the chicken for extra flavor and ensure generous use of enchilada sauce to prevent drying out. Can be made ahead of time and frozen.

Dinner, Main Course
Mexican
Chicken Enchiladas, Comfort Food, Enchilada Recipe, Family Dinner, Joanna Gaines

Million Dollar Baked Chicken Breast

When it comes to simple yet delightful meals, Million Dollar Baked Chicken Breast truly stands out. This dish is not just a treat for your taste buds, but it’s also a crowd-pleaser that leaves everyone asking for seconds. Imagine juicy chicken breasts baked to perfection, topped with creamy goodness that melts in your mouth. It’s a dish that makes weekday dinners feel special, without requiring much effort. If you’re looking to impress your family or friends, this recipe is your ticket to culinary greatness. Get ready, because making this delicious meal will soon become a favorite in your kitchen!

How to Prepare Million Dollar Baked Chicken Breast

To start, gather the following ingredients:

  • 4 boneless, skinless chicken breasts
  • 1 cup cream cheese, softened
  • 1 cup shredded cheddar cheese
  • 1 cup sour cream
  • 1 package ranch seasoning mix
  • Salt and pepper to taste

Before we dive into the steps, remember to set your oven to 350°F (175°C). This will give your chicken the perfect environment to bake while keeping it moist and tasty.

Million Dollar Baked Chicken Breast

  1. Begin by preparing the chicken breasts; season them with salt and pepper.
  2. In a separate bowl, mix the softened cream cheese, ranch seasoning, shredded cheddar cheese, and sour cream until well combined.
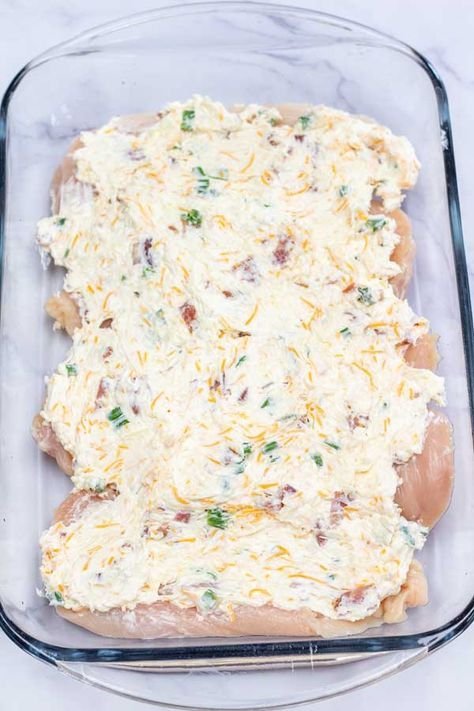
  3. Place the chicken in a baking dish and spread the cheese mixture generously on top.
  4. Bake for 30 to 35 minutes, or until the chicken is cooked through and the top is bubbly and golden brown.

Why You’ll Love Million Dollar Baked Chicken Breast

You’ll love Million Dollar Baked Chicken Breast not just for its mouthwatering flavor but also for its versatility. It pairs wonderfully with almost anything! Whether you enjoy it with a side of steamed vegetables, mashed potatoes, or a fresh salad, this dish fits right in. Plus, it’s an ideal option for potlucks or family gatherings. If you’re craving something equally delicious, consider trying balsamic baked chicken breast with mozzarella cheese, which offers a different but equally rich taste experience.

Tips for Success

  • Make sure to let the cream cheese soften at room temperature before mixing to ensure a smooth and creamy blend.
  • For added flavor, you can incorporate chopped herbs like parsley or chives into the cheese mixture.
  • If you prefer, you can grill the chicken instead of baking it for a lovely smoky flavor.

Million Dollar Baked Chicken Breast

Serving Suggestions

Million Dollar Baked Chicken Breast is perfect for any meal. Serve it with a side of roasted vegetables, or perhaps some buttery rice. For a fresh touch, consider a simple green salad topped with vinaigrette. If you’re in the mood for something more decadent, this dish pairs fabulously with garlic bread on the side. Don’t hesitate to explore and pair it with your favorite side dishes—it’s all about what you love!

FAQs

1. Can I use frozen chicken breasts for this recipe?

Yes, but make sure to thaw them completely before cooking for the best results.

2. How can I store leftovers?

Store any leftovers in an airtight container in the refrigerator for up to 3 days.

3. Is it possible to make this recipe ahead of time?

Absolutely! You can prepare the chicken and cheese mixture a day in advance, just cover it and keep it in the fridge until you’re ready to bake.

For another option, try the delicious garlic butter baked chicken breast for a rich flavor twist. This dish is sure to become a repeat in your meal rotation!

Million Dollar Baked Chicken Breast

A creamy, delicious baked chicken dish that’s easy to prepare and loved by all.

Main Ingredients

  • 4 pieces boneless, skinless chicken breasts
  • 1 cup cream cheese, softened (Ensure it is at room temperature for easy mixing.)
  • 1 cup shredded cheddar cheese
  • 1 cup sour cream
  • 1 package ranch seasoning mix
  • Salt and pepper to taste

Preparation

  1. Preheat your oven to 350°F (175°C).
  2. Season the chicken breasts with salt and pepper.
  3. In a bowl, mix the softened cream cheese, ranch seasoning, shredded cheddar cheese, and sour cream until well combined.
  4. Place the seasoned chicken breasts in a baking dish and spread the cheese mixture generously on top.

Cooking

  1. Bake for 30 to 35 minutes, or until the chicken is cooked through and the top is bubbly and golden brown.

For added flavor, consider incorporating chopped herbs like parsley or chives into the cheese mixture. You can also grill the chicken instead of baking it for a lovely smoky flavor.

Dinner, Main Course
American
Baked Chicken, Creamy Chicken Dish, Delicious Dinner, easy chicken recipe, Million Dollar Chicken

Delicious Char Siu Chicken Recipe.

Looking for a dish that combines mouth-watering flavors and quick prep? Look no further than this Irresistible Char Siu Chicken! This recipe is a favorite among many, thanks to its sweet and savory glaze that caramelizes beautifully. With just 10 minutes of preparation, you can impress your family and friends with a dish that brings the best of Chinese barbecue to your kitchen. Picture serving slices of tender chicken, infused with a rich sauce, that everyone will want to return for seconds. It’s an experience you won’t want to miss.

How to prepare Char Siu Chicken

To make the Char Siu Chicken, you will need chicken thighs, soy sauce, honey, hoisin sauce, five-spice powder, and garlic. Start by mixing together the soy sauce, honey, hoisin sauce, five-spice powder, and minced garlic in a bowl. Marinate the chicken thighs in this mixture for at least 10 minutes. Once they are well coated, grill or bake the chicken until it’s cooked through and has those lovely charred edges that make this dish so delightful.

Irresistible Char Siu Chicken Recipe with 10-Minute Prep Magic

Why You’ll Love Char Siu Chicken

This recipe is not only simple but also delivers a bold flavor profile that you’ll adore. The sweet and savory sauce combined with the tender chicken creates an irresistible dish perfect for weeknight dinners or special occasions. Plus, the 10-minute prep time makes it easy to whip up after a busy day. If you’re a fan of chicken, you’re sure to appreciate this delightful twist on a classic Asian dish. For those who enjoy flavor-packed meals, this recipe will be a hit!

Tips for success

To enhance your Char Siu Chicken, there are a few tips to keep in mind. Firstly, let the chicken marinate longer for a deeper flavor. You can also try grilling the chicken for that authentic charred taste. If you enjoy vibrant flavors, serve it with a side of steamed rice or perhaps try it in a wrap. For more delicious chicken ideas, consider checking out sheet pan chicken pitas, which offer a fresh and herby twist.

Always add

Irresistible Char Siu Chicken Recipe with 10-Minute Prep Magic

Serving Suggestions

Char Siu Chicken pairs wonderfully with a variety of sides. Serve it alongside some jasmine rice or stir-fried vegetables to soak up the delicious sauce. You can also wrap the chicken in lettuce leaves for a delightful twist. Garnishing with fresh cilantro or sliced green onions adds a nice finishing touch that elevates the dish’s appearance.

FAQs

  1. Can I use chicken breast instead of thighs? Yes, you can use chicken breasts, but thighs will provide a juicier result.
  2. How can I store leftovers? Place any leftovers in an airtight container and refrigerate for up to 3 days.
  3. Can I freeze the marinated chicken? Absolutely! You can freeze the marinated chicken for up to 2 months. Just thaw and cook when you’re ready.

For those eager to explore more unique chicken dishes, don’t hesitate to look at chicken kofta with garlic yogurt for an exciting twist on your chicken recipes!

Char Siu Chicken

A delicious dish featuring sweet and savory glazed chicken thighs, perfect for quick weeknight dinners or special occasions.

Main ingredients

  • 4 pieces chicken thighs (Bone-in or boneless thighs can be used.)
  • 1/4 cup soy sauce (Low sodium soy sauce can be used for less salt.)
  • 3 tablespoons honey (Adds sweetness to the dish.)
  • 2 tablespoons hoisin sauce (Provides depth and richness.)
  • 1 teaspoon five-spice powder (Gives an authentic Chinese flavor.)
  • 2 cloves garlic, minced (Enhances the flavor profile.)

Preparation

  1. In a bowl, mix together soy sauce, honey, hoisin sauce, five-spice powder, and minced garlic.
  2. Marinate the chicken thighs in the mixture for at least 10 minutes.

Cooking

  1. Grill or bake the marinated chicken thighs until cooked through and charred at the edges.

For deeper flavor, let the chicken marinate longer. Serve with jasmine rice or stir-fried vegetables. Garnish with fresh cilantro or sliced green onions.

Dinner, Main Course
Asian, Chinese
Asian Flavors, Char Siu Chicken, easy chicken recipe, grilled chicken, Quick Dinner

30-Minute Lemon Chicken

30-Minute Lemon Chicken is a delightful and flavorful dish that makes dinner feel special, even on a busy weeknight. This recipe is quick to prepare and brings a bright, zesty flavor that pleases almost everyone at the table. The juicy chicken combined with a fresh lemon sauce makes this meal both refreshing and satisfying. Plus, if you’re looking for more lemony inspiration, don’t forget to check out the easy lemon butter chicken recipe for another crowd-pleaser.

Why You’ll Love 30-Minute Lemon Chicken

This dish is an absolute favorite for several reasons. First of all, it comes together in just half an hour, making it ideal for those hectic days when time is short but good food is still wanted. The combination of tender chicken and vibrancy from the lemon brings a refreshing twist that can brighten up any dinner routine. Additionally, it’s not only delicious but also healthy, making it a great meal choice for anyone looking to eat lighter without sacrificing taste.

Tips for Success

To ensure your 30-Minute Lemon Chicken turns out perfectly every time, consider these helpful tips. First, make sure to use fresh lemons for the best flavor; bottled lemon juice simply doesn’t compare. Searing the chicken until golden brown also locks in moisture and flavor, giving you that delightful taste and texture. If you want to elevate your dish even further, serve it with a side of steamed vegetables or a light salad, such as a Greek yogurt chicken salad with dill and lemon zest.

30-Minute Lemon Chicken

Serving Suggestions

After preparing your delicious lemon chicken, it pairs beautifully with a variety of sides. Consider serving it with fluffy rice, creamy mashed potatoes, or a vibrant seasonal salad. You can also choose to drizzle some additional lemon sauce over the top for an extra citrus kick.

FAQs

Can I use chicken thighs instead of breasts?

Yes, chicken thighs would work wonderfully and provide a richer flavor.

Can I make this recipe ahead of time?

While this dish is best enjoyed fresh, you can marinate the chicken beforehand for added flavor.

What other herbs can I use?

You can use fresh herbs like thyme or parsley to enhance the flavors even more.

By following this guide, you’ll have a delicious 30-Minute Lemon Chicken recipe that’s easy to enjoy and share with family and friends!

30-Minute Lemon Chicken

A delightful and flavorful dish that brings a bright, zesty flavor to your dinner routine in just 30 minutes.

Chicken

  • 1 lb chicken breasts (Fresh, can substitute with chicken thighs for richer flavor.)

Lemon Sauce

  • 2 tbsp fresh lemon juice (Use fresh lemons for best flavor.)
  • 1 zest lemon (Adds extra lemon flavor.)
  • 2 tbsp olive oil (For searing the chicken.)

Optional Sides

  • 4 servings rice or mashed potatoes (Great side options.)
  • 1 cup seasonal salad (Enhances the meal.)

Preparation

  1. Begin by marinating the chicken in lemon juice and zest for added flavor.
  2. Heat olive oil in a skillet over medium heat.

Cooking

  1. Sear the chicken until golden brown, about 5-7 minutes on each side.
  2. Cook until the chicken is thoroughly cooked and juices run clear.

Serving

  1. Serve the chicken with fluffy rice, creamy mashed potatoes, or a vibrant seasonal salad.
  2. Drizzle additional lemon sauce over the top if desired.

For best results, use fresh ingredients. Pair with steamed vegetables or a light salad. This dish is best enjoyed fresh, but marinating ahead can enhance the flavor.

Dinner, Main Course
American
30-Minute Meal, easy chicken recipe, Healthy Recipe, Lemon Chicken, Quick Dinner

Honey Garlic Chicken Breasts

The savory aroma of Honey Garlic Chicken Breasts fills your kitchen and draws everyone in, making this dish a true crowd-pleaser. The combination of juicy chicken, sweet honey, and tangy garlic creates a delightful flavor that appeals to both kids and adults alike. Not only is this meal delicious, but it’s also easy to prepare, making it ideal for busy weeknights or special occasions. Get ready to impress your family and friends with this tasty recipe that will leave them asking for seconds.

How to prepare Honey Garlic Chicken Breasts

To make Honey Garlic Chicken Breasts, start by gathering your ingredients. You will need boneless chicken breasts, honey, garlic, soy sauce, and a few spices to enhance the flavor.

  1. First, combine honey, minced garlic, soy sauce, and your chosen spices in a bowl.
  2. Next, marinate the chicken breasts in this mixture for at least 30 minutes, allowing the flavors to soak in.
  3. Preheat your oven to 375°F (190°C) and bake the chicken for about 25 to 30 minutes or until fully cooked.

Honey Garlic Chicken Breasts

Why You’ll Love Honey Garlic Chicken Breasts

This recipe is not only simple but also incredibly versatile. You can serve it over rice, mix it with veggies, or even slice it for sandwiches. The sweet and savory profile of this dish makes it a favorite among many. Plus, if you enjoy the taste of honey and garlic together, you might want to explore other recipes, such as honey garlic bourbon glazed chicken thighs.

Tips for success

  1. Marinate the chicken for longer if possible, as this will enhance the flavor.
  2. Consider using an air fryer for a quicker cooking time and a crispy texture, much like the delicious air fryer honey butter garlic chicken tenders.
  3. Always check the internal temperature of the chicken to ensure it reaches 165°F (75°C) for safe consumption.

Honey Garlic Chicken Breasts

Serving Suggestions

Honey Garlic Chicken Breasts can be served alongside a variety of side dishes. Consider pairing it with steamed broccoli, rice pilaf, or a fresh garden salad. This dish is perfect for a family dinner or even a gathering with friends.

FAQs

How long should I marinate the chicken?

For best results, marinate the chicken for at least 30 minutes, but if you can, try to leave it for several hours or overnight in the refrigerator.

Can I use other cuts of chicken?

Yes, you can use thighs or drumsticks, but cooking times may vary slightly, so be sure to check for doneness.

What can I serve with Honey Garlic Chicken Breasts?

You can serve it with rice, noodles, or roasted vegetables for a complete meal.

Honey Garlic Chicken Breasts

A delicious combination of juicy chicken, sweet honey, and tangy garlic that makes for a perfect weeknight meal or special occasion dish.

Main Ingredients

  • 4 pieces boneless chicken breasts
  • 1/2 cup honey
  • 4 cloves minced garlic
  • 1/4 cup soy sauce
  • to taste spices (your choice) (Consider spices like pepper, ginger, or chili flakes.)

Preparation

  1. Combine honey, minced garlic, soy sauce, and your chosen spices in a bowl.
  2. Marinate the chicken breasts in this mixture for at least 30 minutes.

Cooking

  1. Preheat your oven to 375°F (190°C).
  2. Bake the marinated chicken for about 25 to 30 minutes or until fully cooked.

For best results, marinate the chicken longer if possible. An air fryer can be used for a quicker cooking time and a crispy texture. Always check the internal temperature of the chicken to ensure it reaches 165°F (75°C).

Dinner, Main Course
American, Asian
easy chicken recipe, Honey Garlic Chicken, marinated chicken, Oven Baked Chicken, Quick Dinner

Creamy Ranch Chicken

Are you ready to elevate your weeknight dinners? Creamy Ranch Chicken is a delightful dish that brings together the rich flavors of ranch dressing and tender chicken, making it a true crowd-pleaser. This recipe is not just delicious, it’s also incredibly easy to prepare, helping you create a home-cooked meal that your family will love. Imagine tender chicken bathed in a creamy sauce bursting with flavor, it’s hard to resist! Plus, it’s the type of comfort food that feels like a warm hug on a plate. Let’s dig into how you can prepare this delightful dish!

How to prepare Creamy Ranch Chicken

To make Creamy Ranch Chicken, you will need some basic ingredients, including chicken breasts, ranch dressing, and cream. Start by searing your chicken on the stove until golden brown. In a separate bowl, mix ranch dressing with cream and pour this delectable mixture over the chicken in your skillet. Let it simmer until the chicken is cooked through, soaking up all that creamy goodness.

Creamy Ranch Chicken

Why You’ll Love Creamy Ranch Chicken

There are countless reasons to love Creamy Ranch Chicken. Not only is it rich in flavor, but it also takes very little time to prepare. It’s perfect for busy weeknights when you want a nourishing meal without spending hours in the kitchen. The ranch dressing adds a unique twist that makes this dish stand out, and it pairs beautifully with sides like rice or steamed vegetables. For those looking for more savory options, you might enjoy trying a Creamy Baked Asiago Chicken recipe as well!

Tips for success

  1. Use fresh ingredients: Fresh chicken and homemade ranch dressing can vastly improve your dish’s flavor.
  2. Don’t rush the cooking time: Allowing the chicken to simmer in the sauce ensures it stays juicy and flavorful.
  3. Experiment with add-ins: Feel free to add vegetables or spices to enhance the dish to your taste.

Creamy Ranch Chicken

Serving Suggestions

Creamy Ranch Chicken is delightful on its own, but you can elevate the meal by serving it with fluffy mashed potatoes, crispy green beans, or a fresh side salad for a balanced dinner. This dish also makes for great leftovers, perfect for lunch the next day.

FAQs

1. Can I use frozen chicken?

Yes, you can use frozen chicken, but it will take longer to cook through. Make sure it reaches safe internal temperatures.

2. Is there a way to make it lighter?

Absolutely! You can substitute the cream with Greek yogurt or light sour cream for a lighter version.

3. Can I make this dish ahead of time?

Yes, Creamy Ranch Chicken can be made ahead and reheated; just add a splash of milk or cream if the sauce thickens too much when stored.

This recipe for Creamy Ranch Chicken will soon become one of your go-to meals, impressing friends and family alike with its creamy, satisfying taste! Enjoy cooking!

Creamy Ranch Chicken

A delightful dish featuring tender chicken in a rich and creamy ranch sauce, perfect for quick weeknight dinners.

Main ingredients

  • 4 pieces chicken breasts (Use fresh or thawed chicken)
  • 1 cup ranch dressing (You can use homemade ranch for better flavor)
  • 1 cup heavy cream (Can substitute with Greek yogurt for a lighter version)

Preparation

  1. Start by searing the chicken breasts in a skillet until golden brown on both sides.
  2. In a separate bowl, mix together ranch dressing and heavy cream until well combined.
  3. Pour the ranch and cream mixture over the seared chicken in the skillet.
  4. Let the chicken simmer in the creamy sauce until cooked through, ensuring the sauce flavors soak into the chicken.

Serve with mashed potatoes, green beans, or a side salad. This dish is perfect for leftovers; just add milk or cream if the sauce thickens when stored.

Dinner, Main Course
American
Chicken Recipe, Comfort Food, Creamy Ranch Chicken, Easy Dinner, Weeknight Meal

Easy Gochujang Beef Bowls

If you love bold flavors that come together in an easy, one-bowl meal, then Easy Gochujang Beef Bowls are for you. This dish is not only a crowd-pleaser, but it’s also a perfect weeknight dinner option that comes together in no time. With its savory taste and a delightful kick from the gochujang, even your pickiest eaters will be wanting seconds. Let’s dive into how you can whip up this amazing dish in your kitchen!

How to prepare Easy Gochujang Beef Bowls

To make Easy Gochujang Beef Bowls, gather your ingredients first. You will need a few simple items like ground beef, gochujang sauce, and fresh veggies. Once you have everything ready, it’s time to start cooking.

  1. In a large skillet, cook the ground beef over medium heat until it is browned. Drain any excess fat.
  2. Add chopped garlic and ginger to the beef, cooking until fragrant.
  3. Stir in the gochujang sauce, soy sauce, and sugar, and mix well. Let it simmer for a couple of minutes.
  4. Meanwhile, prepare your choice of rice or quinoa in a separate pot.
  5. Once the sauce is thick and the flavors melded, serve the beef over rice and top with fresh veggies like cucumbers, carrots, and green onions.

Easy Gochujang Beef Bowls

Why You’ll Love Easy Gochujang Beef Bowls

You’ll absolutely love Easy Gochujang Beef Bowls for their wonderful combination of flavors and textures. The spicy gochujang sauce gives the beef a rich taste, while the fresh vegetables add a nice crunch. This dish is versatile as you can easily add or swap ingredients based on what you have at home. Plus, it’s a fantastic meal prep option, keeping well in the fridge for lunch the next day.

Tips for success

  • Choose lean ground beef for a healthier option or use ground turkey if you prefer.
  • Adjust the amount of gochujang to your taste. If you like it spicy, feel free to add more!
  • Fresh toppings like sesame seeds, sliced scallions, or cilantro can elevate the dish even more.

Easy Gochujang Beef Bowls

Serving Suggestions

Serve your Easy Gochujang Beef Bowls with additional sides like pickled vegetables or a light salad. You can also offer extra gochujang or soy sauce at the table so everyone can customize their bowls. For a complete meal, pair it with a simple miso soup.

FAQs

Can I use different types of meat?

Yes, you can substitute ground beef with ground turkey, chicken, or even tofu for a vegetarian version.

Is gochujang spicy?

Gochujang has a sweet and spicy flavor, but you can control the heat by adjusting the amount you use.

How do I store leftovers?

Store any leftovers in an airtight container in the fridge for up to three days. Reheat in the microwave or on the stove before serving.

Now that you have the scoop on how to make Easy Gochujang Beef Bowls, it’s time to roll up your sleeves and get cooking. Your family (and your taste buds) will thank you! Enjoy!

Easy Gochujang Beef Bowls

A quick and flavorful one-bowl meal featuring ground beef cooked with spicy gochujang sauce and fresh veggies. Perfect for busy weeknights!

Main Ingredients

  • 1 lb. ground beef (Choose lean ground beef for a healthier option.)
  • 3 tbsp gochujang sauce (Adjust the amount based on your spice preference.)
  • 2 tbsp soy sauce
  • 1 tbsp sugar
  • 2 cloves garlic, minced
  • 1 tsp ginger, minced

Rice/Quinoa

  • 2 cups cooked rice or quinoa (Prepare in a separate pot.)

Fresh Toppings

  • 1 cup cucumbers, sliced
  • 1 cup carrots, shredded
  • 1/4 cup green onions, sliced (Can also use sesame seeds or cilantro.)

Preparation

  1. In a large skillet, cook the ground beef over medium heat until it is browned. Drain any excess fat.
  2. Add chopped garlic and ginger to the beef, cooking until fragrant.
  3. Stir in the gochujang sauce, soy sauce, and sugar, and mix well. Let it simmer for a couple of minutes.
  4. Meanwhile, prepare your choice of rice or quinoa in a separate pot.
  5. Once the sauce is thick and the flavors melded, serve the beef over rice and top with fresh veggies.

This dish is versatile; feel free to add or swap ingredients based on what you have at home. Great for meal prep and keeps well in the fridge for lunch the next day.

Dinner, Main Course
Asian, Korean
Easy Recipes, Gochujang Beef, One Bowl Meal, Quick Dinner, Weeknight Dinner