
Creamy Italian Sausage Rigatoni

Creamy Italian sausage rigatoni served in a bowl with herbs

Creamy Italian Sausage Rigatoni is a comforting and delicious pasta dish that brings together the rich flavors of Italian sausage, creamy sauce, and hearty rigatoni pasta. This recipe is perfect for a cozy family dinner or a gathering with friends. The creamy sauce coats each piece of pasta while the sausage adds a savory depth, making each bite delightful. Cooking this dish is quite simple, even for those who may not be experts in the kitchen.

Why Make This Recipe

Creamy Italian Sausage Rigatoni is a meal that families and friends will surely enjoy. It combines the flavors of savory Italian sausage with a creamy sauce that makes every bite rich and satisfying. Using rigatoni pasta is a smart choice, as its shape holds the sauce well and ensures you get a bit of everything in each forkful. This recipe is not only tasty, but it is also easy to prepare, making it suitable for cooks of all skill levels. You can whip it up for a quick weeknight dinner, or serve it during special occasions.

One of the best parts of this recipe is that it can be made in just under 30 minutes. This means no long hours in the kitchen, and more time enjoying the meal with your loved ones. Additionally, its comforting taste and creamy texture make it a perfect choice for anyone looking for a hearty dish that warms the soul. Finally, the ingredients are easy to find, making it budget-friendly. Overall, Creamy Italian Sausage Rigatoni is a wonderful dish that anyone can create and enjoy.

How to Make Creamy Italian Sausage Rigatoni

Making Creamy Italian Sausage Rigatoni is easy and fun! First, gather your ingredients: rigatoni pasta, Italian sausage, heavy cream, garlic, Parmesan cheese, and a few spices. Begin by boiling a pot of salted water. Once it reaches a rolling boil, add the rigatoni and cook until al dente, usually around 10-12 minutes. Stir occasionally to prevent sticking.

While the pasta cooks, heat a large skillet over medium heat. Remove the casing from the sausage and crumble it into the skillet. Cook the sausage, breaking it apart with a spatula, until it is browned and cooked through. Add minced garlic to the pan to cook alongside the sausage for a minute or two, enhancing the flavor.

Once the sausage is fully cooked, lower the heat and pour in the heavy cream, stirring to combine. Let it simmer for a few minutes, then add grated Parmesan cheese and any desired spices like salt and pepper. Mix until the sauce thickens slightly. Finally, drain the rigatoni and toss it in the skillet with the sauce, ensuring each piece of pasta is well-coated.

How to Serve Creamy Italian Sausage Rigatoni

To serve Creamy Italian Sausage Rigatoni, begin by placing generous portions in bowls or on plates. You can sprinkle extra grated Parmesan cheese on top for a tasty finishing touch. Adding fresh basil or chopped parsley will also bring a pop of color and freshness to the dish. A side of garlic bread or a simple green salad complements this meal perfectly.

This dish also pairs nicely with a glass of red wine, enhancing the Italian flavors even more. If you want to make the meal special, consider arranging the plates beautifully, perhaps with a small bowl of red pepper flakes for those who like a kick. Enjoying this dish with family and friends will surely create a great atmosphere, making it a memorable meal.

How to Store Creamy Italian Sausage Rigatoni

Storing Creamy Italian Sausage Rigatoni is quite simple. First, let the leftovers cool to room temperature after you finish your meal. Then, transfer the pasta into an airtight container. This will help keep it fresh and delicious. Make sure to seal the container tightly.

You can store the rigatoni in the refrigerator for up to 3-4 days. When you are ready to enjoy it again, simply reheat the pasta in the microwave or in a skillet on the stovetop. If the sauce seems too thick, adding a splash of milk or cream while reheating can help bring back its creamy texture.

For long-term storage, you can freeze the rigatoni. Make sure to place it in a freezer-safe container or bag, where it can last for up to 2-3 months. When you are ready to eat it, thaw it overnight in the refrigerator and then reheat it for a quick, comforting meal.

Tips to Make Creamy Italian Sausage Rigatoni

To make the best Creamy Italian Sausage Rigatoni, keep a few helpful tips in mind. First, choosing high-quality Italian sausage can greatly enhance the flavor of your dish. You can use spicy or mild sausage based on your preference.

Second, don’t hesitate to experiment with the sauce. Adding a pinch of nutmeg can give it a nice warmth, while crushed red pepper flakes can add some heat if desired.

Another important tip is not to overcook the rigatoni. Cook it until it is al dente, as it will continue to cook slightly when mixed with the sauce. Additionally, remember to reserve a bit of pasta water before draining, in case you need to thin out the sauce later on.

Lastly, always taste your sauce before serving; this allows you to adjust any seasonings. Keeping these tips in mind will help you create a truly delicious dish.

Variation

If you’re looking to switch things up, you can customize this recipe in several ways. Consider using ground turkey or chicken sausage instead of pork for a lighter option. For a vegetarian version, try using plant-based sausage or simply omit the meat and add more vegetables like spinach, mushrooms, or bell peppers.

Another variation is to use different pasta shapes. Penne, fusilli, or even zoodles (zucchini noodles) can be great alternatives. Additionally, adding a splash of white wine to the sauce before the cream can give it a delicious twist.

FAQs

1. Can I make Creamy Italian Sausage Rigatoni ahead of time?
Yes, you can prepare the sauce ahead of time and store it in the fridge. Cook the pasta fresh when you are ready to serve.

2. What can I serve with Creamy Italian Sausage Rigatoni?
This dish goes well with garlic bread, a simple green salad, or roasted vegetables for a complete meal.

3. Can I freeze Creamy Italian Sausage Rigatoni?
Yes, you can freeze the pasta and sauce separately. Just make sure to store them in airtight containers. Reheat thoroughly before serving.

Creamy Italian Sausage Rigatoni

A comforting and delicious pasta dish that combines savory Italian sausage with a rich, creamy sauce, perfect for family dinners or gatherings.

Pasta and Sauce Ingredients

  • 12 oz rigatoni pasta (Can substitute with penne or fusilli.)
  • 1 lb Italian sausage (Use spicy or mild according to preference.)
  • 1 cup heavy cream (For creaminess.)
  • 2 cloves garlic, minced (Enhances flavor.)
  • 1 cup Parmesan cheese, grated (For rich flavor and thickness.)
  • to taste salt and pepper (Adjust to taste.)

Preparation

  1. Boil a pot of salted water and cook the rigatoni until al dente, about 10-12 minutes, stirring occasionally.
  2. While the pasta cooks, heat a large skillet over medium heat and crumble the Italian sausage into the skillet. Cook until browned and cooked through.
  3. Add minced garlic to the skillet and cook for an additional 1-2 minutes.

Sauce Preparation

  1. Lower the heat and pour in the heavy cream, stirring to combine. Let it simmer for a few minutes.
  2. Add grated Parmesan cheese and any desired spices like salt and pepper, mixing until the sauce thickens slightly.

Combining and Serving

  1. Drain the rigatoni and toss it in the skillet with the sauce, ensuring each piece is well-coated.
  2. Serve in bowls or on plates, garnishing with extra Parmesan cheese and fresh basil or chopped parsley if desired.

To store leftovers, cool to room temperature, then transfer to an airtight container. Refrigerate for up to 3-4 days. Can freeze for 2-3 months.
Main Course, Pasta
Italian
Creamy Italian Sausage Rigatoni, Creamy Sauce, Hearty Dinner, Italian Sausage, Pasta

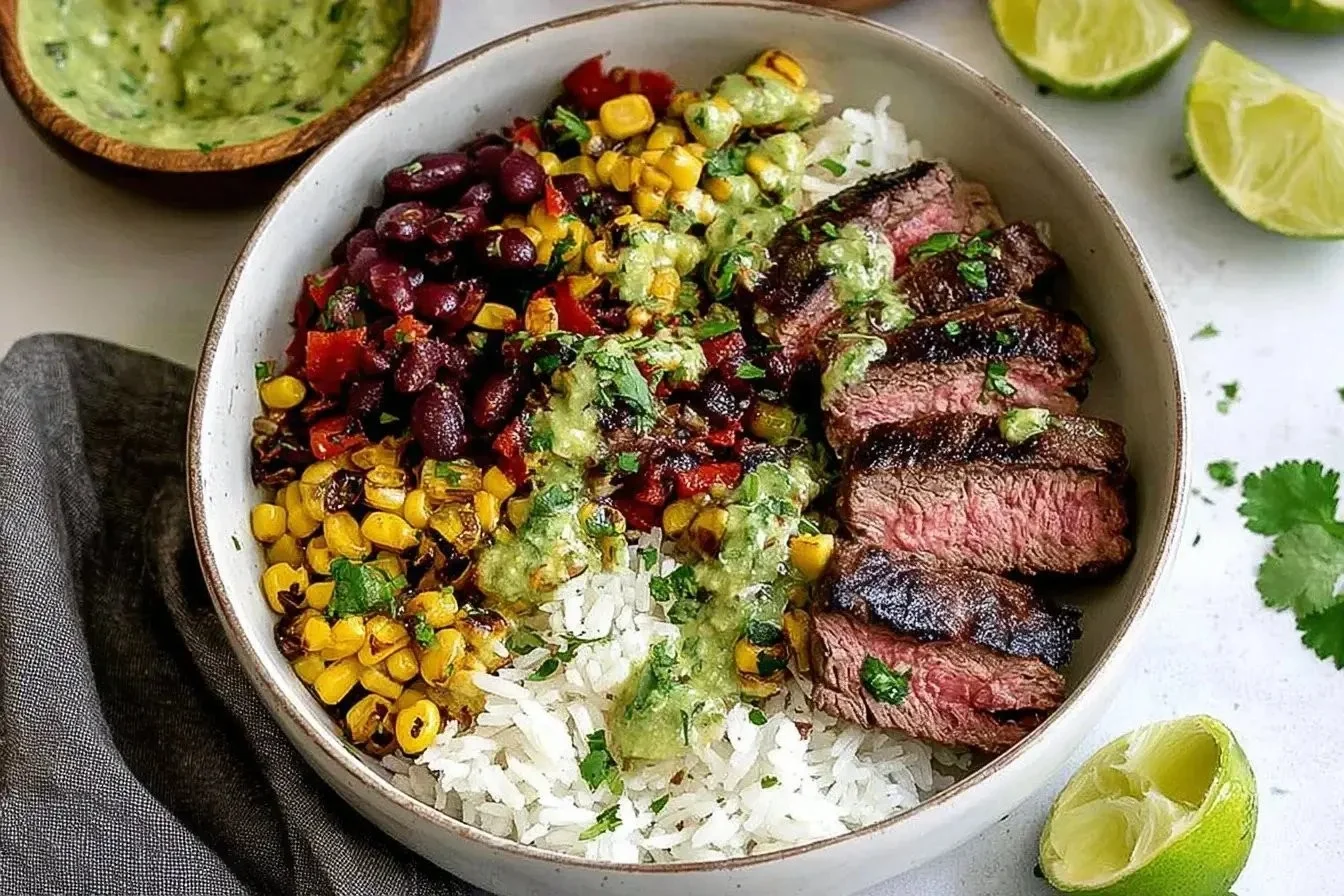
Cilantro Lime Steak Bowls

Cilantro lime steak bowls with fresh ingredients and vibrant colors

Cilantro Lime Steak Bowls are a delicious and healthy meal option that packs a punch of flavor. Fresh ingredients and bold spices create a dish that is both satisfying and nutritious. The combination of juicy steak, zesty lime, and fresh cilantro will tantalize your taste buds. This recipe is easy to prepare and perfect for lunch or dinner.

Making Cilantro Lime Steak Bowls at home allows you to control the ingredients and flavors. You can adjust the spices to your taste and add or omit ingredients based on your preferences. These bowls are also versatile; you can serve them with rice, quinoa, or salad greens.

Another reason to make this recipe is that it is perfect for meal prep. You can cook a large batch of steak and vegetables, then assemble your bowls throughout the week. Not only will you save time, but you’ll also have a delicious and healthy meal ready whenever hunger strikes.

Lastly, this recipe is crowd-pleaser. Whether you are cooking for your family or hosting friends, everyone will enjoy the vibrant flavors of this dish. With simple preparation and easy-to-find ingredients, Cilantro Lime Steak Bowls are a great option for anyone looking for a quick and tasty meal.

How to Make Cilantro Lime Steak Bowls

To make Cilantro Lime Steak Bowls, start with the ingredients. You will need steak, lime juice, garlic, olive oil, salt, pepper, fresh cilantro, and your choice of base such as rice or quinoa.

Begin by marinating the steak. In a bowl, mix lime juice, minced garlic, olive oil, salt, and pepper. Place the steak in the bowl and let it marinate for at least 30 minutes to absorb the flavors. After marinating, heat a grill or skillet over medium-high heat. Cook the steak for about 4-5 minutes on each side for medium-rare, depending on the thickness. Once cooked, let the steak rest for a few minutes before slicing it into thin strips.

Next, prepare your base. If using rice, cook according to the package instructions. If using quinoa, rinse it and cook it with water in a pot until fluffy.

Finally, assemble your bowls. Add a portion of your chosen base, top it with sliced steak, and garnish with fresh chopped cilantro over the top for added flavor. You can also add extra toppings like avocado, salsa, or corn if desired.

How to Serve Cilantro Lime Steak Bowls

Serving Cilantro Lime Steak Bowls is all about presentation and personal preference. Begin by placing a generous scoop of your chosen base, such as rice or quinoa, at the bottom of a bowl. Then, layer the sliced steak on top of the base to make it the star of the dish.

Consider adding some fresh vegetables for color and crunch. Diced tomatoes, bell peppers, or corn add freshness and texture. You can also add sliced avocado for creaminess and extra flavor.

For a zesty finish, drizzle some extra lime juice over the top or add a dollop of sour cream or yogurt. Fresh cilantro should be sprinkled on top to enhance the dish’s flavors and presentation.

These bowls are great for both casual and formal settings. Serve them as a hearty lunch option or as a light dinner. You can also set up a build-your-own bowl station for gatherings, allowing guests to customize their bowls based on their favorite toppings.

How to Store Cilantro Lime Steak Bowls

To store leftover Cilantro Lime Steak Bowls, first, let the ingredients cool to room temperature. You want to prevent condensation from forming inside the storage container.

Use airtight containers to keep the ingredients fresh. Each component—steak, base, and toppings—can be stored separately. This helps maintain the texture and flavor of each item. Store the steak in one container, the base in another, and any veggies or sauces in separate containers.

Refrigerate the food and consume it within 3-4 days for the best flavor and safety. If you want to keep these bowls for longer, consider freezing the cooked steak. Wrap the steak tightly in plastic wrap or aluminum foil and place it in a freezer-safe bag. It can be frozen for up to 3 months. When ready to eat, just thaw in the refrigerator overnight and reheat.

Tips to Make Cilantro Lime Steak Bowls

Here are some helpful tips to ensure your Cilantro Lime Steak Bowls turn out delicious. First, choose the right cut of steak. Cuts like flank steak or skirt steak are ideal as they are flavorful and tender when marinated properly.

Make sure to marinate the steak for at least 30 minutes, but allowing it to sit in the marinade for a few hours can enhance the flavor even further. If you’re short on time, you can also make a quick marinade and grill the steak immediately, although the flavor may not be as strong.

For a meal prep option, cook extra steak so that you have leftovers for the week. You can use the extra steak in sandwiches, salads, or tacos as well. Also, feel free to gather seasonal vegetables for toppings; this adds variety and nutrients to your bowls.

Use fresh cilantro for garnish as it enhances the freshness of the dish. If you don’t like cilantro, parsley can be a good substitute. Lastly, always taste and adjust the seasoning before serving to ensure that your flavors shine.

Variation

Cilantro Lime Steak Bowls can easily be adapted to suit different diets or tastes. For a vegetarian version, replace the steak with grilled tofu or tempeh, which can be marinated similarly. You can also use grilled chicken or shrimp if you prefer seafood.

Feel free to experiment with different grains or bases as well, such as cauliflower rice or whole wheat couscous. Adding beans like black beans or chickpeas can also boost the protein and fiber content. Customize your toppings to include your favorites, like pickled jalapeños or diced red onion for extra flavor.

FAQs

1. Can I use a different type of meat?
Yes! You can substitute steak with chicken, shrimp, or even tofu for a vegetarian option.

2. How long can I keep leftovers?
Leftovers can be stored in the refrigerator for 3-4 days. For longer storage, freeze the cooked steak.

3. What can I serve with these bowls?
These bowls are delicious on their own, but you can also serve them with tortilla chips, salsa, or a side salad for a fuller meal.

Cilantro Lime Steak Bowls

Delicious and healthy meal options packed with juicy steak, zesty lime, and fresh cilantro. Perfect for lunch or dinner, these bowls are versatile and ideal for meal prep.

For the Marinate

  • 1 lb steak (Flank or skirt steak recommended)
  • 1/4 cup lime juice (Freshly squeezed for best flavor)
  • 3 cloves garlic, minced
  • 2 tbsp olive oil
  • 1 tsp salt
  • 1/2 tsp pepper

For Serving

  • 2 cups cooked rice or quinoa (Cook according to package instructions)
  • 1/4 cup fresh cilantro, chopped (Optional for garnish)
  • 1 avocado sliced (Optional for topping)
  • 1/2 cup salsa (Optional for topping)
  • 1/2 cup corn (Optional for topping)
  • 1 cup diced tomatoes or bell peppers (Optional for added freshness)

Preparation

  1. In a bowl, mix lime juice, minced garlic, olive oil, salt, and pepper.
  2. Place the steak in the marinade and let it marinate for at least 30 minutes.

Cooking

  1. Heat a grill or skillet over medium-high heat.
  2. Cook the marinated steak for about 4-5 minutes on each side for medium-rare.
  3. Let the steak rest for a few minutes before slicing into thin strips.

Assembly

  1. Add a portion of cooked rice or quinoa to a bowl.
  2. Top with sliced steak and garnish with fresh chopped cilantro.
  3. Add any additional toppings like avocado, salsa, or corn.

For meal prep, store each component separately in airtight containers. Use fresh cilantro for garnish, and consider parsley as a substitute if needed. Taste and adjust seasoning as necessary before serving.

Dinner, lunch
Healthy, Mexican
Cilantro Lime Steak Bowls, Healthy Dinner, Meal Prep, quick recipe, Steak Bowls


Cilantro Lime Steak Bowls

Delicious and healthy meal options packed with juicy steak, zesty lime, and fresh cilantro. Perfect for lunch or dinner, these bowls are versatile and ideal for meal prep.

For the Marinade

  • 1 lb steak (Flank or skirt steak recommended)
  • 1/4 cup lime juice (Freshly squeezed for best flavor)
  • 3 cloves garlic, minced
  • 2 tbsp olive oil
  • 1 tsp salt
  • 1/2 tsp pepper

For Serving

  • 2 cups cooked rice or quinoa (Cook according to package instructions)
  • 1/4 cup fresh cilantro, chopped (Optional for garnish)
  • 1 each avocado, sliced (Optional for topping)
  • 1/2 cup salsa (Optional for topping)
  • 1/2 cup corn (Optional for topping)
  • 1 cup diced tomatoes or bell peppers (Optional for added freshness)

Preparation

  1. In a bowl, mix lime juice, minced garlic, olive oil, salt, and pepper.
  2. Place the steak in the marinade and let it marinate for at least 30 minutes.

Cooking

  1. Heat a grill or skillet over medium-high heat.
  2. Cook the marinated steak for about 4-5 minutes on each side for medium-rare.
  3. Let the steak rest for a few minutes before slicing into thin strips.

Assembly

  1. Add a portion of cooked rice or quinoa to a bowl.
  2. Top with sliced steak and garnish with fresh chopped cilantro.
  3. Add any additional toppings like avocado, salsa, or corn.

For meal prep, store each component separately in airtight containers. Use fresh cilantro for garnish, and consider parsley as a substitute if needed. Taste and adjust seasoning as necessary before serving.

Dinner, lunch
Healthy, Mexican
Cilantro Lime Steak Bowls, Healthy Recipes, Meal Prep, Quick Dinner, Steak Bowls

Creamy Smothered Chicken And Rice

Creamy smothered chicken served over rice, a delicious comfort food dish.

Creamy Smothered Chicken and Rice is a comfort food classic that brings warmth and satisfaction to the dinner table. This dish combines tender chicken, creamy sauce, and fluffy rice, creating a meal that is both filling and delicious. Whether it’s a cozy family dinner or a gathering with friends, this recipe is sure to please everyone. By using simple ingredients and straightforward steps, you can prepare this dish easily, making it perfect for any weeknight meal or weekend feast.

Why make this recipe

Creamy Smothered Chicken and Rice is a fantastic choice for anyone looking for a hearty meal that doesn’t require extensive cooking skills. One of the main reasons to make this dish is its richness and flavor. The creamy sauce envelops the chicken and rice, creating a comforting blend that warms your soul. Additionally, it is a one-pot meal, which means less mess and easier cleanup. Who doesn’t love that?

This dish is also highly versatile. You can easily customize it by adding your favorite vegetables, such as peas, carrots, or bell peppers. Families with picky eaters will appreciate how this recipe can be adapted to suit everyone’s tastes. Furthermore, it is an economical choice, allowing you to stretch your dollar while still creating a delicious meal that the whole family can enjoy. The leftovers also heat up well, making it a great option for meal prep or quick lunches throughout the week.

How to make Creamy Smothered Chicken And Rice

To make Creamy Smothered Chicken and Rice, start by gathering your ingredients. You will need chicken breasts, rice, cream of chicken soup, chicken broth, and seasonings like garlic powder, onion powder, and pepper. Begin by seasoning the chicken breasts on both sides. In a large skillet, heat a bit of oil over medium heat. When hot, add the chicken breasts and brown them for about 5-7 minutes on each side until they are cooked through.

Once the chicken is browned, remove it from the skillet and set it aside. In the same skillet, add the rice and stir it around for a minute to toast it. Then, pour in the chicken broth and cream of chicken soup. Stir until everything is combined and the rice is coated. Return the chicken to the skillet, nestling it in the rice mixture. Cover the skillet and let it simmer on low heat for about 20 minutes, or until the rice is tender and has absorbed the liquid.

Once cooked, taste and adjust the seasoning as needed. Before serving, let the dish sit for a few minutes to thicken. This simple and straightforward approach guarantees a creamy meal filled with flavor.

How to serve Creamy Smothered Chicken And Rice

Serving Creamy Smothered Chicken and Rice is just as easy as making it. Start by placing a generous scoop of the rice mixture on each plate. Place a chicken breast on top of the rice and spoon some of the creamy sauce over it. This presentation not only looks appealing, but it also allows everyone to enjoy the delicious combination of flavors in every bite.

To enhance your meal, consider adding a sprinkle of fresh parsley or chives for a pop of color and a fresh taste. Serve with a side of green salad or steamed vegetables for added nutrition and texture. You can also accompany the dish with crusty bread for dipping into the creamy sauce. Whether it’s a casual dinner or a more formal gathering, this meal is sure to impress.

How to store Creamy Smothered Chicken And Rice

Storing Creamy Smothered Chicken and Rice properly will help maintain its quality. Once the dish has cooled to room temperature, transfer any leftovers to an airtight container. Make sure to cover the container well to prevent moisture from getting in. You can keep it in the refrigerator for up to 3-4 days.

If you want to store it for a longer period, consider freezing it. Place the cooled dish in a freezer-safe container or a resealable freezer bag. Remember to label the container with the date to keep track of its freshness. Frozen Creamy Smothered Chicken and Rice can last for up to 3 months. When you are ready to eat it, simply thaw it in the refrigerator overnight and reheat in the microwave or on the stove over low heat.

Always check the dish for any spoilage before consuming, especially if it has been stored for a longer period.

Tips to make Creamy Smothered Chicken And Rice

To make the best Creamy Smothered Chicken and Rice, here are some helpful tips. First, choose high-quality chicken. Fresh chicken breasts will enhance the flavor and texture of the dish. Ensure you season the chicken well before cooking for maximum flavor.

Second, consider using brown rice instead of white for a nutty flavor and added fiber. If you choose brown rice, remember it will take longer to cook, so adjust the cooking time accordingly.

Third, feel free to add vegetables. Chopped onions, bell peppers, or frozen peas can create a more colorful and nutritious meal. Just add them to the skillet when you are cooking the rice.

Finally, don’t hesitate to experiment with different seasonings. Adding herbs like thyme or rosemary can elevate the dish. Making small adjustments can personalize the recipe, making it your very own.

Variation

You can create variations of Creamy Smothered Chicken and Rice by using different types of meat or alternatives. For example, try substituting chicken with turkey or even tofu for a vegetarian option. You can also experiment with different types of cream soups, like mushroom or celery, to change the flavor profile of the dish. Adding a splash of white wine can also provide a delicious depth of flavor.

FAQs

1. Can I use frozen chicken for this recipe?
Yes, you can use frozen chicken, but ensure it is fully thawed before cooking for even cooking and safety.

2. Is this recipe suitable for meal prepping?
Absolutely! Creamy Smothered Chicken and Rice stores well in the refrigerator and makes great leftovers for lunch or dinner.

3. Can I cook this in a slow cooker?
Yes, you can cook this recipe in a slow cooker; just cook on low for about 4-6 hours until the chicken is tender and the rice is cooked.

4. Can I use brown rice instead of white rice?
Yes, using brown rice is a great option; just adjust the cooking time as brown rice takes longer to cook.

5. What side dishes go well with Creamy Smothered Chicken and Rice?
Great side dishes include steamed vegetables, a fresh salad, or crusty bread to soak up the creamy sauce.

[tasty-recipe id=”4693″]

Creamy Smothered Chicken and Rice

A comforting one-pot meal combining tender chicken, creamy sauce, and fluffy rice, perfect for family dinners or gatherings.

Main Ingredients

  • 2 pieces chicken breasts (High-quality, fresh chicken for best flavor.)
  • 1 cup rice (Brown rice can be used for a nuttier flavor.)
  • 1 can cream of chicken soup (Or use different variations such as mushroom or celery.)
  • 2 cups chicken broth
  • 1 teaspoon garlic powder
  • 1 teaspoon onion powder
  • to taste pepper (Adjust seasoning as needed.)
  • 1 tablespoon oil (For browning chicken.)

Preparation

  1. Season the chicken breasts on both sides with garlic powder, onion powder, and pepper.
  2. In a large skillet, heat oil over medium heat.
  3. Once hot, add the chicken breasts and brown them for about 5-7 minutes on each side until cooked through.
  4. Remove the browned chicken from the skillet and set it aside.

Cooking

  1. In the same skillet, add the rice and stir for a minute to toast it.
  2. Pour in the chicken broth and cream of chicken soup and stir until combined and rice is coated.
  3. Return the chicken to the skillet, nestling it into the rice mixture.
  4. Cover the skillet and let it simmer on low heat for about 20 minutes or until the rice is tender and has absorbed the liquid.
  5. Taste and adjust seasoning as needed.

Serving

  1. Place a generous scoop of the rice mixture on each plate.
  2. Top with a chicken breast and spoon creamy sauce over it.
  3. Optional: Sprinkle with fresh parsley or chives before serving.

Store leftovers in an airtight container in the refrigerator for 3-4 days or freeze for up to 3 months. Thaw in the refrigerator overnight before reheating.

Dinner, Main Course
American
Comfort Food, Creamy Chicken Rice, Easy Dinner, Meal Prep, One-Pot Meal

Orange Creamsicle Cheesecake

Delicious slice of Orange Creamsicle Cheesecake with vibrant orange topping.

The Orange Creamsicle Cheesecake is a delightful dessert that captures the essence of summer in every bite. Made with simple ingredients and easy steps, this cheesecake is perfect for any occasion, whether it’s a birthday party, a family gathering, or just a sweet treat for yourself. The combination of creamy cheesecake and the bright flavor of orange creates a refreshing taste that is hard to resist.

One of the best things about this cheesecake is its nostalgic flavor. Many people remember enjoying creamsicle popsicles on hot days, and this dessert turns that memory into a rich and satisfying treat. With its vibrant color and creamy texture, the Orange Creamsicle Cheesecake is not only delicious but also visually appealing.

Making this cheesecake at home allows you to control the ingredients and customize it to your taste. You can use fresh oranges for an even more natural flavor or adjust the sweetness to suit your preference. Plus, it’s a great way to impress your friends and family with your baking skills. Whether you are an experienced baker or just starting, this recipe is simple enough for everyone to try. Enjoy the satisfaction of creating a yummy, homemade dessert that is sure to bring smiles to all who taste it!

How to Make Orange Creamsicle Cheesecake

To make Orange Creamsicle Cheesecake, you’ll need to gather your ingredients first. The main ingredients include cream cheese, sugar, eggs, vanilla extract, orange zest, and orange juice. You will also need a graham cracker crust and heavy cream.

Start by preheating your oven to 325°F (160°C). In a large mixing bowl, beat the cream cheese until it’s soft and creamy. Add the sugar and blend well. Next, mix in the eggs, one at a time, making sure to beat well after each addition. Then, mix in the vanilla extract, orange zest, and freshly squeezed orange juice. Stir until everything is combined.

Next, pour this creamy mixture over the prepared graham cracker crust in a springform pan. Smooth the top with a spatula for even baking. Place the cheesecake into the preheated oven, and bake for about 50-60 minutes or until the center is set but still slightly jiggly. Once baked, turn off the oven and let the cheesecake cool with the door slightly open. This helps to prevent cracking.

After cooling, refrigerate the cheesecake for at least four hours, or overnight if possible. This resting time will help set its texture. Once chilled, you can add whipped cream on top and garnish with fresh orange slices to enhance its look and flavor.

How to Serve Orange Creamsicle Cheesecake

Serving Orange Creamsicle Cheesecake is a joyful experience. Begin by slicing the chilled cheesecake into wedges using a sharp knife. For clean cuts, warm the knife under hot water before slicing and wipe it dry between each cut. Arrange the slices on individual dessert plates for a lovely presentation.

You can add a dollop of whipped cream on top of each slice to elevate the dessert’s creaminess. Additionally, consider garnishing with a sprinkle of orange zest or a slice of fresh orange for a pop of color. This adds an inviting touch and enhances its flavor too.

The cheesecake pairs wonderfully with a glass of cold milk or a cup of coffee. For a tropical twist, serve it with a side of fresh fruit, such as berries or kiwi. Guests will enjoy the creamy and fruity combination, transforming each bite into a refreshing treat. This dessert can be enjoyed at room temperature as well, making it versatile for different serving occasions.

How to Store Orange Creamsicle Cheesecake

To store your Orange Creamsicle Cheesecake properly, first ensure it is fully cooled to room temperature. Once it has cooled, cover it with plastic wrap or aluminum foil to protect it from drying out. You can also use a cake carrier or container with a lid for added security.

Refrigerate the cheesecake for up to five days. Keeping it in the fridge will help maintain its creamy texture and fresh flavor. If you need to store it longer, you can freeze the cheesecake. To freeze, wrap individual slices tightly in plastic wrap, then place them in a freezer-safe container. This way, you can easily enjoy a piece anytime you crave something sweet.

When ready to enjoy a frozen slice, move it to the refrigerator to thaw overnight. This helps it gradually regain its texture. Avoid thawing at room temperature to keep the cake from becoming too soft. Enjoy every bite of your stored cheesecake!

Tips to Make Orange Creamsicle Cheesecake

To perfect your Orange Creamsicle Cheesecake, consider these helpful tips. First, ensure your cream cheese is at room temperature before mixing. This helps achieve a smooth and creamy texture without lumps. Take your eggs out early too, so they are also at room temperature when mixing.

When adding the orange zest and juice, use fresh oranges for the best flavor. Store-bought orange juice may not taste as vibrant. For a richer flavor, you can add a bit of orange extract along with the zest and juice.

If cracks appear on the top of your cheesecake after baking, do not worry! This can happen, but it can be disguised with whipped cream or fruit topping. Also, avoid opening the oven door too early while baking; this can cause temperature fluctuations and lead to cracking.

Lastly, let your cheesecake chill overnight if possible. This extra time allows the flavors to meld nicely, resulting in a more flavorful dessert. With these tips, you’ll create a delightful Orange Creamsicle Cheesecake every time.

Variation

For a different twist on the Orange Creamsicle Cheesecake, consider adding a layer of orange jelly or preserves on top after cooling. This creates a vibrant and tasty layer that complements the cheesecake. Additionally, you can experiment with different crust types, such as using crushed Nilla wafers or even a chocolate crust for a unique flavor combination.

FAQs

1. Can I use store-bought crust for the cheesecake?
Yes, you can easily use a store-bought graham cracker crust to save time. Just ensure it fits your springform pan properly.

2. How long should I chill the cheesecake?
Chill the cheesecake for at least four hours, but overnight is best to allow the flavors to develop fully.

3. Can I add more orange flavor?
Definitely! You can increase the amount of orange zest and juice if you prefer a stronger citrus taste. Just be cautious with liquid to keep the texture right.

4. Can I freeze the cheesecake?
Yes, Orange Creamsicle Cheesecake can be frozen. Wrap it tightly and store it in the freezer for up to three months.

5. Is it possible to make this cheesecake without eggs?
Yes, you can use egg substitutes like applesauce or commercial egg replacers. The texture may differ slightly, but it will still be delicious!

[tasty-recipe id=”4954″]

Orange Creamsicle Cheesecake

A delightful dessert that captures the essence of summer with creamy cheesecake and bright orange flavors, making it perfect for any occasion.

For the Cheesecake Filling

  • 16 oz cream cheese (at room temperature)
  • 1 cup sugar
  • 3 eggs (at room temperature)
  • 1 tsp vanilla extract
  • 2 tbsp orange zest (freshly grated)
  • 1/2 cup orange juice (freshly squeezed)

For the Crust

  • 1.5 cups graham cracker crumbs
  • 1/2 cup butter (melted)

For Serving

  • 1 cup heavy cream (for whipped topping)
  • 1 cup fresh orange slices (for garnish)

Preparation

  1. Preheat your oven to 325°F (160°C).
  2. In a large mixing bowl, beat the cream cheese until it’s soft and creamy.
  3. Add the sugar and blend well.
  4. Mix in the eggs, one at a time, beating well after each addition.
  5. Stir in the vanilla extract, orange zest, and freshly squeezed orange juice until everything is combined.

Baking

  1. Pour the creamy mixture over the prepared graham cracker crust in a springform pan.
  2. Smooth the top with a spatula for even baking.
  3. Bake for about 50-60 minutes or until the center is set but slightly jiggly.
  4. Turn off the oven and let the cheesecake cool with the door slightly open.

Chilling

  1. Refrigerate the cheesecake for at least four hours, or overnight if possible.

Serving

  1. Slice the chilled cheesecake into wedges using a sharp knife.
  2. Add a dollop of whipped cream on top of each slice and garnish with fresh orange slices.

Store the cheesecake wrapped in plastic wrap or aluminum foil in the fridge for up to five days. It can also be frozen for longer storage. Thaw frozen slices in the refrigerator overnight.

Dessert
American
cheesecake, creamsicle, dessert recipe, orange, Summer Treat

Tomato and White Bean Soup

Bowl of Tomato and White Bean Soup garnished with fresh herbs

Tomato and White Bean Soup is a wonderful dish to prepare, especially when you’re looking for something hearty yet healthy. This soup combines tomatoes and white beans, creating a satisfying meal filled with flavor and nutrition.

One great reason to make this soup is the simplicity of the ingredients. You likely already have many of them in your pantry or fridge, making it an easy choice for a weeknight dinner. The blend of fresh tomatoes, creamy white beans, and fragrant herbs offers a burst of taste that warms you up and lifts your spirits.

Another reason to prepare this dish is its health benefits. Tomatoes are rich in vitamins A and C, while white beans provide protein and fiber. This makes the soup not only delicious but also nutritious, perfect for those who want a balanced meal. Plus, it’s vegetarian and can easily be made vegan.

Moreover, making the soup at home allows you to control the seasoning, ensuring it’s tailored to your taste. It’s a meal that can be prepared in just one pot, making cleanup a breeze. So, if you’re looking for a comforting, healthy, and easy recipe, Tomato and White Bean Soup is a perfect choice.

How to Make Tomato and White Bean Soup

Making Tomato and White Bean Soup is quite simple and doesn’t take much time. Start by gathering your ingredients: fresh tomatoes, canned white beans, vegetable broth, onion, garlic, olive oil, and your choice of herbs, which may include basil or thyme.

Begin by heating the olive oil in a large pot over medium heat. Add the chopped onion and minced garlic, sautéing them until the onion turns soft and translucent. This usually takes about 5 minutes.

Next, add chopped tomatoes to the pot. If you are using canned tomatoes, just pour them in directly. Stir everything together and bring it to a gentle boil. Then, reduce the heat and let it simmer for about 10 minutes.

Afterward, add the drained and rinsed white beans to the pot along with the vegetable broth. Continue to simmer for another 15-20 minutes. This allows all the flavors to blend wonderfully. Near the end of cooking, season the soup with salt, pepper, and your preferred herbs.

Finally, if you want a creamy texture, you can blend part of the soup with an immersion blender before serving. This will give it a lovely, smooth consistency while still having chunks of beans and tomatoes for texture.

How to Serve Tomato and White Bean Soup

Serving Tomato and White Bean Soup is very straightforward. It’s best to serve it warm, fresh from the pot. Ladle the soup into bowls and consider garnishing it with a sprinkle of fresh herbs, like basil or parsley, for a pop of color and added flavor.

For a more filling meal, you can pair the soup with crusty bread or a simple green salad on the side. A slice of sourdough or a toasted baguette is perfect for dipping.

If you like a little heat, try adding a few crushed red pepper flakes on top before serving. This adds a nice kick that complements the soup’s flavors well.

As an added touch, a drizzle of olive oil on top of each bowl can enhance the dish and add a rich finish. Enjoy your Tomato and White Bean Soup as a cozy meal any time, whether it’s for lunch or dinner.

How to Store Tomato and White Bean Soup

Storing Tomato and White Bean Soup is quite easy. Once the soup has cooled to room temperature, transfer it to an airtight container. Make sure to leave some space at the top, as liquids can expand when frozen.

If you plan to eat the soup within a few days, it can be stored in the refrigerator for up to 3-4 days. Just reheat it on the stovetop over medium heat, stirring occasionally until heated through.

If you want to keep your soup longer, consider freezing it. Tomato and White Bean Soup freezes well and can last for up to 3 months in the freezer. To thaw it, move the container to the refrigerator the night before you plan to enjoy it again. You can also thaw it quickly in a microwave or on the stovetop, just be sure to heat it gently to maintain its texture.

Remember to always check for any changes in color or smell before consuming leftovers, as with any food!

Tips to Make Tomato and White Bean Soup

To make your Tomato and White Bean Soup even better, here are some helpful tips to follow. First, choose ripe, fresh tomatoes for the best flavor; if they’re in season, they can make a big difference in the taste of the soup. If fresh tomatoes aren’t available, good quality canned tomatoes will also work well.

Second, do not rush the sautéing step. Taking the time to cook the onion and garlic until they are soft will enhance the overall flavor of the soup.

Third, be mindful of the seasoning. Adding salt gradually and tasting as you go can help you achieve just the right flavor.

For extra creaminess, consider blending a portion of the soup—this will give a nice consistency while keeping some texture.

Lastly, feel free to experiment with different herbs and spices. Adding cumin or smoked paprika can introduce a new layer of flavor, while a squeeze of lemon juice right before serving can add brightness.

Variation

There are many ways to customize your Tomato and White Bean Soup. For a heartier version, consider adding chopped vegetables like carrots, celery, or spinach—a great way to incorporate more nutrients. You can also include cooked pasta or rice for added texture and substance.

If you’d like a meatier flavor, you can sauté some diced bacon or sausage along with the onion and garlic. For those who love a little heat, adding diced jalapeños or using spicy tomatoes can give your soup a nice kick.

FAQs

1. Can I use canned tomatoes instead of fresh?
Yes, you can easily use canned tomatoes in this recipe. Just make sure to choose high-quality canned tomatoes for great flavor.

2. Is this soup gluten-free?
Yes, Tomato and White Bean Soup is naturally gluten-free as it doesn’t contain any flour or gluten-based ingredients.

3. How can I make this soup creamy?
You can blend a portion of the soup with an immersion blender or regular blender to create a creamy texture while retaining some chunks.

[tasty-recipe id=”4956″]

Tomato and White Bean Soup

A hearty and healthy soup made with fresh tomatoes, creamy white beans, and fragrant herbs. Perfect for a comforting meal.

Main Ingredients

  • 4 cups fresh tomatoes, chopped (Alternatively, use high-quality canned tomatoes.)
  • 2 cans canned white beans, drained and rinsed (Approximately 15 oz cans.)
  • 4 cups vegetable broth (Use low-sodium if preferred.)
  • 1 medium onion, chopped
  • 2 cloves garlic, minced
  • 2 tablespoons olive oil (For sautéing.)
  • 1 teaspoon salt (Adjust to taste.)
  • 1 teaspoon black pepper (Adjust to taste.)
  • 1 tablespoon fresh herbs (basil or thyme), chopped (Add more as desired.)

Preparation

  1. Gather all ingredients before starting the cooking process.
  2. Heat olive oil in a large pot over medium heat.
  3. Add chopped onion and minced garlic, sauté until the onion is soft and translucent, about 5 minutes.
  4. Add chopped tomatoes to the pot and stir. Bring to a gentle boil.
  5. Reduce heat and let it simmer for 10 minutes.

Cooking

  1. Add the drained and rinsed white beans and vegetable broth to the pot.
  2. Continue to simmer for another 15-20 minutes, allowing flavors to meld.
  3. Season with salt, pepper, and preferred herbs near the end of cooking.

Finishing Touch

  1. For a creamy texture, blend part of the soup with an immersion blender before serving.

Serving

  1. Serve warm in bowls and garnish with fresh herbs, if desired.
  2. Pair with crusty bread or a simple salad for a complete meal.
  3. Optionally, add crushed red pepper flakes for heat or a drizzle of olive oil on top.

Store leftovers in an airtight container. Will keep in the refrigerator for 3-4 days or can be frozen for up to 3 months. Reheat gently before serving.

Main Course, Soup
Healthy, Vegetarian
Healthy Dinner, Hearty Soup, Tomato Soup, White Bean Soup

Candy Cane Christmas Punch

Festive Candy Cane Christmas Punch served in a holiday-themed glass

Candy Cane Christmas Punch is a delightful and festive drink that brings the spirit of the holiday season into your glass. This punch combines the refreshing taste of peppermint with fruity flavors and a touch of sparkle from soda. It’s perfect for holiday parties, family gatherings, or cozy nights by the fire. The vibrant colors and sweet taste will surely impress both kids and adults alike. Whether you are hosting a Christmas party or simply want to enjoy a special treat with your loved ones, this punch is a wonderful choice.

Why Make This Recipe

Making Candy Cane Christmas Punch is a great way to celebrate the festivities of the holiday season. This drink stands out because it captures the essence of Christmas with its vibrant red and white colors, resembling candy canes. Not only does it taste amazing, but it also adds a fun and cheerful touch to any gathering.

One reason to make this punch is its versatility. You can easily customize the ingredients to fit your taste and dietary preferences. Whether you prefer a non-alcoholic version for the kids or want to add a splash of vodka for the adults, it works well either way.

Additionally, preparing this punch is simple and quick, which is a lifesaver during the busy holiday rush. You can mix it all in one large bowl or pitcher and serve it to your guests. This way, you can enjoy your party without spending too much time in the kitchen. Finally, Candy Cane Christmas Punch is a conversation starter, its fun flavors and festive appearance invite everyone to grab a glass and join in the cheer!

How to Make Candy Cane Christmas Punch

Making Candy Cane Christmas Punch is easy and fun! Here’s how to do it step by step.

Start by gathering your ingredients. You’ll need cranberry juice, lemon-lime soda, peppermint extract, and some crushed candy canes for that festive touch. You can also add some fresh mint leaves for extra freshness and a pop of green.

Next, in a large bowl or pitcher, combine about 4 cups of cranberry juice and 2 cups of lemon-lime soda. The soda adds carbonation, making the drink refreshing and bubbly. Mix well to combine these two main ingredients.

Now, add a teaspoon of peppermint extract. This is where the candy cane flavor comes in! Stir the mixture thoroughly to ensure it’s well blended.

To serve, fill glasses with the punch and garnish with crushed candy canes on the rim. This not only looks great but adds an extra sweet crunch to each sip. For a fun twist, you could also float some mint leaves on top or add a scoop of vanilla ice cream for a creamy version.

Your Candy Cane Christmas Punch is now ready to enjoy.

How to Serve Candy Cane Christmas Punch

Serving Candy Cane Christmas Punch can enhance its festive appeal. Start by preparing a large bowl or pitcher, as this punch is perfect for sharing. When serving, consider using clear glasses or holiday-themed mugs to showcase the beautiful colors of the drink.

Garnish each glass with crushed candy cane around the rim for a fun presentation. A few fresh mint leaves on top can also add a festive touch and a hint of color.

You could also serve the punch over ice for a refreshing drink. If you want to make it even more festive, consider adding some whole candy canes as stirrers in each glass.

If you’re hosting a party, have a self-serving station where guests can help themselves. Include cups, ice, and extra garnishes to let everyone customize their drinks.

No matter how you choose to serve it, your Candy Cane Christmas Punch will be a hit at any holiday gathering!

How to Store Candy Cane Christmas Punch

Storing Candy Cane Christmas Punch properly is important to maintain its refreshing flavor and fizzy texture. If you have leftover punch, pour it into a covered pitcher or airtight container.

It’s best to store it in the refrigerator. However, to keep the carbonation of the soda, avoid mixing all the ingredients if you plan to make it in advance. Instead, combine the juices and peppermint extract ahead of time, but add the soda right before serving.

If you want to store it for a longer time, consider freezing the punch in ice cube trays or larger containers. This way, you can have fun punch cubes to add to future holiday drinks. Just remember, the tasty punch will be best when consumed fresh, so aim to enjoy it within a couple of days.

When you’re ready to serve the stored punch again, you can either let it thaw in the fridge or mix it with a fresh batch of soda for that bubbly lift!

Tips to Make Candy Cane Christmas Punch

Here are some helpful tips to ensure your Candy Cane Christmas Punch turns out great every time!

First, always taste as you mix. Adjust the peppermint extract to your liking, especially if you’re not a big fan of a strong mint flavor. You can start with less and add more until you find the right balance.

Using cold ingredients is crucial for keeping the punch refreshing. Make sure to chill the cranberry juice and soda before mixing.

Another tip is to experiment with different sodas. While lemon-lime soda works brilliantly, you could also try ginger ale or club soda as alternatives for a different twist. Each variation brings a new layer of flavor.

To add even more excitement, you could make a festive ice ring with cranberry juice and mint leaves. This not only keeps your punch cold but also adds decoration as it melts into the drink.

Lastly, don’t forget to have enough garnishes ready. Extra crushed candy canes and fresh mint leaves will enhance the look and taste, making your punch more inviting for guests!

Variation

You can make variations of Candy Cane Christmas Punch to suit different tastes. For a spiked version, simply add vodka or rum for an adult twist. Another option is to create a non-alcoholic version by excluding any alcohol, making it kid-friendly.

Adding different fruits, like blueberries or pomegranate seeds, can give a delightful surprise. You can also create a creamier punch by incorporating some vanilla ice cream or whipped cream floating on top for a richer, dessert-like experience.

FAQs

1. Can I make Candy Cane Christmas Punch ahead of time?
Yes, you can prepare the cranberry juice and peppermint mixture in advance. Add the soda just before serving to maintain its fizziness.

2. Is this punch suitable for kids?
Absolutely! The recipe can be made non-alcoholic and is perfect for kids and families to enjoy during the holidays.

3. How can I make the punch visually appealing?
Using clear glasses helps showcase the drink’s color. You can add crushed candy canes or mint leaves as garnishes to elevate the presentation!

[tasty-recipe id=”4966″]

Candy Cane Christmas Punch

A delightful and festive drink combining the refreshing taste of peppermint with fruity flavors and a touch of sparkle from soda, perfect for holiday gatherings.

For the Punch

  • 4 cups cranberry juice (Use chilled for best results.)
  • 2 cups lemon-lime soda (Use chilled to maintain carbonation.)
  • 1 teaspoon peppermint extract (Adjust to taste for desired mint flavor.)
  • 1/2 cup crushed candy canes (For garnish.)
  • optional fresh mint leaves (For garnish and extra flavor.)

Preparation

  1. Gather all the ingredients together.
  2. In a large bowl or pitcher, combine 4 cups of cranberry juice and 2 cups of lemon-lime soda. Mix well.
  3. Add 1 teaspoon of peppermint extract and stir thoroughly to blend.
  4. Fill glasses with the punch and garnish with crushed candy canes on the rim.
  5. Optionally, float some fresh mint leaves on top or add a scoop of vanilla ice cream for a creamy version.

Store any leftover punch in a covered pitcher in the refrigerator. Combine juices and peppermint beforehand, but add soda right before serving to keep it fizzy. You can freeze punch in ice cubes for future use.

Beverage, Party Drink
American
Candy Cane Punch, Christmas Punch, Festive Beverage, Holiday Drink, Non-Alcoholic Punch

Lemon Chicken Orzo Soup

A bowl of Lemon Chicken Orzo Soup garnished with herbs and lemon slices.

Lemon Chicken Orzo Soup is a comforting and flavorful dish that is perfect for any time of year. This soup combines tender chicken, bright lemon flavors, and nutritious vegetables, all brought together with tiny, chewy orzo pasta. It’s not just a dish; it’s a warm hug in a bowl that can lift anyone’s spirits.

why make this recipe

There are many reasons to make Lemon Chicken Orzo Soup. First, it’s a delicious way to enjoy a hearty meal that doesn’t take too long to prepare. With its bright and refreshing flavors, it is particularly uplifting during colder months, making it a perfect recipe for rainy days or chilly evenings.

Second, this soup is very healthy. The combination of chicken, vegetables, and lemon makes it packed with protein, vitamins, and minerals. The orzo adds some carbohydrates, making it filling and nutritious.

Additionally, Lemon Chicken Orzo Soup is easy to customize. You can add your favorite vegetables or swap chicken for another protein, making it versatile for different diets or preferences.

Finally, it’s a great recipe for meal prep. You can make a big pot and store it for easy lunches or dinners throughout the week. Overall, this soup is simple yet flavorful, healthy, and comforting – a great addition to any home-cooked meal rotation.

how to make Lemon Chicken Orzo Soup

Making Lemon Chicken Orzo Soup is straightforward and satisfying. Start by gathering your ingredients: chicken breast, orzo pasta, carrots, celery, onion, garlic, chicken broth, and, of course, fresh lemons.

Begin by heating a little olive oil in a large pot over medium heat. Add diced onion, carrots, and celery. Sauté the vegetables for about 5-7 minutes until they start to soften. Next, add minced garlic and cook for another minute until fragrant.

Add the chicken broth to the pot and bring it to a simmer. Once simmering, add the chicken breasts. Let the chicken cook in the broth for about 15-20 minutes, until it’s cooked through. Once cooked, remove the chicken and let it cool slightly before shredding it into bite-sized pieces.

Return the shredded chicken to the pot and stir in the orzo. Cook for 8-10 minutes, or until the orzo is tender. Finally, squeeze in fresh lemon juice and add chopped parsley for a burst of fresh flavor. Adjust seasoning with salt and pepper to taste.

how to serve Lemon Chicken Orzo Soup

Serving Lemon Chicken Orzo Soup is a delightful experience. Once your soup is ready, ladle it into bowls while it’s hot. You may want to sprinkle each bowl with freshly chopped parsley or add lemon slices as garnishes. This not only enhances the presentation but also adds an extra zing of flavor.

Pair the soup with crusty bread for dipping or a side salad for a complete meal. It’s perfect for lunch or dinner. If you’re serving guests, consider offering a sprinkle of grated Parmesan cheese on top for an extra touch. The soup is warm, nourishing, and sure to please everyone at the table.

how to store Lemon Chicken Orzo Soup

To store Lemon Chicken Orzo Soup, let it cool to room temperature. Then, transfer it into airtight containers. You can keep it in the refrigerator for up to 3-4 days. If you want to keep it longer, consider freezing it. Freeze in individual portions in freezer-safe containers or bags.

When you’re ready to enjoy the soup again, simply reheat it on the stove or in the microwave. Note that the orzo may absorb some broth while stored, so you might want to add a splash of extra broth or water while reheating to restore its soupy consistency. Enjoying leftovers is just as delicious as the first serving!

tips to make Lemon Chicken Orzo Soup

Here are some helpful tips to make your Lemon Chicken Orzo Soup even better. First, choose fresh ingredients whenever possible. Fresh vegetables and herbs can greatly enhance the flavor of the soup.

Next, don’t skip the lemon juice. It brightens the taste and adds a refreshing note that pairs wonderfully with the chicken and orzo. You can adjust the amount of lemon juice based on your taste preferences.

If you prefer a thicker soup, reduce the amount of broth or increase the orzo slightly. However, keep in mind that the orzo will absorb more liquid as it sits.

For added flavor, consider seasoning the soup with fresh thyme or dill along with salt and pepper. These herbs complement the lemon and chicken beautifully. Lastly, if you have leftover rotisserie chicken, feel free to use it instead of cooking raw chicken for quicker preparation.

variation

You can easily modify Lemon Chicken Orzo Soup to suit your tastes. For a vegetarian version, replace the chicken with chickpeas or white beans and use vegetable broth instead of chicken broth. You can also add more greens, such as spinach or kale, for an extra nutrient boost.

For those who love spice, consider adding a pinch of red pepper flakes for a little heat. If you’re a fan of other pasta, you can swap orzo for small shells or ditalini pasta.

FAQs

1. Can I use frozen chicken for this recipe?
Yes, you can use frozen chicken, but it will need additional cooking time. Ensure it is fully cooked before shredding.

2. Can I make this soup in advance?
Absolutely! This soup stores well in the refrigerator for a few days and also freezes nicely for later enjoyment.

3. Is orzo gluten-free?
No, orzo is typically made from wheat. If you need a gluten-free option, look for gluten-free pasta alternatives or use rice instead of orzo.

[tasty-recipe id=”4697″]

Lemon Chicken Orzo Soup

A comforting and flavorful dish combining tender chicken, bright lemon flavors, and nutritious vegetables, perfect for any time of year.

Main Ingredients

  • 1 lb chicken breast (Diced or whole depending on preference.)
  • 1 cup orzo pasta (Or any small pasta variety.)
  • 2 medium carrots (Diced.)
  • 2 stalks celery (Diced.)
  • 1 medium onion (Diced.)
  • 2 cloves garlic (Minced.)
  • 8 cups chicken broth (Or vegetable broth for a vegetarian version.)
  • 2 tablespoons olive oil (For sautéing.)
  • 2 medium lemons (Juiced.)
  • 1 cup fresh parsley (Chopped, for garnish.)
  • to taste salt and pepper (For seasoning.)

Preparation

  1. Gather all ingredients: chicken breast, orzo pasta, carrots, celery, onion, garlic, chicken broth, and fresh lemons.
  2. Heat olive oil in a large pot over medium heat.
  3. Add diced onion, carrots, and celery. Sauté for about 5-7 minutes until they start to soften.
  4. Add minced garlic and cook for another minute until fragrant.
  5. Add chicken broth and bring to a simmer.
  6. Once simmering, add chicken breasts and let cook for about 15-20 minutes, until cooked through.
  7. Remove the chicken, cool slightly, then shred it into bite-sized pieces.
  8. Return shredded chicken to the pot and stir in the orzo. Cook for 8-10 minutes or until orzo is tender.
  9. Squeeze in fresh lemon juice and add chopped parsley. Adjust seasoning with salt and pepper to taste.

Enjoy with crusty bread or a side salad. For added flavor, consider sprinkling grated Parmesan cheese on top when serving. Store leftovers by cooling to room temperature, then transferring to airtight containers.

Main Course, Soup
American
Comfort Food, Easy Recipe, Healthy Soup, Lemon Chicken Orzo Soup, Meal Prep

Carrot Apple Zucchini Muffins with Cream Cheese Frosting Bliss

Delicious Carrot Apple Zucchini Muffins with Cream Cheese Frosting

Carrot Apple Zucchini Muffins with Cream Cheese Frosting Bliss are a delightful treat that combines the sweetness of apples and carrots with the subtle flavor of zucchini. These muffins are moist, flavorful, and topped with a rich cream cheese frosting that takes them to the next level. Perfect for breakfast, snacks, or dessert, they are sure to become a family favorite.

Why Make This Recipe

Making Carrot Apple Zucchini Muffins is a wonderful way to enjoy a nutritious and delicious treat. These muffins are packed with healthy ingredients. Carrots provide a good source of vitamins and fiber, while zucchini adds moisture without overpowering the flavor. Apples bring natural sweetness and a touch of tartness, creating a delightful balance in every bite.

This recipe is also a great way to sneak in some veggies for those picky eaters. Each bite is bursting with flavor and texture. Plus, the cream cheese frosting is a simple yet indulgent touch that makes these muffins feel extra special.

These muffins are versatile too! You can enjoy them warm out of the oven or at room temperature. They’re perfect for breakfast on busy mornings or as an afternoon snack. You can even freeze them for later. Just pop them in the microwave for a quick treat. When you make these muffins, you are not just baking; you’re creating a wholesome treat that your family will love.

How to Make Carrot Apple Zucchini Muffins

To make Carrot Apple Zucchini Muffins, you’ll need simple ingredients: flour, sugar, carrots, apples, zucchini, eggs, oil, baking powder, baking soda, cinnamon, and nutmeg. Start by preheating your oven to 350°F (175°C). Line a muffin tin with paper liners or grease it lightly.

In a large bowl, mix the dry ingredients: flour, sugar, baking powder, baking soda, cinnamon, and nutmeg. In another bowl, beat the eggs and mix in the oil. Then, add grated carrots, zucchini, and apples to the egg mixture, stirring well.

Next, combine the wet and dry ingredients until just mixed. Be careful not to overmix. Spoon the batter into each muffin cup, filling them about two-thirds full. Bake for 20-25 minutes or until a toothpick inserted into the center comes out clean. Once baked, let the muffins cool in the pan for a few minutes before transferring them to a wire rack.

For the cream cheese frosting, beat together cream cheese, butter, powdered sugar, and vanilla extract until smooth. Once the muffins are completely cool, pipe or spread the frosting on top. Enjoy the delicious flavors and aromas of your homemade muffins!

How to Serve Carrot Apple Zucchini Muffins

Carrot Apple Zucchini Muffins are delightful on their own, but serving them right can enhance the experience. These muffins are great for breakfast or a snack at any time of the day. They pair perfectly with a cup of tea or coffee, making them an ideal choice for a cozy afternoon.

To serve, simply place the muffins on a beautiful platter or basket. If you want to impress your guests, you can dust them with powdered sugar for a nice touch. You might also consider adding a dollop of extra cream cheese frosting on the side for those who love a sweeter taste.

For a fun twist, you can serve the muffins warm alongside a scoop of vanilla ice cream for dessert. The warm muffins will melt the ice cream just a bit, creating a delicious combination. Whether at a gathering, a potluck, or just for family, these muffins will surely be a hit with everyone who tries them!

How to Store Carrot Apple Zucchini Muffins

Storing Carrot Apple Zucchini Muffins properly will help keep them fresh for longer. Once the muffins have cooled completely, you can store them in an airtight container. If you plan to eat them within a few days, keep them at room temperature, away from direct sunlight.

For longer storage, these muffins freeze beautifully. To freeze, wrap each muffin individually in plastic wrap or place them in a freezer-safe bag. Make sure to squeeze out as much air as possible to prevent freezer burn. When you’re ready to enjoy them again, just take out the desired number of muffins and let them thaw on the counter or warm them in the microwave.

If you have frosted muffins, it’s best to store them in the refrigerator to prevent the cream cheese frosting from melting. Just remember to let them come to room temperature before serving for the best taste.

Tips to Make Carrot Apple Zucchini Muffins

Here are some helpful tips to ensure your Carrot Apple Zucchini Muffins turn out great every time. First, make sure to use fresh and moist zucchini and perfectly ripe apples. This will enhance the flavor and moisture of your muffins. Grate the zucchini and squeeze out any excess moisture to prevent the batter from becoming overly wet.

When measuring your flour, spoon it into your measuring cup instead of scooping it directly from the bag. This prevents over-packing and keeps your muffins light and fluffy. If you want a little extra flavor, you can add chopped nuts or raisins into the batter.

Mixing the dry and wet ingredients separately before combining them helps maintain the right texture. Avoid overmixing the batter once combined—this can lead to dense muffins. Lastly, be creative with the cream cheese frosting! You can add cocoa powder for chocolate-flavored frosting or lemon zest for a citrusy twist.

Variation

You can easily adapt this recipe to suit your preferences. For a healthier option, substitute half of the flour for whole wheat flour or replace sugar with honey or maple syrup. You can also try adding spices like ginger or using different fruits, such as crushed pineapple instead of apples. If you’re a fan of nuts, consider adding chopped walnuts or pecans for added crunch and flavor.

FAQs

Can I make these muffins without the frosting?
Yes, you can absolutely enjoy these muffins without the cream cheese frosting. They are delicious on their own!

Can I freeze these muffins?
Yes, you can freeze Carrot Apple Zucchini Muffins for up to three months. Wrap them tightly and store them in a freezer-safe container.

How do I know when the muffins are done baking?
You can check if your muffins are done by inserting a toothpick into the center. If it comes out clean or with just a few crumbs, they are ready to be taken out of the oven.

Can I make these muffins gluten-free?
Yes, you can use a gluten-free flour blend to make these muffins gluten-free. Just ensure that the other ingredients you use are also gluten-free.

[tasty-recipe id=”4960″]

Carrot Apple Zucchini Muffins

Moist and flavorful muffins packed with carrots, apples, and zucchini, topped with a rich cream cheese frosting. Perfect for breakfast, snacks, or dessert.

Muffin Ingredients

  • 2 cups all-purpose flour (Spoon into the measuring cup to avoid overpacking.)
  • 1 cup granulated sugar (Can be replaced with honey or maple syrup for a healthier option.)
  • 1 cup grated carrots (Fresh and moist.)
  • 1 cup grated zucchini (Squeeze excess moisture before adding.)
  • 1 cup grated apples (Use perfectly ripe apples.)
  • 2 large eggs (Beaten.)
  • 1/2 cup vegetable oil
  • 2 teaspoons baking powder
  • 1 teaspoon baking soda
  • 1 teaspoon cinnamon
  • 1/2 teaspoon nutmeg

Cream Cheese Frosting Ingredients

  • 8 oz cream cheese (Softened.)
  • 1/2 cup butter (Softened.)
  • 2 cups powdered sugar
  • 1 teaspoon vanilla extract

Preparation

  1. Preheat your oven to 350°F (175°C) and line a muffin tin with paper liners or grease it lightly.
  2. In a large bowl, mix the dry ingredients: flour, sugar, baking powder, baking soda, cinnamon, and nutmeg.
  3. In another bowl, beat the eggs and mix in the vegetable oil.
  4. Add the grated carrots, zucchini, and apples to the egg mixture, stirring well.

Baking

  1. Combine the wet and dry ingredients until just mixed, being careful not to overmix.
  2. Spoon the batter into each muffin cup, filling them about two-thirds full.
  3. Bake for 20-25 minutes or until a toothpick inserted into the center comes out clean.
  4. Let the muffins cool in the pan for a few minutes before transferring them to a wire rack.

Frosting

  1. For the cream cheese frosting, beat together the cream cheese, butter, powdered sugar, and vanilla extract until smooth.
  2. Once the muffins are completely cool, pipe or spread the frosting on top.

Tips: Use fresh zucchini and ripe apples, grate the zucchini and squeeze out excess moisture, avoid overmixing, and get creative with the frosting by adding cocoa or lemon zest.

Breakfast, Dessert, Snack
American
Apple, Carrot, Cream Cheese Frosting, Muffins, Zucchini

Cheesy Ranch Potatoes

Cheesy ranch potatoes with smoked sausage, a delicious comfort meal

Cheesy Ranch Potatoes and Smoked Sausage is a delicious and hearty dish that combines creamy, cheesy potatoes with seasoned smoked sausage for a comforting meal. This dish is easy to make, making it perfect for family dinners or gatherings with friends. The combination of flavors and textures creates a satisfying and filling dish that is loved by many.

why make this recipe

There are many reasons to prepare Cheesy Ranch Potatoes and Smoked Sausage. First, it is a versatile recipe that is simple to customize. You can add your favorite vegetables, adjust spices, or use different types of sausage based on your taste preferences. This dish is also a crowd-pleaser, making it ideal for parties or potluck gatherings. Everyone enjoys the rich flavor of cheesy potatoes combined with savory sausage.

Another reason to make this dish is the ease and speed of preparation. With just a few ingredients and straightforward steps, you can have a delicious meal in about an hour. The one-pan method means less cleanup, which is always a bonus after a long day.

Furthermore, it is a comforting meal that provides warmth and satisfies hunger. The combination of creamy cheese, ranch seasoning, and hearty sausage creates a dish that feels indulgent yet is simple to prepare. It can also be enjoyed any time of year, making it a go-to recipe for any season.

how to make Cheesy Ranch Potatoes and Smoked Sausage

To start making Cheesy Ranch Potatoes and Smoked Sausage, you will need the following ingredients: 2 pounds of potatoes, 1 pound of smoked sausage, 1 cup of shredded cheese, 1 packet of ranch seasoning, and some oil for cooking.

First, preheat your oven to 400°F (200°C). Begin by washing and dicing the potatoes into small pieces. In a large bowl, combine the diced potatoes with a drizzle of oil and the ranch seasoning. Mix everything well so that all the potatoes are coated in the seasoning.

Next, slice the smoked sausage into rounds and add it to the bowl with the potatoes. Stir well to combine. Pour the potato and sausage mixture into a greased baking dish. Spread it out evenly and top with the shredded cheese.

Bake in the preheated oven for about 30-35 minutes until the potatoes are tender. You may want to check them with a fork to ensure they are cooked through. For an extra cheesy finish, you can broil for a few minutes to bubble the cheese on top. Once done, take the baking dish out of the oven and let it cool for a few minutes before serving.

how to serve Cheesy Ranch Potatoes and Smoked Sausage

Cheesy Ranch Potatoes and Smoked Sausage can be served in a variety of ways. A simple way to serve this dish is directly from the baking dish, allowing everyone to help themselves. You can pair it with a fresh green salad or steamed vegetables for an added healthy touch. The freshness of a salad complements the richness of the cheesy potatoes and sausage.

For a family-style meal, consider putting the dish on the center of the table with serving utensils. This encourages sharing and enjoyment among family and friends.

You might also enjoy this dish with a dollop of sour cream or a sprinkle of fresh herbs on top for added flavor. If you have leftovers, they can be reheated and served as a quick lunch the next day. No matter how you choose to serve it, this dish is sure to please everyone around the table.

how to store Cheesy Ranch Potatoes and Smoked Sausage

Storing Cheesy Ranch Potatoes and Smoked Sausage is simple. First, allow the dish to cool to room temperature before storing it. This step prevents condensation that can make the dish soggy. Transfer any leftovers to an airtight container.

You can store the dish in the refrigerator for up to 3-4 days. When reheating, it’s best to use an oven to retain the dish’s crispiness. Preheat the oven to 350°F (175°C) and place the leftovers in an oven-safe dish, covering it with foil to prevent drying out. Heat for about 20-25 minutes or until warmed through.

If you want to store it for a longer period, consider freezing it. Pack the cooled dish in a well-sealed freezer container. It can last in the freezer for up to 2-3 months. Thaw overnight in the refrigerator before reheating. This makes it perfect for meal prep and easy weeknight dinners.

tips to make Cheesy Ranch Potatoes and Smoked Sausage

Here are some helpful tips to make your Cheesy Ranch Potatoes and Smoked Sausage even better. First, make sure to cut the potatoes into even sizes. This helps them cook evenly. You can also soak the diced potatoes in cold water for 30 minutes to remove excess starch, which helps to make them crispier.

Secondly, feel free to get creative with the cheese. While shredded cheddar works great, experimenting with other cheeses like Monterey Jack or pepper jack can add a nice twist.

Consider adding some vegetables to the dish. Bell peppers, onions, or broccoli can enhance the flavor and nutrition of the meal. You can roast them alongside the potatoes for a complete one-pan meal.

Finally, taste as you go! Adjust the seasoning according to your preference by adding more ranch seasoning or spices like garlic powder or paprika for an extra kick.

variation

If you want to switch things up, try replacing the smoked sausage with grilled chicken or turkey sausage for a different protein option. You can also make it vegetarian by omitting the sausage and adding extra vegetables, such as spinach or zucchini. For a spicier dish, consider adding jalapeños or a dash of hot sauce to the mix.

FAQs

1. Can I use fresh potatoes instead of frozen?
Yes, fresh potatoes work perfectly for this recipe. Just make sure to wash and chop them into even pieces.

2. Is this dish gluten-free?
Yes, Cheesy Ranch Potatoes and Smoked Sausage can be gluten-free if you use gluten-free ranch seasoning and ensure the sausage is also gluten-free.

3. Can I make this dish ahead of time?
Absolutely! You can prepare the dish in advance and keep it in the refrigerator before baking. Just add some extra baking time if it goes into the oven chilled.

[tasty-recipe id=”4705″]

Cheesy Ranch Potatoes and Smoked Sausage

A delicious and hearty dish that combines creamy, cheesy potatoes with seasoned smoked sausage for a comforting meal, perfect for family dinners or gatherings.

Main Ingredients

  • 2 pounds potatoes, diced (Cut into even sizes for even cooking.)
  • 1 pound smoked sausage, sliced (Can be substituted with grilled chicken or turkey sausage.)
  • 1 cup shredded cheese (Cheddar, Monterey Jack, or Pepper Jack cheese can be used.)
  • 1 packet ranch seasoning
  • 2 tablespoons oil (For cooking.)

Preparation

  1. Preheat the oven to 400°F (200°C).
  2. Wash and dice the potatoes into small pieces.
  3. In a large bowl, combine the diced potatoes with a drizzle of oil and the ranch seasoning.
  4. Mix everything well so that all the potatoes are coated in the seasoning.
  5. Slice the smoked sausage into rounds and add it to the bowl with the potatoes.
  6. Stir well to combine and pour the mixture into a greased baking dish.
  7. Spread it out evenly and top with the shredded cheese.

Cooking

  1. Bake in the preheated oven for about 30-35 minutes until the potatoes are tender.
  2. For an extra cheesy finish, broil for a few minutes to bubble the cheese on top.

Serving

  1. Allow to cool for a few minutes before serving.
  2. Serve directly from the baking dish or pair with a fresh green salad.
  3. Optional: Add a dollop of sour cream or a sprinkle of fresh herbs on top.

You can store leftovers in an airtight container in the refrigerator for up to 3-4 days. Reheat using an oven to retain crispiness.

Dinner, Main Course
American
Cheesy Ranch Potatoes, Comfort Food, Easy Dinner, Party Dish, Smoked Sausage

Lemon Cream Cheese Dump Cake

Delicious Lemon Cream Cheese Dump Cake slice on a plate with lemon slices.

This Lemon Cream Cheese Dump Cake is bright, creamy, and easy to make. It mixes lemon cake mix with soft cream cheese, and the top bakes into a sweet, buttery crust. People love it at family dinners and potlucks because it looks like you worked hard, but it really takes just a few steps. If you enjoy lemon desserts and want another simple twist, try the Italian lemon cream cake recipe for more ideas. You will love the sweet lemon taste and the soft, creamy center, so get ready to wow your friends with very little work.

How to prepare Lemon Cream Cheese Dump Cake

Preheat the oven to 350°F, grease a 9×13 inch baking dish lightly.

Spread the cream cheese in an even layer on the bottom of the dish. Break the graham crackers into pieces and sprinkle them over the cream cheese. Pour the lemon cake mix evenly over the top, do not mix. Drizzle the melted butter slowly over the cake mix so it soaks in small spots. Bake for 35 to 45 minutes, until the top is golden and a toothpick in the center comes out mostly clean. Let it cool for 15 to 20 minutes before slicing. Chill for a firmer, creamier texture, or serve warm for a soft, gooey treat.

Lemon Cream Cheese Dump Cake

Why You’ll Love Lemon Cream Cheese Dump Cake

  • Very easy, no heavy mixing or special tools.
  • Bright lemon flavor, it tastes fresh and sweet.
  • Cream cheese makes the center smooth and rich, balanced by a crisp top.
  • Great for potlucks, family dinners, or a quick dessert any night.
  • Uses common pantry items like cake mix and butter, ideal for busy cooks.

Tips for success

  • Use room temperature cream cheese so it spreads easily.
  • Drizzle melted butter slowly, this helps the cake mix bake evenly.
  • If you want more lemon, add a teaspoon of lemon zest to the cream cheese layer.
  • For a crunchier top, add a handful of chopped pecans or sliced almonds before baking.
  • Cool the cake at least 15 minutes, it slices cleaner when it rests.

Serving Suggestions

  • Serve chilled with a dollop of whipped cream or a scoop of vanilla ice cream.
  • Garnish with fresh lemon slices or a light dusting of powdered sugar.
  • Pair with hot tea or coffee for a simple afternoon treat.
  • Bring to a picnic or potluck, it travels well and pleases crowds.

Lemon Cream Cheese Dump Cake

FAQs

Q: Can I make this ahead of time?

A: Yes, make it a day ahead and chill it. The flavors will set and it will slice well.

Q: Can I use a different cake mix?

A: Yes, you can use yellow or white cake mix for a milder lemon taste, but lemon mix gives the brightest flavor.

Q: Is there a gluten free option?

A: Use a gluten free cake mix and gluten free crackers or skip crackers and use thin almond flour layer under the cream cheese.

Q: Can I freeze leftovers?

A: Yes, wrap tightly and freeze up to one month. Thaw in the fridge overnight, then bring to room temperature before serving.

Conclusion

This Lemon Cream Cheese Dump Cake is a simple, crowd-pleasing dessert that blends bright lemon flavor with a creamy center and a buttery top, perfect for busy cooks and big gatherings. For a tested recipe and step by step guide from a trusted source, see Lemon Cream Cheese Dump Cake Recipe – The Kitchn.

Lemon Cream Cheese Dump Cake

A bright and creamy dessert that’s easy to make, featuring a buttery top and soft cream cheese center, perfect for potlucks and family dinners.

Main Ingredients

  • 8 ounces cream cheese, softened (Use room temperature for easy spreading.)
  • 1 box lemon cake mix (Lemon flavor recommended for best taste.)
  • 1/2 cup butter, melted (Drizzle slowly over the cake mix.)
  • 1 packaged graham crackers, broken into pieces (Sprinkle evenly over cream cheese.)

Preparation

  1. Preheat the oven to 350°F (175°C) and lightly grease a 9×13 inch baking dish.
  2. Spread the softened cream cheese evenly on the bottom of the baking dish.
  3. Break the graham crackers into pieces and sprinkle them over the cream cheese.
  4. Pour the lemon cake mix evenly over the top, without mixing.
  5. Drizzle the melted butter slowly over the cake mix to allow it to soak in.

Baking

  1. Bake for 35 to 45 minutes until the top is golden and a toothpick comes out mostly clean.
  2. Let it cool for 15 to 20 minutes before slicing.

For a firmer, creamier texture, chill in the refrigerator before serving. This cake travels well and is great for potlucks.

Dessert, Snack
American
Cream Cheese, Dump Cake, easy dessert, Lemon Cake, Potluck Dessert


Lemon Cream Cheese Dump Cake

A bright and creamy dessert that’s easy to make, featuring a buttery top and soft cream cheese center, perfect for potlucks and family dinners.

Main Ingredients

  • 8 ounces cream cheese, softened (Use room temperature for easy spreading.)
  • 1 box lemon cake mix (Lemon flavor recommended for best taste.)
  • 1/2 cup butter, melted (Drizzle slowly over the cake mix.)
  • 1 packaged graham crackers, broken into pieces (Sprinkle evenly over cream cheese.)

Preparation

  1. Preheat the oven to 350°F (175°C) and lightly grease a 9×13 inch baking dish.
  2. Spread the softened cream cheese evenly on the bottom of the baking dish.
  3. Break the graham crackers into pieces and sprinkle them over the cream cheese.
  4. Pour the lemon cake mix evenly over the top, without mixing.
  5. Drizzle the melted butter slowly over the cake mix to allow it to soak in.

Baking

  1. Bake for 35 to 45 minutes until the top is golden and a toothpick comes out mostly clean.
  2. Let it cool for 15 to 20 minutes before slicing.

For a firmer, creamier texture, chill in the refrigerator before serving. This cake travels well and is great for potlucks.

Dessert, Snack
American
Cream Cheese Cake, Dump Cake, easy dessert, Lemon Cake, Potlucks