Juicy 30-Minute Baked Chicken Breast

Are you looking for a quick and delicious meal that will surely impress your family? If so, the Juicy 30-Minute Baked Chicken Breast is just the recipe you need! This dish brings together tender chicken, flavorful seasoning, and a hint of mouthwatering juices that make it a crowd-pleaser at any dinner table. It’s perfect for busy weeknights when you want something tasty without spending hours in the kitchen. Just imagine biting into a juicy piece of chicken that’s bursting with flavor—sounds delicious, right? Let’s dive into how to prepare this delightful meal.

How to prepare Juicy Baked Chicken Breast

First, gather your ingredients and preheat your oven. You will want your chicken to cook evenly and quickly. Make sure to season it well with your favorite spices. For a truly delicious twist, you might also want to check out this Pineapple BBQ Baked Chicken Breast recipe, which adds a fun fruity flavor to your chicken!

Juicy 30-Minute Baked Chicken Breast

Once your oven is ready, place the chicken breasts in a baking dish. Brush them with some olive oil, season with salt and pepper, and sprinkle any additional herbs or spices that you enjoy. Bake them for around 20-30 minutes, or until the chicken reaches an internal temperature of 165°F. This will ensure that your chicken is cooked perfectly and remains juicy.

Juicy 30-Minute Baked Chicken Breast

Why You’ll Love Baked Chicken Breast

This recipe is not only quick to make but also adaptable to everyone’s taste! You can easily customize the seasoning to suit your palate, whether you enjoy something zesty, sweet, or savory. Besides, baked chicken is loaded with protein and is a healthier option compared to fried versions. It pairs wonderfully with various side dishes, making it an ideal choice for family gatherings or meal prep for the week ahead.

Tips for success

To ensure your chicken is as juicy as possible, here are some helpful tips:

  • Always let the chicken rest for a few minutes before slicing, which helps to lock in those tasty juices.
  • Consider marinating the chicken for a few hours before baking for even more flavor.
  • Experiment with different spices and herbs to discover your favorite combination.

Serving Suggestions

Juicy 30-Minute Baked Chicken Breast

Baked chicken breast is versatile and can be served in many ways. Serve it alongside a fresh salad, roasted vegetables, or creamy mashed potatoes. You could even slice the chicken and put it in a sandwich or wrap for a delicious lunch option. If you’re in the mood for something different, you might also enjoy trying out the Balsamic Baked Chicken Breast with Mozzarella Cheese, which adds a delightful twist to your meal.

FAQs

1. How can I store leftover baked chicken?

Store any leftover chicken in an airtight container in the refrigerator for up to 4 days.

2. Can I freeze baked chicken?

Yes, baked chicken can be frozen. Make sure it’s completely cool, then wrap it tightly in freezer-safe packaging. It should be good for up to 3 months.

3. What are some easy sides to serve with baked chicken?

Some great sides include steamed broccoli, quinoa, or a simple rice pilaf. You can choose sides that add nutrition and color to your plate.

Juicy Baked Chicken Breast

A quick and delicious baked chicken breast recipe that is tender, flavorful, and perfect for busy weeknights.

Main Ingredients

  • 4 pieces chicken breasts (Boneless and skinless for best results)
  • 2 tablespoons olive oil (For brushing the chicken)
  • 1 teaspoon salt (Adjust to taste)
  • 1 teaspoon black pepper (Adjust to taste)

Optional Seasonings

  • to taste additional herbs and spices (Customize to your preference (e.g., garlic powder, paprika))

Preparation

  1. Preheat your oven to 375°F (190°C).
  2. Gather all the ingredients.

Seasoning

  1. Brush the chicken breasts with olive oil.
  2. Season the chicken with salt, pepper, and any additional herbs or spices.

Baking

  1. Place the seasoned chicken breasts in a baking dish.
  2. Bake in the preheated oven for 20-30 minutes until the internal temperature reaches 165°F (74°C).

Serving

  1. Let the chicken rest for a few minutes before slicing to lock in the juices.
  2. Serve with your choice of sides like salad, roasted vegetables, or mashed potatoes.

For added flavor, consider marinating the chicken for a few hours before baking. Experiment with different spices to discover your favorite flavor combination.
Dinner, Main Course
American
Baked Chicken, Easy Dinner, Family Dinner, Healthy Recipe, Quick Meal

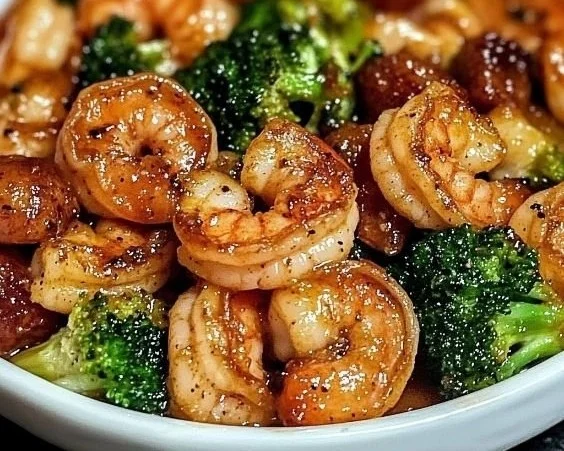
High-Protein Honey Garlic Shrimp

High-protein honey garlic shrimp dish served with vegetables

This High-Protein Honey Garlic Shrimp is warm, simple, and full of flavor. It mixes sweet honey with garlic and a little soy for a bright sauce. The shrimp cook fast and stay juicy. It is a great high-protein meal that fits weeknight dinners and meal prep. People love this shrimp because it tastes rich, but it feels light and healthy. Give it a try, you might find yourself making it again and again.

How to prepare High-Protein Honey Garlic Shrimp

Ingredients

  • 1 pound large shrimp, peeled and deveined
  • 2 tablespoons olive oil
  • 3 garlic cloves, minced
  • 3 tablespoons honey
  • 2 tablespoons low-sodium soy sauce
  • 1 tablespoon rice vinegar or lemon juice
  • 1 teaspoon grated ginger (optional)
  • Salt and pepper to taste
  • Chopped green onion or parsley for garnish

Directions

  1. Pat the shrimp dry and season with a little salt and pepper.
  2. In a small bowl mix honey, soy sauce, rice vinegar, garlic, and ginger if you use it.
  3. Heat olive oil in a large pan over medium-high heat.
  4. Add shrimp in one layer, cook 1 to 2 minutes per side until pink and curled. Do not overcook.
  5. Lower the heat, pour the honey garlic sauce into the pan. Stir and cook 1 more minute until sauce thickens and coats the shrimp.
  6. Remove from heat, garnish with green onion or parsley, serve right away.


High-Protein Honey Garlic Shrimp

Why You’ll Love High-Protein Honey Garlic Shrimp

  • Fast to cook, ready in about 15 minutes.
  • High-protein, great for muscle building and a filling meal.
  • Sweet and savory sauce that most people enjoy, a true crowd-pleaser.
  • Works for quick dinner, meal prep, or a light healthy lunch.
  • Uses simple pantry ingredients, no hard steps.

tips for success

  • Pat shrimp dry before cooking, this helps a nice sear.
  • Use large or extra-large shrimp for more protein per bite.
  • Don’t overcook, shrimp go from perfect to rubbery fast.
  • Taste the sauce before adding, adjust honey or soy to your taste.
  • If sauce gets too thick, add a splash of water to loosen it.

Serving Suggestions

  • Serve over steamed rice or cauliflower rice for a low-carb option.
  • Spoon over a green salad for a warm salad bowl.
  • Try with noodles, quinoa, or in lettuce wraps.
  • Add steamed broccoli or snap peas on the side for more veggies.
  • Top with sesame seeds for a nice crunch.


High-Protein Honey Garlic Shrimp

FAQs

Q: Can I use frozen shrimp?

A: Yes, thaw fully and pat dry before cooking for best texture.

Q: How long does this keep in the fridge?

A: Keep in an airtight box for 2 to 3 days. Reheat gently so shrimp do not overcook.

Q: Can I make the sauce ahead?

A: Yes, mix the sauce in advance and store in the fridge. Add it to the pan when shrimp are nearly done.

Q: Is this recipe low calorie?

A: It can be, if you use moderate honey and serve with veggies or cauliflower rice.

Q: Can I use a sugar substitute?

A: You can, but the taste and sauce texture may change. Try a small test batch.

Conclusion

For another trusted take on honey garlic shrimp and extra tips, see Honey-Garlic Shrimp – Allrecipes.

High-Protein Honey Garlic Shrimp

This High-Protein Honey Garlic Shrimp is a warm, simple dish that mixes sweet honey with garlic and soy for a bright sauce. Packed with flavor and high in protein, it’s perfect for weeknight dinners or meal prep.

Main Ingredients

  • 1 pound large shrimp, peeled and deveined
  • 2 tablespoons olive oil
  • 3 cloves garlic, minced
  • 3 tablespoons honey
  • 2 tablespoons low-sodium soy sauce
  • 1 tablespoon rice vinegar or lemon juice
  • 1 teaspoon grated ginger (optional) (Can be omitted if desired.)
  • Salt and pepper to taste
  • Chopped green onion or parsley for garnish

Preparation

  1. Pat the shrimp dry and season with a little salt and pepper.
  2. In a small bowl, mix honey, soy sauce, rice vinegar, garlic, and ginger (if using).
  3. Heat olive oil in a large pan over medium-high heat.

Cooking

  1. Add shrimp in one layer and cook for 1 to 2 minutes per side until pink and curled. Do not overcook.
  2. Lower the heat and pour the honey garlic sauce into the pan. Stir and cook for 1 more minute until the sauce thickens and coats the shrimp.
  3. Remove from heat, garnish with green onion or parsley, and serve right away.

Pat shrimp dry before cooking for a nice sear. Use large or extra-large shrimp for more protein per bite. Taste the sauce before adding, and adjust honey or soy to your taste. If sauce gets too thick, add a splash of water to loosen it.

Dinner, Main Course
Asian
Healthy, High Protein, Honey Garlic Shrimp, Meal Prep, Quick Dinner