Banana Bread Overnight Oats

A bowl of Banana Bread Overnight Oats topped with sliced bananas and nuts

Banana Bread Overnight Oats feel like a warm slice of banana bread turned into a quick, cool breakfast. This easy, creamy oat jar mixes the sweet banana taste, cinnamon spice, and a hint of vanilla for a familiar, cozy flavor. It makes mornings simple, it fills you up, and it tastes like a treat without the fuss.

The featured recipe below is a true crowd-pleaser, perfect for busy weekdays, work lunches, or a grab-and-go breakfast. It tastes like banana bread, but it is healthy, easy to make ahead, and great for meal prep. Get ready to make a breakfast that feels like dessert, and smile while you eat it.

How to prepare Banana Bread Overnight Oats

Ingredients

  • 1 ripe banana, mashed
  • 1 cup rolled oats
  • 1 cup milk or dairy-free milk
  • 1/2 cup plain yogurt or plant yogurt
  • 1 tablespoon chia seeds
  • 1 teaspoon vanilla extract
  • 1 teaspoon cinnamon
  • 1 tablespoon maple syrup or honey, optional
  • Pinch of salt
  • Optional toppings, chopped nuts, sliced banana, or chocolate chips

Directions

  1. In a bowl or mason jar, mash the ripe banana with a fork until smooth.
  2. Add the rolled oats, milk, yogurt, chia seeds, vanilla, cinnamon, maple syrup, and salt.
  3. Stir well, make sure the oats and chia seeds mix with the liquid.
  4. Close the jar or cover the bowl and chill in the fridge for at least 4 hours, or overnight for best texture.
  5. In the morning, stir the oats. Add a splash of milk if you want it looser.
  6. Top with sliced banana, chopped nuts, or a few chocolate chips, then enjoy.

Banana Bread Overnight Oats

Why You’ll Love Banana Bread Overnight Oats

  • It tastes like banana bread, but it is ready in the morning, no baking needed.
  • The oats and chia seeds keep you full for hours, making it a great healthy breakfast.
  • You can make jars ahead for easy meal prep, great for busy weeks.
  • It uses simple pantry ingredients, rolled oats, banana, cinnamon, and milk.
  • It is easy to change, add yogurt for creaminess, or nuts for crunch.

Tips for success

  • Use a ripe banana, it gives the best banana flavor and natural sweetness.
  • If you like a smoother texture, mash the banana very well or blend it with the milk before mixing.
  • Let the oats sit overnight for the best creamy texture, at least 4 hours if short on time.
  • Stir before serving, add more milk if the oats are too thick.
  • If you want more protein, add a scoop of protein powder or more yogurt.
  • Keep jars refrigerated up to 3 days for easy breakfasts all week.

Serving Suggestions

  • Serve in a mason jar for a neat, portable breakfast.
  • Top with toasted walnuts or pecans for crunch.
  • Add sliced banana and a drizzle of maple syrup for extra sweetness.
  • Sprinkle extra cinnamon or a few dark chocolate chips for a treat feel.
  • Pair with coffee or a green smoothie for a full morning meal.

Banana Bread Overnight Oats

FAQs

Q, Can I use quick oats instead of rolled oats? A, Yes, quick oats work, but the texture may be softer. Rolled oats keep a heartier bite.

Q, How long do overnight oats last in the fridge? A, They stay good for about 3 days in a sealed jar, great for meal prep.

Q, Can I make this recipe dairy free? A, Yes, use almond milk, oat milk, or soy yogurt to make it dairy free.

Q, Can I use frozen bananas? A, Yes, thaw and mash frozen banana before mixing, it works well.

Q, Do I need chia seeds? A, Chia seeds add thickness and fiber, but you can skip them if you want.

Conclusion

If you want more ideas or a similar recipe guide, you can find a nice version at Banana Bread Overnight Oats | Lemons & Zest, it has helpful photos and tips. Enjoy your easy, tasty banana oatmeal and have fun making a breakfast that feels like banana bread.

Banana Bread Overnight Oats

A quick and easy breakfast that tastes like a warm slice of banana bread, made with rolled oats, ripe banana, and cozy spices.

Main Ingredients

  • 1 ripe banana, mashed (Ensure the banana is ripe for better flavor and sweetness.)
  • 1 cup rolled oats (Use rolled oats for best texture.)
  • 1 cup milk or dairy-free milk (Any milk substitute can be used.)
  • 1/2 cup plain yogurt or plant yogurt (Optional for creaminess.)
  • 1 tablespoon chia seeds (Adds thickness and fiber.)
  • 1 teaspoon vanilla extract (For flavor enhancement.)
  • 1 teaspoon cinnamon (To mimic the flavor of banana bread.)
  • 1 tablespoon maple syrup or honey (Optional for added sweetness.)
  • Pinch of salt (Balances flavor.)

Optional Toppings

  • chopped nuts (For crunch.)
  • sliced banana (To enhance banana flavor.)
  • chocolate chips (For a dessert-like treat.)

Preparation

  1. In a bowl or mason jar, mash the ripe banana with a fork until smooth.
  2. Add the rolled oats, milk, yogurt, chia seeds, vanilla, cinnamon, maple syrup, and salt.
  3. Stir well and ensure the oats and chia seeds mix with the liquid.
  4. Close the jar or cover the bowl and chill in the fridge for at least 4 hours, or overnight for best texture.

Serving

  1. In the morning, stir the oats. Add a splash of milk if you want it looser.
  2. Top with sliced banana, chopped nuts, or a few chocolate chips, then enjoy.

Use a ripe banana for the best flavor, and let the oats sit overnight for optimal texture. Keep jars refrigerated up to 3 days for easy breakfasts.
Breakfast
American
Banana Bread Flavored, Easy Recipe, Healthy Breakfast, Meal Prep, Overnight Oats

Air Fryer Chicken Breasts

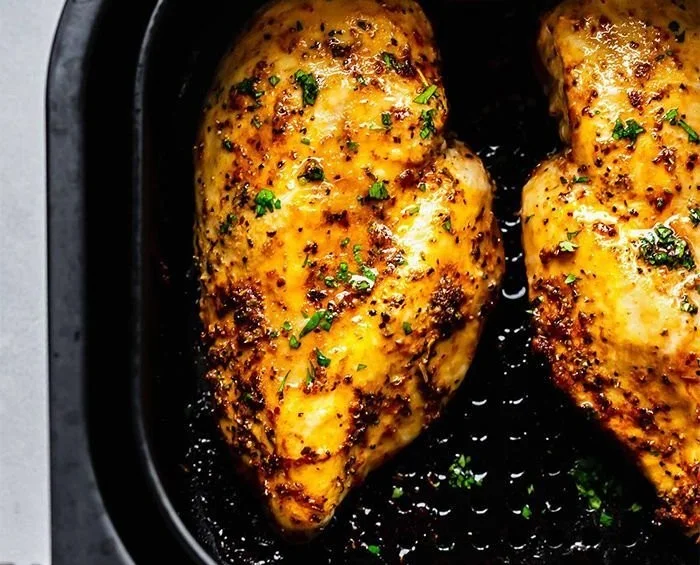
Delicious air fryer chicken breasts garnished with herbs and spices

Air fryer chicken breasts are a simple, fast way to get juicy and tender chicken with a bit of crisp on the outside. This recipe makes chicken that stays moist inside and browns nicely on the outside, so it works great for family dinners or meal prep. The featured recipe for Air Fryer Chicken Breasts is a crowd-pleaser, easy to make, and full of simple flavor from salt, pepper, garlic powder, and a little oil. If you like quick air fryer meals, you can also try an air fryer grilled cheese hot dogs for a fun side idea. You will smile when you taste how tender and juicy the chicken turns out, and you might make it on repeat.

how to prepare Air Fryer Chicken Breasts

  1. Pat 2 boneless skinless chicken breasts dry with paper towel. Trim fat if needed.
  2. Pound each breast to even thickness, about 1/2 inch to 3/4 inch, so they cook evenly.
  3. Brush or rub each breast with 1 to 2 teaspoons of olive oil.
  4. Season both sides with 1/2 teaspoon salt, 1/4 teaspoon black pepper, 1/2 teaspoon garlic powder, and 1/2 teaspoon paprika, or use your favorite spice mix.
  5. Preheat the air fryer to 380 F for 3 minutes.
  6. Place the chicken breasts in the air fryer basket in a single layer. Do not crowd.
  7. Cook at 380 F for 10 to 12 minutes, flipping once at the halfway point. Use a meat thermometer, chicken is done at 165 F internal.
  8. Let the chicken rest 3 to 5 minutes before slicing. This keeps the meat juicy.

Air Fryer Chicken Breasts

Why You’ll Love Air Fryer Chicken Breasts

  • Fast and easy, ready in about 20 minutes total time.
  • Tender and juicy inside, with a light crisp outside from the air fryer.
  • Low fuss, only a few pantry spices and a little oil.
  • Versatile, use for salads, sandwiches, bowls, or as a main dish.
  • Healthier than deep frying, with less oil and less mess.

tips for success

  • Pound the chicken to the same thickness so it cooks evenly.
  • Do not skip the rest time, it keeps juices inside.
  • Use a meat thermometer to be sure you hit 165 F, avoid overcooking.
  • Don’t overcrowd the basket, cook in batches if needed for even air flow.
  • If your chicken is thin, reduce time to avoid drying out, check at 8 minutes.

Serving Suggestions

  • Slice and serve over a green salad with a lemon vinaigrette for a light meal.
  • Make sandwiches with lettuce, tomato, and mayo on toasted bread.
  • Chop and add to rice bowls with roasted veggies and a drizzle of sauce.
  • Serve with steamed broccoli and roasted potatoes for a family plate.
  • Use leftovers in wraps, soups, or pasta for quick lunches.

Air Fryer Chicken Breasts

FAQs

Q: How long do I cook chicken breasts in the air fryer?

A: For average size breasts, cook at 380 F for 10 to 12 minutes, flipping once. Use a thermometer for best results.

Q: Can I cook frozen chicken breasts in the air fryer?

A: Yes, but add time. Cook at 360 F for about 18 to 22 minutes, flip halfway, and check the internal temperature.

Q: How do I keep chicken breasts from drying out?

A: Pound to even thickness, do not overcook, use a little oil, and let the chicken rest for a few minutes after cooking.

Q: Can I use bone-in chicken in the air fryer?

A: You can, but bone-in pieces need longer cooking time and slightly lower temperature, check often and use a thermometer.

Q: What spices work well with air fryer chicken?

A: Simple salt, pepper, garlic powder, paprika work well. You can also try Italian seasoning, lemon pepper, or paprika and cumin for more flavor.

Conclusion

Try the step by step tips and simple spice mix in this recipe, or compare methods with the Well Plated air fryer chicken breast recipe to see small ways to change time and heat. For another clear guide and ideas for juicy, tender results, read the cooking notes at Plating and Pairings air fryer chicken breast recipe.

Air Fryer Chicken Breasts

Quick, juicy, and tender chicken breasts with a crispy outside, perfect for dinner or meal prep.

Main Ingredients

  • 2 pieces boneless skinless chicken breasts (Pound to even thickness)
  • 1-2 teaspoons olive oil (Brush or rub on chicken breasts)
  • 1/2 teaspoon salt (Season both sides)
  • 1/4 teaspoon black pepper (Season both sides)
  • 1/2 teaspoon garlic powder (Season both sides)
  • 1/2 teaspoon paprika (Season both sides)

Preparation

  1. Pat the chicken breasts dry with paper towel and trim any fat if needed.
  2. Pound each breast to even thickness, about 1/2 inch to 3/4 inch.
  3. Brush or rub each breast with olive oil.
  4. Season both sides with salt, pepper, garlic powder, and paprika.

Cooking

  1. Preheat the air fryer to 380°F for 3 minutes.
  2. Place the chicken breasts in the air fryer basket in a single layer.
  3. Cook at 380°F for 10 to 12 minutes, flipping once halfway through.
  4. Use a meat thermometer to ensure the internal temperature reaches 165°F.
  5. Let the chicken rest for 3 to 5 minutes before slicing.

Pound the chicken to the same thickness for even cooking. Do not skip resting time. Avoid overcrowding the basket. If using thin chicken, check for doneness at 8 minutes.

Dinner, Main Course
American
Air Fryer Chicken, Chicken Breasts, Easy Recipes, Healthy Chicken, Quick Dinner

Air Fryer Calzones

Delicious homemade air fryer calzones filled with cheese and toppings

Warm, cheesy, and ready fast, Air Fryer Calzones are a quick way to get a hot, homemade meal on the table. They give you the same cozy pizza flavors wrapped in a golden pocket, and kids and adults both love them. This recipe is a crowd-pleaser because it is crispy outside, gooey inside, and easy to make with simple ingredients. If you like easy air fryer meals, you might also enjoy the air fryer grilled cheese hot dogs for another fun snack idea. Get your apron on, because you will want to make these again and again.

how to prepare Air Fryer Calzones

Ingredients

  • 1 pound pizza dough, store bought or homemade
  • 1 cup marinara sauce, plus more for dipping
  • 1 1/2 cups shredded mozzarella cheese
  • 12-16 slices pepperoni, or cooked sausage, or vegetables
  • 1 egg, beaten, for egg wash
  • 1 tablespoon olive oil
  • 1/2 teaspoon garlic powder
  • 1/2 teaspoon dried oregano
  • Salt and pepper, to taste
  • Optional, grated Parmesan for topping

Directions

  1. Preheat your air fryer to 370°F, about 3 to 5 minutes.
  2. Lightly flour a clean surface and roll the pizza dough into a rough circle, about 10 to 12 inches across.
  3. Cut the dough into 4 equal pieces, or use a round cutter to make 4 to 6 circles, depending on your size choice.
  4. Mix olive oil, garlic powder, oregano, salt, and pepper. Brush a little oil on the edges of each dough piece.
  5. Spoon 2 tablespoons marinara on one half of each piece, leaving a clean edge. Add a handful of mozzarella and a few pepperoni slices. Do not overfill.
  6. Fold the dough over to cover the filling, press edges to seal, and crimp with a fork or pinch firmly to close.
  7. Brush each calzone with beaten egg for a golden top, and sprinkle a little Parmesan if you want.
  8. Place calzones in the air fryer basket, seam side down, leaving space so air can move. Cook at 370°F for 8 to 12 minutes, until the crust is golden brown and the cheese is melted. You may need to cook in batches.
  9. Let the calzones rest for 2 minutes before serving, they will be very hot inside. Serve with warm marinara for dipping.

Air Fryer Calzones

Why You’ll Love Air Fryer Calzones

  • Fast cooking time, you get a hot meal in under 20 minutes.
  • Crispy outside and melty cheese inside, a perfect contrast.
  • Easy to change the filling, use pepperoni, veggies, or chicken.
  • Less oil than frying, and less heat in your kitchen than an oven.

tips for success

  • Don’t overfill the calzones, too much filling makes them leak.
  • Seal edges well, pinch and crimp or use a fork to press the dough closed.
  • Use parchment or a light spray in the basket to stop sticking.
  • Cook in a single layer with space between calzones so air flows.
  • If the top browns too fast, lower the temperature a little and add a minute or two to the time.
  • Let them cool for a minute or two before cutting, so the cheese sets a bit.

Serving Suggestions

  • Serve with warm marinara sauce for dipping.
  • Add a side salad, simple greens with lemon and olive oil.
  • Try garlic butter brushed on top for extra flavor.
  • Serve with roasted veggies or a cup of soup for a fuller meal.
  • Great as a party snack, cut into smaller pieces for sharing.

Air Fryer Calzones

FAQs

Q: Can I freeze calzones before cooking?

A: Yes, shape and freeze on a tray until firm, then wrap each one and store in a freezer bag. Cook from frozen, add a few extra minutes to the cook time at 370°F.

Q: How do I reheat leftover calzones?

A: Reheat in the air fryer at 350°F for 3 to 5 minutes, or until warm. This keeps the crust crisp.

Q: Can I use store bought pizza sauce?

A: Yes, store bought marinara works great. You can also use pesto or alfredo for a different taste.

Q: What fillings are good for kids?

A: Keep it simple, mozzarella and pepperoni or cooked chicken and cheese are usually a hit.

Q: Do I need to brush with egg?

A: No, egg gives a nice golden color, but olive oil works fine if you want to skip the egg.

Conclusion

Air Fryer Calzones are a simple, tasty way to enjoy pizza flavors fast, and they work for weeknight dinners or weekend snacks. For another easy air fryer calzone idea, check this helpful recipe for Air Fryer Calzones (Crazy Easy) – Momsdish that shows a basic method and tips. If you want a spicy twist, see this version for Air Fryer Buffalo Chicken Calzones – The Creative Bite for a buffalo chicken filling idea.

Air Fryer Calzones

Warm, cheesy, and ready fast, Air Fryer Calzones are a quick way to get a hot, homemade meal with cozy pizza flavors wrapped in a golden pocket.

Dough and Filling

  • 1 pound pizza dough, store bought or homemade
  • 1 cup marinara sauce, plus more for dipping
  • 1.5 cups shredded mozzarella cheese
  • 12-16 slices pepperoni, or cooked sausage, or vegetables (Choose your favorite filling)
  • 1 large egg, beaten, for egg wash (Optional, for golden top)
  • 1 tablespoon olive oil (For brushing)

Spices and Seasoning

  • 0.5 teaspoon garlic powder
  • 0.5 teaspoon dried oregano
  • to taste Salt and pepper
  • optional grated Parmesan for topping (For extra flavor)

Preparation

  1. Preheat your air fryer to 370°F, about 3 to 5 minutes.
  2. Lightly flour a clean surface and roll the pizza dough into a rough circle, about 10 to 12 inches across.
  3. Cut the dough into 4 equal pieces, or use a round cutter to make 4 to 6 circles, depending on your size choice.
  4. Mix olive oil, garlic powder, oregano, salt, and pepper. Brush a little oil on the edges of each dough piece.
  5. Spoon 2 tablespoons marinara on one half of each piece, leaving a clean edge. Add a handful of mozzarella and a few pepperoni slices. Do not overfill.
  6. Fold the dough over to cover the filling, press edges to seal, and crimp with a fork or pinch firmly to close.
  7. Brush each calzone with beaten egg for a golden top, and sprinkle a little Parmesan if you want.

Cooking

  1. Place calzones in the air fryer basket, seam side down, leaving space so air can move.
  2. Cook at 370°F for 8 to 12 minutes, until the crust is golden brown and the cheese is melted. You may need to cook in batches.
  3. Let the calzones rest for 2 minutes before serving, they will be very hot inside.

Tips for success include: Don’t overfill the calzones to prevent leakage, seal edges well, and use parchment or a light spray in the basket to stop sticking.

Dinner, Snack
Italian
Air Fryer Calzones, Easy Calzones, Homemade Calzones, Quick Meals

Lemon Chicken Asparagus Stir-Fry

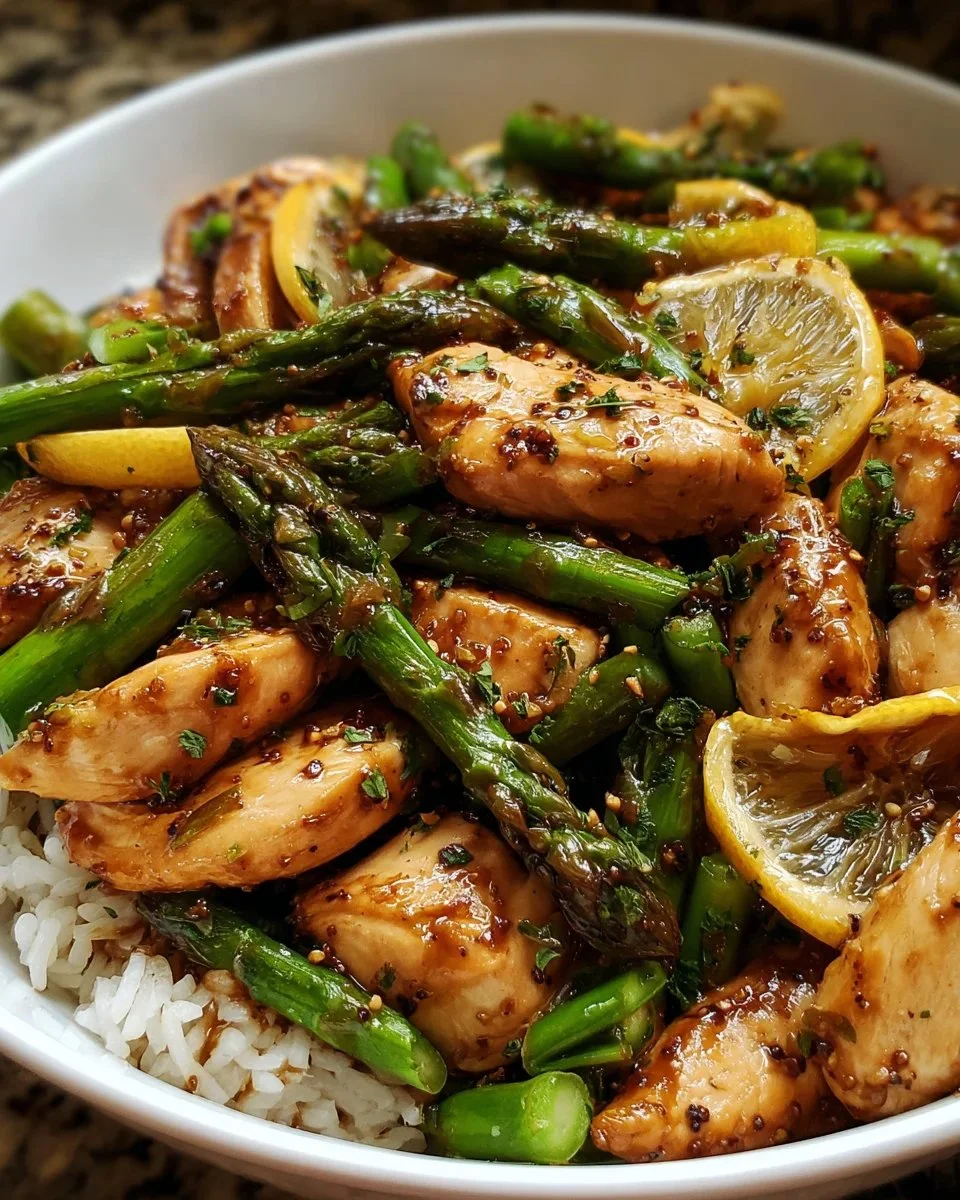
Lemon Chicken Stir-Fry with asparagus in a vibrant stir-fry dish

This Lemon Chicken Asparagus Stir-Fry is bright, simple, and full of fresh flavor. It mixes juicy, tender chicken with crisp asparagus and a lemon sauce that wakes up every bite. The dish cooks fast, cleans up fast, and feeds a hungry family or a small crowd with little fuss. It is a true crowd-pleaser, with a tangy lemon taste, a touch of garlic, and a bit of sweetness that many people love. Get ready to make a tasty, healthy meal that feels special, but comes together like a weeknight classic, and have fun cooking it tonight.

how to prepare Lemon Chicken Asparagus Stir-Fry

  1. Cut 1 pound of boneless chicken into thin strips, pat dry, and season with salt and pepper.
  2. Trim and cut 1 bunch of asparagus into 2 inch pieces. Prepare 2 cloves garlic, minced, and 1 teaspoon lemon zest.
  3. Mix the sauce in a bowl, use 3 tablespoons lemon juice, 2 tablespoons soy sauce, 1 tablespoon honey or sugar, and 1 teaspoon cornstarch, stir until smooth.
  4. Heat 1 to 2 tablespoons oil in a large pan over medium-high heat. Add chicken in a single layer, cook 3 to 4 minutes until lightly browned and cooked through, then remove from pan.
  5. In the same pan, add a little more oil if needed, cook asparagus 2 to 3 minutes until bright green and just tender. Add garlic and cook 30 seconds until fragrant.
  6. Return chicken to the pan, pour in the lemon sauce, stir and cook 1 to 2 minutes until sauce thickens and coats the chicken and asparagus. Taste and adjust salt or lemon if needed.
  7. Turn off heat, sprinkle lemon zest and chopped green onions if you like, serve hot over rice or noodles.

Lemon Chicken Asparagus Stir-Fry

Why You’ll Love Lemon Chicken Asparagus Stir-Fry

  • Quick to make, it works well for busy weeknights.
  • Bright lemon flavor lifts the whole dish, it tastes fresh and light.
  • The asparagus stays crisp and adds a nice texture, while the chicken stays tender.
  • One pan, simple sauce, and easy clean up, perfect for a fast, healthy dinner.
  • The recipe is flexible, you can swap vegetables or use thighs or breasts with good results.

tips for success

  • Cut chicken thin and even, it cooks fast and cooks evenly.
  • Use a hot pan and do not crowd the chicken, brown it in one layer.
  • Cook asparagus until bright green, avoid overcooking to keep a nice crunch.
  • Use fresh lemon juice and a little zest for the best citrus taste.
  • Mix cornstarch with cold water first, then add to sauce to avoid lumps.
  • Taste the sauce before serving, add a pinch of sugar if it needs balance.
  • Make extra sauce if you like a saucier stir-fry.

Serving Suggestions

  • Serve over steamed white rice, brown rice, or quick-cooking noodles.
  • Try it with quinoa for a healthy, gluten-free side.
  • Add sesame seeds or sliced green onions on top for extra flavor.
  • Serve with lemon wedges on the side for extra brightness.
  • Pair with a simple green salad for a full, light meal.

Lemon Chicken Asparagus Stir-Fry

FAQs

Q: Can I use chicken thighs instead of chicken breast?

A: Yes, chicken thighs work well, they stay juicy and add a bit more flavor. Cut them into thin pieces and cook until done.

Q: How long will leftovers keep?

A: Store in an airtight container in the fridge for 3 to 4 days. Reheat gently in a pan or microwave, add a splash of water to keep it moist.

Q: Can I make this gluten-free?

A: Yes, use gluten-free soy sauce or tamari and make sure any other sauces you use are gluten-free.

Q: What can I use instead of asparagus?

A: Broccoli, snap peas, green beans, or bell peppers are good swaps and cook quickly in the pan.

Q: Can I prepare this ahead of time?

A: You can cut the chicken and vegetables ahead, and mix the sauce. Cook fresh for best texture, but you can reheat leftovers.

Conclusion

If you want another simple take or a quick reference for a similar lemon chicken and asparagus recipe, check this easy version at Lemon Chicken and Asparagus Stir Fry {20 Min Meal} | Lil’ Luna, it can give you a helpful step by step and ideas to try.

Lemon Chicken Asparagus Stir-Fry

This Lemon Chicken Asparagus Stir-Fry is quick, bright, and full of fresh flavor, mixing juicy chicken with crisp asparagus and a tangy lemon sauce.

Main Ingredients

  • 1 pound boneless chicken, cut into thin strips (Pat dry and season with salt and pepper.)
  • 1 bunch asparagus, trimmed and cut into 2-inch pieces
  • 2 cloves garlic, minced
  • 1 teaspoon lemon zest (For garnishing.)

Sauce Ingredients

  • 3 tablespoons lemon juice (Freshly squeezed for best flavor.)
  • 2 tablespoons soy sauce (Use gluten-free if needed.)
  • 1 tablespoon honey or sugar (For a touch of sweetness.)
  • 1 teaspoon cornstarch (Mix with cold water before adding to avoid lumps.)

For Cooking

  • 1-2 tablespoons oil (For frying; use as needed.)

Preparation

  1. Cut the chicken into thin strips, pat dry, and season with salt and pepper.
  2. Trim and cut the asparagus into 2-inch pieces.
  3. Prepare the garlic by mincing it and zest the lemon.
  4. Mix the sauce in a bowl: combine lemon juice, soy sauce, honey or sugar, and cornstarch. Stir until smooth.

Cooking

  1. Heat oil in a large pan over medium-high heat.
  2. Add chicken in a single layer and cook for 3 to 4 minutes until lightly browned and cooked through, then remove from pan.
  3. In the same pan, add a little more oil if needed. Cook asparagus for 2 to 3 minutes until bright green and just tender.
  4. Add garlic and cook for 30 seconds until fragrant.
  5. Return chicken to the pan, pour in lemon sauce, stir and cook for 1 to 2 minutes until the sauce thickens and coats the chicken and asparagus.
  6. Taste and adjust salt or lemon as needed.
  7. Turn off heat and sprinkle with lemon zest and chopped green onions if desired.
  8. Serve hot over rice or noodles.

Cut chicken thin and evenly for fast cooking. Use fresh lemon juice for the best flavor. Taste the sauce before serving and add a pinch of sugar if it needs balance.

Dinner, Main Course
Asian, Healthy
Asparagus, Healthy Meal, Lemon Chicken, Quick Dinner, Stir-Fry

Creamy Salmon Asparagus Pasta

Creamy salmon asparagus pasta garnished with fresh herbs in a bowl.

Making Creamy Salmon Asparagus Pasta is easier than you might think! Start by boiling your favorite pasta according to the package instructions. While that cooks, sauté fresh asparagus in a bit of olive oil until tender. Add pieces of cooked salmon and let them warm through. Now, for the creamy part, mix together heavy cream, garlic, lemon juice, and some grated Parmesan cheese in a separate bowl. Once the pasta is done, drain it, and then toss everything together in the pan. You can adjust the seasoning with salt and pepper. In just a short time, you’ll have a delicious and creamy pasta dish to share!

Creamy Salmon Asparagus Pasta

Why You’ll Love Creamy Salmon Asparagus Pasta

This dish is truly a crowd-pleaser! The creamy sauce pairs perfectly with the tender asparagus and flaky salmon, creating a wonderful mix of flavors. It’s rich, comforting, and feels fancy enough for a special dinner or date night. Plus, it’s packed with protein and veggies, making it a balanced meal. Who wouldn’t love a plate of this delightful pasta? It’s a comforting hug in a bowl that you’ll want to make again and again.

Tips for Success

To make sure your Creamy Salmon Asparagus Pasta turns out perfect, here are a few tips. First, don’t overcook the pasta; it should have a slight bite to it, known as al dente. Second, use fresh asparagus for the best texture and flavor. If you like a bit of spice, add some red pepper flakes to the sauce. Finally, feel free to swap the salmon for another fish or even grilled chicken if you prefer.

Serving Suggestions

Serve your Creamy Salmon Asparagus Pasta with a simple green salad for a fresh contrast. A slice of crusty bread or garlic bread would be great, too, to mop up any leftover sauce. And don’t forget a glass of white wine, like a crisp Sauvignon Blanc, to elevate your meal!

FAQs

Can I use canned salmon?

Yes, canned salmon works well too. Just drain it and flake it into the pasta towards the end of cooking.

Can I make this pasta ahead of time?

While it’s best enjoyed fresh, you can prepare the sauce ahead and store it in the fridge. Just heat it up before mixing it with the pasta.

What can I substitute for heavy cream?

If you’re looking for a lighter option, you can use half-and-half or a dairy-free cream alternative, but the sauce will be less rich.

Get ready to enjoy a plate of deliciousness with this Creamy Salmon Asparagus Pasta! It’s tasty, satisfying, and simply fun to make. Grab your ingredients and let’s get cooking!

Creamy Salmon Asparagus Pasta

A rich and comforting pasta dish featuring creamy sauce, fresh asparagus, and flaky salmon, perfect for a special dinner or date night.

Pasta and Veggies

  • 8 ounces pasta (your choice) (Cook according to package instructions)
  • 1 bunch fresh asparagus (Trimmed and cut into pieces)
  • 1 tablespoon olive oil (For sautéing asparagus)

Creamy Sauce

  • 1 cup heavy cream (Can substitute with half-and-half or dairy-free cream alternative)
  • 2 cloves garlic (Minced)
  • 2 tablespoons lemon juice (Freshly squeezed)
  • 1/2 cup grated Parmesan cheese (For added creaminess and flavor)

Salmon

  • 2 cups cooked salmon (Flaked or in pieces)

Seasoning

  • salt to taste
  • pepper to taste
  • red pepper flakes (optional) (For added spice)

Cooking the Pasta and Asparagus

  1. Boil pasta according to package instructions until al dente.
  2. While the pasta cooks, heat olive oil in a pan and sauté asparagus until tender.

Preparing the Sauce

  1. In a separate bowl, mix together heavy cream, minced garlic, lemon juice, and grated Parmesan cheese.

Combining Ingredients

  1. Once the pasta is cooked, drain it and add it to the pan with the asparagus.
  2. Add the cooked salmon and creamy sauce to the pan, tossing everything together.
  3. Adjust seasoning with salt, pepper, and red pepper flakes if desired.

For best results, serve immediately. You can store the sauce in the fridge and reheat before adding to pasta. Enjoy with a fresh salad and crusty bread.

Dinner, Main Course
Italian
Asparagus Dish, Comfort Food, Creamy Pasta, Easy Dinner, Salmon Pasta