High Protein Overnight Oats

High-Protein Overnight Oats are a delightful way to start your day. They are simple to make, filling, and packed with nutrients. Imagine waking up to a creamy bowl of oats that have soaked overnight, infused with flavors and topped with your favorite ingredients. This recipe is not just a breakfast, it’s a treat that many people rave about because of its great taste and satisfying texture. Plus, if you’re looking to add a bit more protein to your morning routine, these oats are a perfect choice. You’ll find yourself eager to measure out those ingredients, ready to enjoy a nutritious and delicious breakfast!

Why You’ll Love High-Protein Overnight Oats

These High-Protein Overnight Oats are a fantastic option for busy mornings. They are incredibly versatile, allowing you to customize with fruits, nuts, and seeds. Each bite is creamy and flavorful, making it hard to believe something so healthy can taste this good. You can prepare several servings ahead of time, so breakfast is ready whenever you are. They are not only convenient but also help keep you full and energized throughout the morning.

Tips for Success

When making these overnight oats, consider the texture you enjoy. If you like a thicker consistency, use less liquid, whereas if you prefer a creamier bowl, add a bit more. Another great tip is to let your oats chill in the refrigerator for at least a few hours or overnight, allowing the flavors to meld together beautifully. If you’re looking for additional inspiration, try variations of overnight oats like this high-protein tiramisu overnight oats recipe for a unique twist.

High-Protein Overnight Oats

Serving Suggestions

These oats are delightful served straight from the jar, but you can also dress them up. Top with fresh fruits like berries or banana slices for a burst of flavor and nutrients. A drizzle of honey or maple syrup adds a hint of sweetness, while a sprinkle of nuts or seeds gives a satisfying crunch. You can also experiment with yogurt or nut butter for added creaminess and protein. The possibilities are endless, so have fun creating your perfect bowl!

FAQs

Can I use quick oats instead of rolled oats?

Yes, you can use quick oats. They will give a different texture, becoming softer and creamier.

How long can I store overnight oats in the fridge?

Overnight oats can be stored in the fridge for up to five days, making them great for meal prep.

Can I make these oats vegan?

Absolutely! Use plant-based milk like almond milk or oat milk and choose a vegan protein powder if needed.

High-Protein Overnight Oats

Start your day with creamy and nutritious High-Protein Overnight Oats, perfect for busy mornings and easily customizable with your favorite toppings.

Base Ingredients

  • 1 cup rolled oats (Use quick oats for a softer texture.)
  • 2 cups milk of choice (Almond milk or oat milk can be used for a vegan option.)
  • 2 scoops protein powder (Choose a flavor that complements your oats.)

Toppings

  • 1 banana sliced banana (Fresh or can use frozen.)
  • 1 cup berries (Any mix of berries works well.)
  • 2 tablespoons honey or maple syrup (Adjust to taste.)
  • 2 tablespoons nuts or seeds (Choose your favorites for crunch.)

Preparation

  1. In a bowl or jar, combine rolled oats, milk, and protein powder.
  2. Mix thoroughly to ensure the oats are well-coated with the liquid.
  3. Cover and refrigerate for at least 4 hours or overnight.

Serving

  1. Remove from the fridge and stir the oats before serving.
  2. Top with sliced banana, berries, and your choice of sweetener.
  3. Add nuts or seeds for extra crunch and enjoy!

Consider the texture you prefer; use more or less liquid to achieve desired consistency. Overnight oats can be stored in the fridge for up to five days.

Breakfast, Snack
American
Easy Recipe, Healthy Breakfast, high-protein breakfast, Meal Prep, Overnight Oats

High Protein Freezer Breakfast

Starting your day with a healthy meal can set a positive tone for everything that follows. If you’re looking for a simple and delicious breakfast that’s quick to prepare and easy to store, then you will absolutely adore these high protein freezer friendly breakfast bowls. They are not only nutritious but also packed with flavor, making them a favorite among busy folks who still want to enjoy a hearty meal in the morning. Imagine waking up to a warm, savory bowl filled with wholesome ingredients that give you the energy to tackle your day. Sounds delightful, right?

How to prepare High Protein Freezer Breakfast

Preparing these bowls is easy and fun. Start by gathering all your favorite ingredients, such as eggs, vegetables, and a good source of protein like chicken or beans. Whisk your eggs and mix in the vegetables along with seasoning to taste. Next, cook everything in a skillet until the eggs are just set. Portion the mixture into freezer-safe containers and let them cool. Finally, freeze your breakfast bowls for later enjoyment.

High Protein Freezer Friendly Breakfast Bowls You'll Love

Why You’ll Love High Protein Freezer Breakfast

One of the many reasons you’ll love these breakfast bowls is their versatility. You can customize them with different protein sources, veggies, and spices, creating variations that suit your taste buds. Not only are they convenient, but they also make sure you start your day with enough protein to keep you full and satisfied. Plus, if you’re in a rush, you can quickly reheat them, giving you a warm meal in minutes.

Tips for success

To make your breakfast bowls even better, consider these helpful tips. First, choose vegetables that freeze well, such as bell peppers and spinach, to maintain their flavor and texture. Secondly, allow the cooked ingredients to cool before sealing them in containers to avoid condensation. Lastly, don’t forget to label your containers; it makes it easier to grab the right bowl in the morning rush. For more meal prep ideas, check out these easy high protein breakfast boxes that are just as delicious and satisfying.

High Protein Freezer Friendly Breakfast Bowls You'll Love

Serving Suggestions

These breakfast bowls can be enjoyed as is, but you might want to add some toppings for extra flavor. A dollop of Greek yogurt or a sprinkle of feta cheese can elevate your meal beautifully. You could also pair them with a side of fresh fruit or whole grain toast for a complete breakfast experience. Get creative and make it your own!

FAQs

1. Can I prepare these breakfast bowls ahead of time?

Absolutely! These bowls are designed to be made in advance and frozen for later use.

2. How long do they last in the freezer?

These breakfast bowls can be stored in the freezer for up to three months.

3. Can I reheat them in the microwave?

Yes, just make sure to remove any plastic wrap and cover them with a microwave-safe lid or plate to retain moisture while reheating.

High Protein Freezer Breakfast Bowls

Start your day with these delicious and nutritious breakfast bowls that are high in protein and easy to store and reheat.

For the Breakfast Bowls

  • 8 large large eggs (Whisked)
  • 1 cup mixed vegetables (bell peppers, spinach, etc.) (Choose vegetables that freeze well)
  • 1 cup cooked chicken or beans (Good source of protein)
  • to taste seasoning (salt, pepper, etc.) (Adjust according to preference)

Preparation

  1. Gather all your ingredients: eggs, vegetables, and a protein source.
  2. Whisk the eggs and mix in the vegetables and seasoning to taste.
  3. Cook the mixture in a skillet until the eggs are just set.
  4. Portion the mixture into freezer-safe containers and let them cool.
  5. Freeze the breakfast bowls for later enjoyment.

For added flavor, consider topping your breakfast bowls with Greek yogurt or feta cheese. Pair with fresh fruit or whole grain toast for a complete breakfast. Label your containers for easy retrieval in the morning rush.

Breakfast, Meal Prep
American
Breakfast Bowls, Freezer Friendly, Healthy, High Protein, Meal Prep

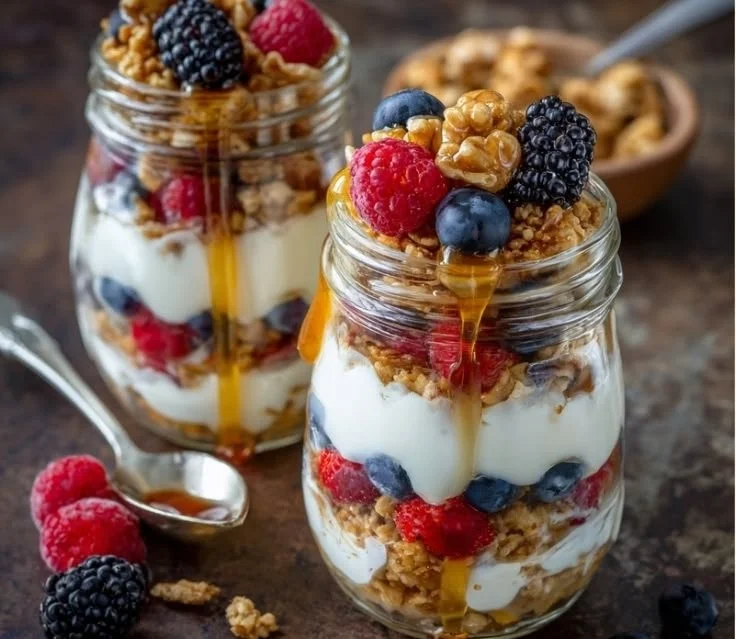
Overnight Yogurt Parfait Jars

Overnight yogurt parfait jars with layers of yogurt, fruit, and granola.

There’s something truly special about starting your day with a breakfast that feels more like a treat, and Overnight Yogurt Parfait Jars do exactly that. They are delicious, nutritious, and oh-so-easy to prepare. Perfect for busy mornings or even as a delightful snack, these parfaits are a wonderful combination of creamy yogurt, fresh fruits, and crunchy granola. Each layer offers a burst of flavor and texture that will make your taste buds dance with joy. Plus, they are a crowd-pleaser at brunches or gatherings, leaving everyone wanting seconds. So, grab your jars and get ready to whip up this tasty recipe that you will surely want to make time and time again!

Overnight Yogurt Parfait Jars

How to prepare Overnight Yogurt Parfait Jars

To make these delightful parfaits, you will need:

  • 2 cups of your favorite yogurt (plain or flavored)
  • 1 cup of granola
  • 2 cups of fresh fruit (like berries, bananas, or peaches)
  • Honey or maple syrup (optional for extra sweetness)
  1. Start by layering half of the yogurt in the bottom of a jar.
  2. Add a layer of granola on top of the yogurt.
  3. Next, add a layer of your chosen fresh fruit.
  4. Repeat the layers with the remaining yogurt, granola, and fruit.
  5. If you want extra sweetness, drizzle honey or maple syrup on top.
  6. Close the jars and refrigerate them overnight.

{image_2}

Overnight Yogurt Parfait Jars

Why You’ll Love Overnight Yogurt Parfait Jars

You will love Overnight Yogurt Parfait Jars for many reasons. First, they are incredibly versatile. You can use any yogurt flavor and mix it up with different fruits and granola types weekly. This keeps breakfast exciting and never boring. Second, they are perfect for meal prep. Just prepare a few jars at once, and you have your breakfast ready for the week. Finally, they are not just tasty but also healthy. Packed with protein, vitamins, and fiber, these parfaits give you the energy you need to kick start your day!

Tips for success

  • Use a variety of fruits for added color and flavor.
  • Make sure to store the parfaits in airtight jars to keep them fresh.
  • For a more indulgent treat, add a layer of nuts or seeds.
  • Experiment with different yogurts, like Greek or plant-based, for various textures and flavors.

{image_1}

Serving Suggestions

These Overnight Yogurt Parfait Jars can be served chilled straight from the fridge. They also work great as a dessert or a snack during the day. For brunch, place a selection of parfait jars on a platter, and let your guests choose their favorite flavors. You might even add a sprinkle of cinnamon or a dollop of nut butter for an extra touch!

FAQs

Can I make these jars vegan?

Yes, you can use plant-based yogurt and make sure to choose granola that is dairy-free.

How long can I store these parfaits in the fridge?

They can be stored for up to three days in the fridge. Just make sure to cover them properly.

Can I use frozen fruit?

Yes, you can use frozen fruit! Just make sure to thaw them slightly before layering in the jars.

Overnight Yogurt Parfait Jars

Delicious and nutritious breakfast parfaits made with yogurt, fresh fruits, and granola, perfect for busy mornings or a satisfying snack.

For the parfaits

  • 2 cups favorite yogurt (plain or flavored) (Choose your preferred yogurt flavor.)
  • 1 cup granola (Use your favorite granola.)
  • 2 cups fresh fruit (like berries, bananas, or peaches) (You can mix and match different fruits.)
  • to taste Honey or maple syrup (Optional for extra sweetness.)

Preparation

  1. Layer half of the yogurt in the bottom of a jar.
  2. Add a layer of granola on top of the yogurt.
  3. Next, add a layer of your chosen fresh fruit.
  4. Repeat the layers with the remaining yogurt, granola, and fruit.
  5. If you want extra sweetness, drizzle honey or maple syrup on top.
  6. Close the jars and refrigerate them overnight.

These parfaits are versatile, great for meal prep, and packed with nutrients. Feel free to use plant-based yogurt and dairy-free granola for a vegan option. Store in airtight jars and consume within three days.

Breakfast, Brunch, Snack
American
Easy Recipe, Healthy Breakfast, Meal Prep, Nutritious Snack, Yogurt Parfait

Egg Muffins with Spinach and Feta

Savory egg muffins with spinach and feta cheese, perfect for a healthy meal.

I love a simple breakfast that feels a bit special, and Egg Muffins with Spinach and Feta do just that. They are light, savory, and full of green spinach and tangy feta cheese. These muffins cook fast, they hold well for meal prep, and they please both kids and adults. This recipe is a true crowd-pleaser, with soft egg, bright spinach, and salty feta in every bite. You will smile when you smell them baking, and you might eat one straight from the tin, warm and happy.

How to prepare Egg Muffins with Spinach and Feta

  1. Preheat the oven to 180°C (350°F). Grease a 12-cup muffin tin or use liners.
  2. Chop about 2 cups of fresh spinach, or thaw and drain 1 cup of frozen spinach. Squeeze out extra water.
  3. In a bowl, whisk 8 large eggs with 1/3 cup milk, a pinch of salt, and a little black pepper.
  4. Mix in the spinach and about 3/4 cup crumbled feta cheese. You can add 1/4 cup chopped onion or bell pepper if you like.
  5. Spoon the egg mix into the muffin cups, filling each about 3/4 full.
  6. Bake for 18 to 22 minutes, until the muffins are set and the tops are lightly golden. A toothpick comes out clean.
  7. Let the muffins cool in the tin for a few minutes, then move them to a rack. Serve warm, or cool completely to store.

Egg Muffins with Spinach and Feta

Why You’ll Love Egg Muffins with Spinach and Feta

  • They are quick to make, and they bake all at once.
  • These egg muffins are great for make ahead breakfasts and meal prep.
  • Spinach adds color and vitamins, feta adds salty, tangy flavor.
  • They are easy to change, add herbs, or swap cheese.
  • They are high in protein and keep you full longer.

Tips for success

  • Drain the spinach well, extra water makes the muffins soggy.
  • Do not overfill the cups, eggs will puff up while baking.
  • Whisk the eggs until the yolk and white look even, this helps a smooth texture.
  • Use room temperature eggs for even cooking.
  • Check at 18 minutes, ovens vary, you want set but not dry muffins.
  • Cool fully before freezing in a zip bag for up to 2 months.

Serving Suggestions

  • Serve hot with toast or a simple green salad for a light lunch.
  • Pack two muffins in a lunchbox with fruit and yogurt for an easy meal.
  • Top with a spoon of salsa or a little hot sauce for more flavor.
  • Pair with roasted potatoes or a slice of avocado for a heartier plate.

Egg Muffins with Spinach and Feta

FAQs

Q: Can I make these ahead and reheat them?
A: Yes, bake, cool, and store in the fridge for up to 4 days. Reheat in the microwave for 30 to 60 seconds.

Q: Can I freeze egg muffins?
A: Yes, cool fully, wrap or place in a freezer bag, freeze up to 2 months. Reheat from frozen in the microwave for 60 to 90 seconds, or thaw in the fridge overnight.

Q: Can I use other greens or cheese?
A: Yes, kale, chard, or arugula work. Try goat cheese, cheddar, or mozzarella instead of feta.

Q: Do I need milk in the eggs?
A: Milk makes the muffins a bit softer, but you can skip it or use water or a splash of cream.

Q: How do I make them dairy free?
A: Leave out the feta, add savory herbs, and use a dairy free cheese if you like.

Conclusion

If you want another variation or visual guide, check this simple recipe for inspiration, Spinach Feta Egg Cups – Perchance to Cook. Enjoy making these egg muffins, they are a small, tasty win any morning.

Egg Muffins with Spinach and Feta

A delicious and healthy breakfast option, these egg muffins are packed with spinach and feta cheese, making them a quick and satisfying meal prep choice that pleases the whole family.

Main Ingredients

  • 8 large eggs (Use room temperature for even cooking.)
  • 1/3 cup milk (Can substitute with water or cream.)
  • 2 cups fresh spinach (Chopped or thawed if frozen. Drain well.)
  • 3/4 cup crumbled feta cheese (Can replace with goat cheese or cheddar.)
  • 1/4 cup chopped onion or bell pepper (Optional add-in for extra flavor.)
  • 1 pinch salt (To taste.)
  • To taste black pepper (Add according to preference.)

Preparation

  1. Preheat the oven to 180°C (350°F). Grease a 12-cup muffin tin or use liners.
  2. Chop about 2 cups of fresh spinach or thaw and drain 1 cup of frozen spinach, squeezing out extra water.
  3. In a bowl, whisk the eggs with milk, salt, and black pepper until mixed well.
  4. Mix in the spinach and feta cheese (and onion or bell pepper if using).
  5. Spoon the egg mixture into muffin cups, filling each about 3/4 full.

Baking

  1. Bake for 18 to 22 minutes, until muffins are set and tops are lightly golden. Use a toothpick to check if it comes out clean.
  2. Let the muffins cool in the tin for a few minutes before transferring to a rack.
  3. Serve warm or cool completely to store.

Drain spinach well to avoid sogginess. Do not overfill muffin cups as eggs will puff up while baking. Cool fully before freezing, can last up to 2 months.

Breakfast, Brunch
American
Egg Muffins, Healthy Breakfast, Meal Prep, Quick Breakfast, Spinach and Feta

Easy Yogurt Granola Bowls (4 Ways!)

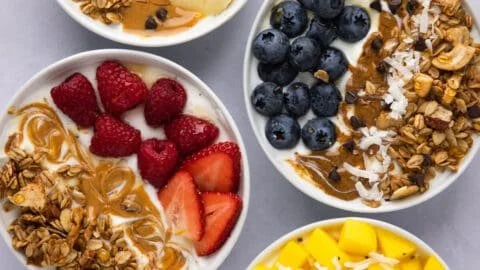
Delicious yogurt granola bowls served in colorful dishes with fresh fruits

Welcome to a simple, tasty idea for breakfast or a snack, Easy Yogurt Granola Bowls (4 Ways!). This dish is quick to make, healthy, and works for any time you want something fresh and crunchy. Each bowl mixes creamy yogurt with crunchy granola and fresh fruit, so every bite feels bright and satisfying. It’s a crowd-pleaser because you can change it up fast, and everyone can pick their favorite mix-ins. Get ready to build a bowl you will want to eat again and again.

How to prepare Easy Yogurt Granola Bowls (4 Ways!)

  1. Start with plain or flavored yogurt, about 1 cup per bowl. Spoon the yogurt into a bowl.
  2. Add 1/2 to 3/4 cup granola on top for crunch.
  3. Choose one of the 4 ways below and add the toppings.
  • Classic Berry: fresh strawberries, blueberries, a drizzle of honey.
  • Tropical: diced mango, pineapple, shredded coconut.
  • Nutty Banana: sliced banana, chopped almonds or walnuts, a pinch of cinnamon.
  • Apple Cinnamon: chopped apple, raisins, a little maple syrup and cinnamon.
  1. Stir a little if you like mixed textures, or leave layers for a pretty bowl.
  2. Taste, then add a touch more honey or a squeeze of lemon if you want more flavor.
  3. Serve right away for the best crunch, or cover and chill for up to a few hours, knowing the granola may soften.

Easy Yogurt Granola Bowls (4 Ways!)

Why You’ll Love Easy Yogurt Granola Bowls (4 Ways!)

  • They are fast to make, perfect for busy mornings or an easy snack.
  • You get creamy yogurt, crunchy granola, and fresh fruit in one bowl, great for texture and taste.
  • They are easy to change, so kids and adults can each have the flavors they like.
  • This recipe is healthy, full of protein, fiber, and real fruit to start your day well.

Tips for success

  • Use cold yogurt for a fresh taste.
  • Keep granola in a sealed bag or jar so it stays crunchy.
  • Add wet toppings like chopped fruit last to keep the granola crisp.
  • If you need more protein, choose Greek yogurt or add a spoon of nut butter.
  • Chop fruit into even pieces so every bite is balanced.

Serving Suggestions

  • Serve with a side of toast or a boiled egg for a fuller breakfast.
  • Pack in a jar for an easy take-to-work or school lunch.
  • Top with seeds or a spoon of chia for extra fiber.
  • Pair with coffee or a smoothie for a bright morning combo.

Easy Yogurt Granola Bowls (4 Ways!)

FAQs

Q: Can I use flavored yogurt instead of plain?

A: Yes, flavored yogurt works great, it adds more sweetness and flavor.

Q: How long will the bowls keep?

A: If you plan to eat right away, the bowl is best immediately. If you make ahead, keep yogurt and granola separate, then combine within a few hours.

Q: Can I make this dairy free?

A: Yes, use plant-based yogurt like almond or coconut yogurt and choose a dairy-free granola.

Q: Is granola high in sugar?

A: Some store-bought granolas have added sugar, so check labels or use a low-sugar or homemade granola.

Q: Can kids help make these bowls?

A: Definitely, kids can pick and add toppings, which makes breakfast fun and easy.

Conclusion

If you want more ideas for mix-ins and simple ways to build bowls, this recipe idea pairs well with many guides online, such as Granola & Yogurt Bowls (4 Ways) – Jar Of Lemons.

Easy Yogurt Granola Bowls (4 Ways)

A quick, healthy breakfast or snack that combines creamy yogurt, crunchy granola, and fresh fruit, perfect for customization.

Base Ingredients

  • 4 cup plain or flavored yogurt (1 cup per bowl)
  • 2-3 cup granola (1/2 to 3/4 cup per bowl)

Toppings Options

  • 1 cup fresh strawberries, blueberries (For Classic Berry variation)
  • 1 cup diced mango, pineapple, shredded coconut (For Tropical variation)
  • 1 cup sliced banana, chopped almonds or walnuts, pinch of cinnamon (For Nutty Banana variation)
  • 1 cup chopped apple, raisins, maple syrup, pinch of cinnamon (For Apple Cinnamon variation)

Preparation

  1. Start by spooning 1 cup of yogurt into a bowl.
  2. Add 1/2 to 3/4 cup of granola on top.
  3. Choose one of the four topping options and add them to your bowl.
  4. Stir to combine if you prefer mixed textures, or leave in layers for a prettier presentation.
  5. Taste the bowl and add more honey or a squeeze of lemon if desired.
  6. Serve immediately for the best crunch, or chill for up to a few hours (note that granola may soften).

Use cold yogurt for a fresher taste. Keep granola stored in a sealed bag or jar to maintain crunchiness. Add wet toppings last to keep granola crisp. For more protein, opt for Greek yogurt or add nut butter. Make sure to chop fruit into even pieces for balanced bites.

Breakfast, Snack
American
Customizable Snacks, Easy Recipes, Granola Bowls, Healthy Breakfast, Yogurt Bowls

Banana Bread Overnight Oats

A bowl of Banana Bread Overnight Oats topped with sliced bananas and nuts

Banana Bread Overnight Oats feel like a warm slice of banana bread turned into a quick, cool breakfast. This easy, creamy oat jar mixes the sweet banana taste, cinnamon spice, and a hint of vanilla for a familiar, cozy flavor. It makes mornings simple, it fills you up, and it tastes like a treat without the fuss.

The featured recipe below is a true crowd-pleaser, perfect for busy weekdays, work lunches, or a grab-and-go breakfast. It tastes like banana bread, but it is healthy, easy to make ahead, and great for meal prep. Get ready to make a breakfast that feels like dessert, and smile while you eat it.

How to prepare Banana Bread Overnight Oats

Ingredients

  • 1 ripe banana, mashed
  • 1 cup rolled oats
  • 1 cup milk or dairy-free milk
  • 1/2 cup plain yogurt or plant yogurt
  • 1 tablespoon chia seeds
  • 1 teaspoon vanilla extract
  • 1 teaspoon cinnamon
  • 1 tablespoon maple syrup or honey, optional
  • Pinch of salt
  • Optional toppings, chopped nuts, sliced banana, or chocolate chips

Directions

  1. In a bowl or mason jar, mash the ripe banana with a fork until smooth.
  2. Add the rolled oats, milk, yogurt, chia seeds, vanilla, cinnamon, maple syrup, and salt.
  3. Stir well, make sure the oats and chia seeds mix with the liquid.
  4. Close the jar or cover the bowl and chill in the fridge for at least 4 hours, or overnight for best texture.
  5. In the morning, stir the oats. Add a splash of milk if you want it looser.
  6. Top with sliced banana, chopped nuts, or a few chocolate chips, then enjoy.

Banana Bread Overnight Oats

Why You’ll Love Banana Bread Overnight Oats

  • It tastes like banana bread, but it is ready in the morning, no baking needed.
  • The oats and chia seeds keep you full for hours, making it a great healthy breakfast.
  • You can make jars ahead for easy meal prep, great for busy weeks.
  • It uses simple pantry ingredients, rolled oats, banana, cinnamon, and milk.
  • It is easy to change, add yogurt for creaminess, or nuts for crunch.

Tips for success

  • Use a ripe banana, it gives the best banana flavor and natural sweetness.
  • If you like a smoother texture, mash the banana very well or blend it with the milk before mixing.
  • Let the oats sit overnight for the best creamy texture, at least 4 hours if short on time.
  • Stir before serving, add more milk if the oats are too thick.
  • If you want more protein, add a scoop of protein powder or more yogurt.
  • Keep jars refrigerated up to 3 days for easy breakfasts all week.

Serving Suggestions

  • Serve in a mason jar for a neat, portable breakfast.
  • Top with toasted walnuts or pecans for crunch.
  • Add sliced banana and a drizzle of maple syrup for extra sweetness.
  • Sprinkle extra cinnamon or a few dark chocolate chips for a treat feel.
  • Pair with coffee or a green smoothie for a full morning meal.

Banana Bread Overnight Oats

FAQs

Q, Can I use quick oats instead of rolled oats? A, Yes, quick oats work, but the texture may be softer. Rolled oats keep a heartier bite.

Q, How long do overnight oats last in the fridge? A, They stay good for about 3 days in a sealed jar, great for meal prep.

Q, Can I make this recipe dairy free? A, Yes, use almond milk, oat milk, or soy yogurt to make it dairy free.

Q, Can I use frozen bananas? A, Yes, thaw and mash frozen banana before mixing, it works well.

Q, Do I need chia seeds? A, Chia seeds add thickness and fiber, but you can skip them if you want.

Conclusion

If you want more ideas or a similar recipe guide, you can find a nice version at Banana Bread Overnight Oats | Lemons & Zest, it has helpful photos and tips. Enjoy your easy, tasty banana oatmeal and have fun making a breakfast that feels like banana bread.

Banana Bread Overnight Oats

A quick and easy breakfast that tastes like a warm slice of banana bread, made with rolled oats, ripe banana, and cozy spices.

Main Ingredients

  • 1 ripe banana, mashed (Ensure the banana is ripe for better flavor and sweetness.)
  • 1 cup rolled oats (Use rolled oats for best texture.)
  • 1 cup milk or dairy-free milk (Any milk substitute can be used.)
  • 1/2 cup plain yogurt or plant yogurt (Optional for creaminess.)
  • 1 tablespoon chia seeds (Adds thickness and fiber.)
  • 1 teaspoon vanilla extract (For flavor enhancement.)
  • 1 teaspoon cinnamon (To mimic the flavor of banana bread.)
  • 1 tablespoon maple syrup or honey (Optional for added sweetness.)
  • Pinch of salt (Balances flavor.)

Optional Toppings

  • chopped nuts (For crunch.)
  • sliced banana (To enhance banana flavor.)
  • chocolate chips (For a dessert-like treat.)

Preparation

  1. In a bowl or mason jar, mash the ripe banana with a fork until smooth.
  2. Add the rolled oats, milk, yogurt, chia seeds, vanilla, cinnamon, maple syrup, and salt.
  3. Stir well and ensure the oats and chia seeds mix with the liquid.
  4. Close the jar or cover the bowl and chill in the fridge for at least 4 hours, or overnight for best texture.

Serving

  1. In the morning, stir the oats. Add a splash of milk if you want it looser.
  2. Top with sliced banana, chopped nuts, or a few chocolate chips, then enjoy.

Use a ripe banana for the best flavor, and let the oats sit overnight for optimal texture. Keep jars refrigerated up to 3 days for easy breakfasts.

Breakfast
American
Banana Bread Flavored, Easy Recipe, Healthy Breakfast, Meal Prep, Overnight Oats

High-Protein Cottage Cheese Bagels

Healthy high-protein cottage cheese bagels ready to be served

introduction

If you want a quick, tasty bagel that packs more protein, these High-Protein Cottage Cheese Bagels are a great pick. They use simple pantry items and cottage cheese to make a soft, chewy bagel with extra protein. This crowd-pleaser works well for a fast breakfast, a post-workout snack, or a light lunch that still fills you up. You can find other cottage cheese ideas like cottage cheese blueberry muffins if you like baking with cottage cheese. Try these bagels for a warm, fresh bite that tastes great plain or topped, and get ready to smile when you pull them from the oven.

how to prepare High-Protein Cottage Cheese Bagels

  1. Preheat your oven to 375 F, and line a baking tray with parchment paper.
  2. In a bowl, mix 1 cup cottage cheese, 2 cups self-rising flour, 1 large egg, and a pinch of salt. Stir until a soft dough forms.
  3. If the dough is very sticky, add a little more flour, one tablespoon at a time, until it is easy to handle.
  4. Divide the dough into 6 equal pieces. Roll each piece into a rope, then join the ends to make a bagel shape. Press gently to seal.
  5. Beat one egg and brush the tops of the bagels for a shiny crust. Sprinkle sesame seeds, poppy seeds, or everything seasoning if you like.
  6. Bake on the prepared tray for 18 to 22 minutes, until the bagels are light golden and firm. Cool on a rack for a few minutes before slicing.

High-Protein Cottage Cheese Bagels

Why You’ll Love High-Protein Cottage Cheese Bagels

  • High in protein, they help keep you full longer.
  • Simple ingredients, no long rise time, you can make them fast.
  • Soft inside, slightly chewy crust, great texture.
  • Versatile, you can top them sweet or savory.
  • Better for a health focus than many store-bought bagels, they cut refined carbs and add protein.

tips for success

  • Use full-fat cottage cheese for richer taste, or low-fat if you prefer fewer calories.
  • If you have no self-rising flour, mix 2 cups all-purpose flour with 3 teaspoons baking powder and 1 teaspoon salt.
  • Don’t add too much flour, the dough should be soft, not dry.
  • Press the ends well when shaping rings, so they do not open while baking.
  • Let bagels cool a few minutes before slicing, they finish setting as they cool.

Serving Suggestions

  • Slice and toast, then spread cream cheese and smoked salmon for a classic twist.
  • Top with mashed avocado, a squeeze of lemon, and a sprinkle of pepper for a fresh lunch.
  • Make a breakfast sandwich with egg, spinach, and cheese.
  • Serve with jam or honey for a sweet treat.
  • Pack one with turkey, tomato, and lettuce for an easy take-to-work meal.

High-Protein Cottage Cheese Bagels

FAQs

Q: Can I make these bagels without self-rising flour?
A: Yes, use all-purpose flour with 3 teaspoons baking powder and 1 teaspoon salt added, mix well, then follow the same steps.

Q: Can I freeze these bagels?
A: Yes, let the bagels cool, then freeze in a sealed bag. Toast or warm from frozen when you want one.

Q: How do I make them dairy free?
A: Cottage cheese is the main dairy ingredient, so for dairy free you can try a high-protein plant yogurt, but results will vary. These bagels work best with real cottage cheese.

Q: Can I add mix-ins like herbs or cheese?
A: Yes, fold chopped herbs, grated cheese, or minced garlic into the dough for extra flavor.

Q: How many calories and protein are in one bagel?
A: Exact numbers vary by ingredient brands and sizes, but a cottage cheese bagel often has more protein and fewer empty carbs than a store bagel. Use your ingredient labels to get a precise count.

Conclusion

These High-Protein Cottage Cheese Bagels are a simple, tasty way to boost breakfast or snacks with extra protein. For another step-by-step cottage cheese bagel approach with oven and air fryer tips, see High Protein Cottage Cheese Bagels (Oven or Air Fryer).

High-Protein Cottage Cheese Bagels

These soft, chewy bagels made with cottage cheese are high in protein and perfect for breakfast, snacks, or light lunches.

For the bagels

  • 1 cup cottage cheese (full-fat or low-fat) (Full-fat for richer taste; low-fat for fewer calories.)
  • 2 cups self-rising flour (Or substitute with 2 cups all-purpose flour mixed with 3 tsp baking powder and 1 tsp salt.)
  • 1 large egg (Beaten for brushing the tops.)
  • a pinch salt

Optional toppings

  • as desired sesame seeds, poppy seeds, or everything seasoning (For added flavor and texture.)

Preparation

  1. Preheat your oven to 375°F (190°C) and line a baking tray with parchment paper.
  2. In a bowl, mix cottage cheese, self-rising flour, a large egg, and a pinch of salt until a soft dough forms.
  3. If the dough is very sticky, add a little more flour, one tablespoon at a time, until it is easy to handle.
  4. Divide the dough into 6 equal pieces. Roll each piece into a rope, then join the ends to make a bagel shape.
  5. Press gently to seal the ends.

Baking

  1. Beat one egg and brush the tops of the bagels to create a shiny crust.
  2. Sprinkle with sesame seeds, poppy seeds, or everything seasoning if desired.
  3. Bake on the prepared tray for 18 to 22 minutes or until the bagels are light golden and firm.
  4. Cool on a rack for a few minutes before slicing.

Use full-fat cottage cheese for richer taste. Press the ends well when shaping the rings to avoid them opening while baking. Let bagels cool before slicing to allow them to finish setting.

Breakfast, Brunch, Snack
American
Cottage Cheese Bagels, Easy Bagel Recipe, Healthy Bagels, High-Protein Bagels, Protein Bagels