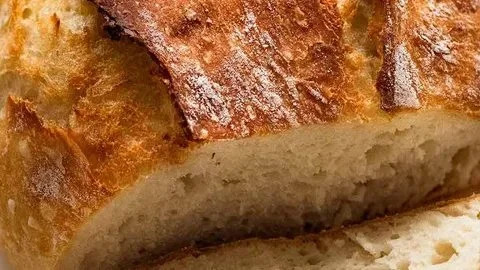
Easy 2-Ingredient Cottage Cheese Bread

Sliced easy 2-ingredient cottage cheese bread on a wooden table

I love quick recipes that feel like a hug from the oven, and Easy 2-Ingredient Cottage Cheese Bread is just that. It is soft, slightly tangy, and so simple to make. This two-ingredient bread is a real crowd-pleaser, great for busy mornings, simple lunches, or when you want fresh bread without a lot of work. If you want a quick read on one version of this recipe, see this simple two-ingredient cottage cheese bread recipe for a clear how-to. You will smile when the kitchen fills with the bread smell, and you’ll be ready to slice it warm with butter in no time.

How to prepare Easy 2-Ingredient Cottage Cheese Bread

Ingredients

  • 2 cups self-rising flour
  • 2 cups cottage cheese

Directions

  1. Preheat your oven to 350°F, and grease a loaf pan or line it with parchment paper.
  2. In a bowl, add the self-rising flour.
  3. Add the cottage cheese to the flour.
  4. Mix with a spoon until a sticky dough forms. It should pull together and not be very runny.
  5. Turn the dough into the prepared pan, and smooth the top with a spatula or wet hands.
  6. Bake for 35 to 45 minutes, until the top is golden and a toothpick in the center comes out clean.
  7. Let the bread cool in the pan for 10 minutes, then remove and cool on a rack before slicing.

Easy 2-Ingredient Cottage Cheese Bread

Why You’ll Love Easy 2-Ingredient Cottage Cheese Bread

  • Very simple, only two main items needed, perfect for busy days.
  • Soft inside, with a light tang from the cottage cheese.
  • No yeast, no rise time, so you make it fast.
  • Works as a basic loaf to use with sweet or savory toppings.

Tips for success

  • Use self-rising flour for the best rise, do not substitute plain flour unless you add baking powder and salt.
  • If the dough seems too dry, add a tablespoon of milk at a time until it comes together.
  • If it is too sticky to handle, dust your hands with a little flour.
  • Check the bread after 35 minutes, ovens vary, and you don’t want to overbake.
  • Let it cool a bit before slicing, warm slices hold together better.

Serving Suggestions

  • Slice and toast, then spread with butter or jam.
  • Use as a sandwich bread with eggs, cheese, or deli meats.
  • Serve with soup or stew as a soft, comforting side.
  • Cut into cubes and toast for croutons or bread bites.

Easy 2-Ingredient Cottage Cheese Bread

FAQs

Q: Can I use low-fat cottage cheese? A: Yes, low-fat cottage cheese works. The bread may be a bit denser, but it still bakes well.

Q: Is this bread gluten-free? A: Not with regular self-rising flour. For a gluten-free version, use a gluten-free self-rising flour blend that is made to replace regular flour.

Q: How can I store leftover bread? A: Wrap the cooled bread in plastic or keep it in an airtight container at room temperature for 2 days, or freeze slices for up to 2 months.

Q: Can I add herbs or cheese to the dough? A: Yes, mix in chopped herbs, grated cheese, or garlic for extra flavor, about 1/2 cup total.

Conclusion

If you want another take or more tips, check this detailed version of the recipe at Easy 2 Ingredient Cottage Cheese Bread Recipe – Suzie The Foodie, it has helpful notes and photos to guide you.

Easy 2-Ingredient Cottage Cheese Bread

This soft and slightly tangy bread is made with just two ingredients, perfect for busy mornings and requires no yeast or rise time.

Bread Ingredients

  • 2 cups self-rising flour (Use self-rising flour for best results; do not substitute with plain flour.)
  • 2 cups cottage cheese (Low-fat cottage cheese can be used.)

Preparation

  1. Preheat your oven to 350°F (175°C) and grease a loaf pan or line it with parchment paper.
  2. In a bowl, add the self-rising flour.
  3. Add the cottage cheese to the flour.
  4. Mix with a spoon until a sticky dough forms. It should pull together and not be very runny.
  5. Turn the dough into the prepared pan, and smooth the top with a spatula or wet hands.

Baking

  1. Bake for 35 to 45 minutes, until the top is golden and a toothpick in the center comes out clean.
  2. Let the bread cool in the pan for 10 minutes, then remove and cool on a rack before slicing.

If the dough seems too dry, add a tablespoon of milk at a time until it comes together. If it is too sticky to handle, dust your hands with a little flour. Check the bread after 35 minutes, as oven times may vary.
Breakfast, Snack
American
2-Ingredient Bread, Cottage Cheese Bread, Easy Recipe, Homemade Bread, Quick Bread

No Knead Salt Bread

Loaf of no knead salt bread fresh out of the oven, golden crust and soft interior.

No Knead Salt Bread is a simple, rustic bread that uses time instead of elbow work. You mix flour, water, yeast, and salt, let the dough rest for hours, then bake it in a hot covered pot or on a tray. The long rest builds flavor, the hot container makes a great crust, and you get a loaf that looks and tastes like artisan bread.

This featured recipe is a crowd-pleaser, its crust is crisp, the inside is tender, and the salty edge makes it a great match for butter, soups, and salads. It is also forgiving, so even new bakers can do well. Get your hands ready, because this bread is fun to make and even better to eat.

I love bread that feels like it came from a bakery, but that I made at home with little fuss. No Knead Salt Bread fits that wish, it gives a crunchy crust, a soft center, and a bright, clean salt taste. It is simple to make, needs only a few ingredients, and it makes a warm house feel even cozier. If you like easy breads, you might also enjoy a sweeter treat like Amish apple fritter bread for another simple baking day.

How to prepare No Knead Salt Bread

  1. In a large bowl, stir together 3 cups all-purpose flour, 1 teaspoon instant yeast, and 1 teaspoon salt.
  2. Add 1 1/2 cups warm water, stir with a spoon until a sticky shaggy dough forms.
  3. Cover the bowl with plastic wrap or a clean towel, leave it at room temperature for 12 to 18 hours, the dough will rise and look bubbly.
  4. Dust your work surface with flour, turn the dough out gently, shape it into a round by folding the edges under.
  5. Place the shaped dough on a piece of parchment paper, cover and let rest 30 to 60 minutes.
  6. Preheat your oven to 450 F, place a heavy pot with lid, like a Dutch oven, inside the oven to heat for 30 minutes.
  7. Carefully lift the dough with the parchment into the hot pot, cover with the lid, and bake 30 minutes.
  8. Remove the lid and bake another 10 to 15 minutes until the crust is deep golden.
  9. Lift the loaf out with the parchment, cool on a rack at least 20 minutes before slicing.


No Knead Salt Bread

Why You’ll Love No Knead Salt Bread

  • It needs very little active time, you mostly wait while the dough rests.
  • The crust turns out crisp and the inside stays soft, a nice contrast.
  • It uses common pantry ingredients, no special flour needed.
  • It pairs well with many foods, from soups to spreads, and works for plain toast or fancy meals.

tips for success

  • Use warm water, not hot, to help the yeast wake up.
  • Do not add too much flour when shaping, the dough should stay a bit sticky for good crumb.
  • Let the dough rest long enough, the slow rise builds flavor.
  • Heat the pot well before you bake, the hot pot gives the best crust.
  • Cool the bread before slicing, cutting too soon can make the crumb gummy.

Serving Suggestions

  • Slice and serve with butter and a sprinkle of sea salt.
  • Use for sandwiches, it holds up to fillings without getting soggy.
  • Serve with soup or stew for a simple, filling meal.
  • Make garlic toast from slices, or use it to soak up olive oil and herbs.


No Knead Salt Bread

FAQs

Q: How long can I keep No Knead Salt Bread? A: Store at room temperature in a bread bag for 2 to 3 days, or freeze slices for up to 1 month.

Q: Can I make this bread without a Dutch oven? A: Yes, bake on a hot baking stone or a heavy tray, and add a small pan of water to the oven to make steam for a better crust.

Q: Can I add seeds or herbs to the dough? A: Yes, fold in a handful of seeds or chopped herbs during shaping, they add flavor and texture.

Q: Do I need to use instant yeast? A: Instant yeast works well, but you can use active dry yeast if you let it sit in warm water for a few minutes first.

Conclusion

This No Knead Salt Bread is a simple way to get fresh, crusty bread at home with little work and big reward. For another take on easy home baking and a different flavor profile, see this helpful resource on a similar simple loaf, No Knead Salt Bread – Okonomi Kitchen.

No Knead Salt Bread

A simple, rustic bread that uses time instead of elbow work, resulting in a crunchy crust and tender inside that’s perfect for various pairings.

Main ingredients

  • 3 cups all-purpose flour (Use high-quality flour for better results.)
  • 1 teaspoon instant yeast (Instant yeast works best but you can use active dry yeast.)
  • 1 teaspoon salt (Adjust according to taste.)
  • 1.5 cups warm water (Not hot, to properly activate the yeast.)

Preparation

  1. In a large bowl, stir together flour, yeast, and salt.
  2. Add warm water and stir with a spoon until a sticky shaggy dough forms.
  3. Cover the bowl with plastic wrap or a clean towel and leave at room temperature for 12 to 18 hours until dough rises and looks bubbly.
  4. Dust your work surface with flour, turn the dough out gently, and shape it into a round by folding the edges under.
  5. Place the shaped dough on parchment paper, cover, and let rest for 30 to 60 minutes.
  6. Preheat your oven to 450°F (232°C) and place a heavy pot with lid inside to heat for 30 minutes.

Baking

  1. Carefully lift the dough with the parchment into the hot pot, cover with the lid, and bake for 30 minutes.
  2. Remove the lid and bake for an additional 10 to 15 minutes until the crust is deep golden.
  3. Lift the loaf out with the parchment and cool on a rack for at least 20 minutes before slicing.

Use warm water to help the yeast wake up, avoid adding too much flour when shaping, and heat the pot well for best crust.

Bread, Snack
American
Artisan Bread, Easy Bread Recipe, Homemade Bread, No Knead Bread, Rustic Bread

Easy Soft Sandwich Bread

Loaf of easy soft sandwich bread fresh out of the oven

Easy Soft Sandwich Bread feels warm and friendly, the kind of loaf that makes simple lunches and cozy breakfasts better. This homemade sandwich loaf is soft, tender, and mild in taste, so kids and adults both love it. The crumb is light and the crust stays soft, which makes perfect slices for sandwiches, toast, and more. If you like soft baked goods, you might enjoy a sweet twist too, like this banana bread cookies recipe for another soft treat. Ready to bake a loaf that will vanish fast, and maybe steal a piece before anyone notices?

how to prepare Easy Soft Sandwich Bread

  1. Gather ingredients, about 3 1/2 cups all purpose flour, 2 1/4 teaspoons active dry yeast, 2 tablespoons sugar, 1 teaspoon salt, 1 cup warm milk, 1/4 cup warm water, 2 tablespoons softened butter, 1 large egg.
  2. Mix yeast and warm water with a pinch of sugar, let sit 5 minutes until foamy.
  3. In a large bowl, stir flour, sugar, and salt. Make a well in center, add milk, egg, yeast mix, and softened butter.
  4. Stir until dough comes together, then turn onto a lightly floured surface. Knead 8 to 10 minutes until smooth and elastic.
  5. Place dough in a lightly oiled bowl, cover with a clean towel or plastic wrap, let rise in a warm spot until doubled, about 1 hour.
  6. Punch dough down gently, shape into a loaf, place in a greased 9×5 inch loaf pan. Cover and let rise again until about 1 inch above the rim, about 30 to 45 minutes.
  7. Preheat oven to 350°F (175°C). Brush top with a little milk or melted butter for a soft crust.
  8. Bake 30 to 35 minutes until golden and the loaf sounds hollow when tapped. If top browns too fast, cover loosely with foil.
  9. Let cool in pan 10 minutes, then remove to a rack to cool before slicing, this helps keep slices neat and soft.

Easy Soft Sandwich Bread

Why You’ll Love Easy Soft Sandwich Bread

  • The texture is pillowy and moist, perfect for sandwiches and toast.
  • It uses simple pantry ingredients, no fancy tools needed.
  • It stays soft for days if wrapped well, so you get fresh bread without daily baking.
  • Versatile for peanut butter, jam, deli meats, or grilled cheese.
  • Great for beginners, the steps are clear and forgiving.

tips for success

  • Use warm, not hot, milk and water, about 100°F to 110°F, so yeast wakes up without dying.
  • Measure flour by spooning into the cup and leveling, do not pack, too much flour makes a dense loaf.
  • Knead until dough is smooth, it may feel sticky at first, but it should become elastic.
  • Let the dough rise in a warm, draft free spot, like an oven with the light on.
  • Don’t skip the second rise, it gives the loaf its soft crumb.
  • Test doneness by tapping the bottom, it should sound hollow, or check the internal temp, about 190°F to 200°F.

Serving Suggestions

  • Make classic deli sandwiches with thin slices, lettuce, and cheese.
  • Toast slices and spread butter and jam for simple breakfasts.
  • Use for French toast, soak slices for extra soft results.
  • Cube and use for warm bread pudding or stuffing.
  • Freeze sliced loaf, then toast straight from the freezer for quick meals.

Easy Soft Sandwich Bread

FAQs

Q: How long does this bread stay fresh?

A: Wrapped tight in plastic or stored in a bread box, it stays soft for 3 to 4 days at room temperature. For longer storage, slice and freeze.

Q: Can I use whole wheat flour?

A: Yes, you can swap part of the flour for whole wheat, try replacing up to half for a softer rise. You may need a little more liquid.

Q: Can I make this bread without an egg?

A: Yes, skip the egg and add a tablespoon more milk and one more minute of kneading for a similar result.

Q: Do I need a stand mixer?

A: No, you can knead by hand. A mixer with a dough hook just saves time and effort.

Conclusion

This Easy Soft Sandwich Bread makes simple meals feel homemade and special, with a soft slice every time. For another tested sandwich bread method and a step by step video, see Simply Sandwich Bread (Recipe + Video) – Sally’s Baking Addiction. Enjoy baking, and don’t forget to save a slice for yourself.

Easy Soft Sandwich Bread

A soft, tender loaf perfect for sandwiches, toast, and cozy breakfasts, Easy Soft Sandwich Bread is loved by both kids and adults alike.

Dough Ingredients

  • 3.5 cups all-purpose flour (Measure by spooning into the cup and leveling.)
  • 2.25 teaspoons active dry yeast (Mix with warm water to activate.)
  • 2 tablespoons sugar (Used to activate yeast.)
  • 1 teaspoon salt
  • 1 cup warm milk (Temperature should be about 100°F to 110°F.)
  • 0.25 cups warm water (Temperature should be about 100°F to 110°F.)
  • 2 tablespoons softened butter (For flavor and texture.)
  • 1 large egg (Optional, can be replaced for egg-free version.)

Preparation

  1. Mix yeast and warm water with a pinch of sugar, let sit for 5 minutes until foamy.
  2. In a large bowl, stir together flour, sugar, and salt. Make a well in the center, then add warm milk, egg, yeast mixture, and softened butter.
  3. Stir until the dough comes together, then turn it onto a lightly floured surface and knead for 8 to 10 minutes until smooth and elastic.

Rising

  1. Place the dough in a lightly oiled bowl, cover with a towel or plastic wrap, and let it rise in a warm spot until doubled in size, about 1 hour.
  2. Punch the dough down gently, shape it into a loaf, and place in a greased 9×5 inch loaf pan. Cover and let rise again until about 1 inch above the rim, about 30 to 45 minutes.

Baking

  1. Preheat oven to 350°F (175°C). Brush the top with a little milk or melted butter for a soft crust.
  2. Bake for 30 to 35 minutes until golden and the loaf sounds hollow when tapped. If the top browns too quickly, cover loosely with foil.
  3. Let cool in the pan for 10 minutes, then remove to a rack to cool before slicing.

Wrap well to keep bread fresh for 3 to 4 days at room temperature. For longer storage, slice and freeze.

Breakfast, lunch, Snack
American
basic bread, Easy Bread Recipe, Homemade Bread, sandwich bread, soft bread

World’s Easiest Yeast Bread Recipe

Freshly baked yeast bread loaf on a wooden table

This bread feels like a warm hug, and it is easy to make. The World’s Easiest Yeast Bread Recipe – Artisan, No Knead makes a crusty loaf with a soft, open crumb inside. People love it because it tastes like bakery bread but needs very little work. It fits busy days, beginners, and anyone who likes fresh bread. For a different homemade treat, you might also enjoy a simple cookie recipe I like, like this banana bread cookies recipe. Try this loaf and you will soon want to bake it again, it is that good and friendly.

how to prepare Yeast Bread Recipe

Ingredients

  • 3 cups all purpose flour
  • 1 teaspoon instant yeast
  • 1 1/4 teaspoons salt
  • 1 1/2 cups warm water

Directions

  1. In a big bowl, mix flour, yeast, and salt. Stir to combine.
  2. Pour in warm water, mix with a spoon until the dough comes together, it will be sticky.
  3. Cover the bowl with plastic wrap or a towel. Let it sit at room temperature for 12 to 18 hours, the dough will rise and get bubbles.
  4. After rising, dust your work surface with flour. Tip the dough out and fold it a few times to shape a rough ball. Do not knead.
  5. Place the dough on a piece of parchment paper. Cover and rest 30 minutes while you heat the oven.
  6. Heat oven to 450°F (230°C) with a heavy pot or Dutch oven inside, lid on, for 30 minutes.
  7. Carefully remove the hot pot, lift the dough with parchment into the pot, cover, and bake 30 minutes.
  8. Remove the lid, bake 10 to 15 more minutes until the crust is deep golden and crisp.
  9. Take the bread out and cool on a rack at least 30 minutes before slicing.

World's Easiest Yeast Bread Recipe - Artisan, No Knead

Why You’ll Love Yeast Bread Recipe

  • Very low work, no kneading, mix and wait.
  • Crunchy crust and soft inside, like artisan bread.
  • Uses simple pantry ingredients, no fancy tools.
  • Great for beginner bakers and busy cooks.
  • It fills your home with a warm, fresh bread smell.

tips for success

  • Use warm, not hot water, to help the yeast work.
  • Let the dough rest long enough, the long rise builds flavor.
  • Do not add too much flour when shaping, a sticky dough makes a better crumb.
  • Use a heavy lidded pot for best crust, a cast iron Dutch oven works well.
  • Cool the bread fully before you cut it, slicing too soon makes it gummy.

Serving Suggestions

  • Serve warm with butter and jam, simple and perfect.
  • Make sandwiches with slices of this crusty loaf.
  • Use for soup dipping, the crust holds up well.
  • Turn slices into toast or garlic bread for a quick treat.

World's Easiest Yeast Bread Recipe - Artisan, No Knead

FAQs

Q: How long can I store this bread?

A: Store at room temperature in a paper bag for 2 to 3 days. For longer, freeze sliced.

Q: Can I make smaller loaves?

A: Yes, divide the dough into two and bake in two smaller pots, adjust time a little.

Q: Do I need to use instant yeast?

A: Instant yeast works best for the no knead method, but active dry yeast will work if you proof it first.

Q: Can I add herbs or seeds?

A: Yes, fold in herbs or seeds after the first rise for extra flavor.

Conclusion

If you want the original detailed method and extra tips, see the full World’s Easiest Yeast Bread recipe – Artisan, NO KNEAD crusty bread page for more info and photos.

Yeast Bread

This no-knead, artisan-style bread features a crunchy crust and soft interior, making it a perfect choice for busy bakers looking for a simple and delicious bread option.

Main Ingredients

  • 3 cups all purpose flour
  • 1 teaspoon instant yeast
  • 1.25 teaspoons salt
  • 1.5 cups warm water (Use warm, not hot water.)

Preparation

  1. In a big bowl, mix flour, yeast, and salt. Stir to combine.
  2. Pour in warm water and mix with a spoon until the dough comes together; it will be sticky.
  3. Cover the bowl with plastic wrap or a towel and let it sit at room temperature for 12 to 18 hours to rise.
  4. After rising, dust your work surface with flour. Tip the dough out and fold it a few times to shape a rough ball. Do not knead.
  5. Place the dough on a piece of parchment paper, cover, and rest for 30 minutes while you heat the oven.
  6. Heat oven to 450°F (230°C) with a heavy pot or Dutch oven inside, lid on, for 30 minutes.

Baking

  1. Carefully remove the hot pot, lift the dough with parchment into the pot, cover, and bake for 30 minutes.
  2. Remove the lid and bake for an additional 10 to 15 minutes until the crust is deep golden and crisp.
  3. Take the bread out and cool on a rack for at least 30 minutes before slicing.

For best results, allow the bread to cool fully before cutting to prevent it from becoming gummy. Consider serving warm with butter and jam.

Bread, Snack
American, Artisan
Artisan Bread, Easy Bread Recipe, Homemade Bread, No Knead Bread, Yeast Bread