Garlic Dairy Free and Keto Breadsticks

Garlic Dairy Free and Keto Breadsticks (Or Twists!) are a delightful addition to any meal. They are packed with flavor and have a wonderful, chewy texture that everyone loves. Perfect for dipping or enjoying on their own, these breadsticks cater to both keto and dairy-free diets. Imagine serving these at your next family dinner, and watch them disappear in seconds! They’re not just another side; they’re a crowd-pleaser that will have everyone coming back for more. Let’s dive into this tasty recipe so you can whip them up in no time.

How to prepare Garlic Dairy Free & Keto Breadsticks

To prepare your garlic dairy free and keto breadsticks, start by gathering the following ingredients:

  • 1 cup almond flour
  • 1/4 cup coconut flour
  • 1/4 teaspoon baking soda
  • 1/4 teaspoon salt
  • 2 tablespoons olive oil
  • 1/4 cup water
  • 2 garlic cloves, minced
  • 1 teaspoon Italian seasoning

Mix the almond flour, coconut flour, baking soda, and salt in a bowl. Then, add in olive oil, water, minced garlic, and Italian seasoning. Stir well until a dough forms. Roll the dough into sticks or twists, and place them on a baking sheet lined with parchment paper. Bake in a preheated oven at 350°F (175°C) for about 15-20 minutes, or until golden brown.

Garlic Dairy Free & Keto Breadsticks (Or Twists!)

Why You’ll Love Garlic Dairy Free & Keto Breadsticks

These breadsticks are not only easy to make, but they also taste fantastic! The garlic adds a wonderful aroma, while the almond flour gives them a light and fluffy texture that’s hard to resist. Perfect for dipping into your favorite sauces or soups, they can be an excellent side for hearty meals too. If you’re looking for a low-carb treat, these breadsticks are a perfect solution. Plus, you can feel good knowing they fit into your dietary needs without sacrificing taste.

Tips for success

To ensure your breadsticks turn out perfectly every time, here are some tips to keep in mind:

  • Make sure to measure your ingredients correctly, as precise measurements can affect the texture.
  • Don’t skip on the garlic, as it’s the star of the show. Feel free to add more if you love its flavor.
  • For extra crunch, brush the breadsticks with olive oil before baking.
  • If you have leftovers, store them in an airtight container to keep them fresh.

Garlic Dairy Free & Keto Breadsticks (Or Twists!)

Serving Suggestions

These garlic dairy free and keto breadsticks can be enjoyed in many ways. Serve them with a hearty homemade soup or alongside a fresh salad. They also go wonderfully with pasta dishes or as an appetizer with dips like hummus or marinara sauce. For an extra kick, sprinkle some red pepper flakes over them before baking.

FAQs

1. Can I use different flours?

Yes, you can experiment with other gluten-free flours like flaxseed meal or sunflower seed flour, but the texture may vary.

2. How do I store leftover breadsticks?

Store them in an airtight container in the fridge for up to 3 days. Reheat them in the oven to keep them crispy.

3. Can I freeze these breadsticks?

Absolutely! You can freeze them after baking. Just wrap them tightly and thaw them before reheating in the oven.

If you’re looking for another delicious recipe to try, check out this air fryer honey butter garlic chicken tenders for a tasty meal that complements your homemade breadsticks. Enjoy your culinary creation.

Garlic Dairy Free and Keto Breadsticks

Delightful, chewy, and packed with flavor, these breadsticks cater to both keto and dairy-free diets. Perfect for dipping or enjoying on their own!

Dry Ingredients

  • 1 cup almond flour
  • 1/4 cup coconut flour
  • 1/4 teaspoon baking soda
  • 1/4 teaspoon salt

Wet Ingredients

  • 2 tablespoons olive oil
  • 1/4 cup water
  • 2 cloves garlic, minced
  • 1 teaspoon Italian seasoning

Preparation

  1. Preheat your oven to 350°F (175°C).
  2. In a bowl, mix the almond flour, coconut flour, baking soda, and salt.
  3. Add in the olive oil, water, minced garlic, and Italian seasoning. Stir well until a dough forms.
  4. Roll the dough into sticks or twists and place them on a baking sheet lined with parchment paper.

Baking

  1. Bake in the preheated oven for about 15-20 minutes, or until golden brown.

To ensure perfect breadsticks: measure ingredients correctly, don’t skimp on garlic, brush with olive oil before baking, and store leftovers in an airtight container.

Appetizer, Side Dish
American, Keto
Dairy Free, Garlic Breadsticks, Healthy Snacks, Keto, Low Carb

low carb Firecracker ground Chicken

Firecracker Chicken is a delightful dish that bursts with flavor and is sure to be a hit at any gathering. This recipe features tender chicken pieces coated in a spicy sauce that perfectly balances heat and sweetness. It’s a dish that not only excites the taste buds but also brings a touch of fun to your dinner table. Picture the vibrant colors and the irresistible aroma wafting through your kitchen, inviting everyone to dig in. Plus, it’s easy to prepare, making it perfect for both busy weeknights and special occasions.

How to prepare Firecracker ground Chicken

To prepare Firecracker Chicken, begin by gathering your ingredients like chicken breast, soy sauce, and a mix of spices. Start by cutting the chicken into bite-sized pieces and marinating them in soy sauce and some of your favorite spices. Next, cook the chicken in a hot skillet until it’s golden brown and cooked through. For that signature “firecracker” kick, whip together a sauce made of honey, sriracha, and other zesty ingredients. Once the chicken is ready, toss it in the sauce until each piece is evenly coated.

Firecracker Chicken

Why You’ll Love Firecracker ground Chicken

One of the best things about Firecracker Chicken is how versatile it is. You can easily adjust the level of spice to suit your taste or even add veggies like bell peppers or broccoli for an extra pop of color and nutrition. It pairs wonderfully with rice or noodles, making it a complete meal. If you’re a fan of flavorful, spicy dishes, you’re going to love this recipe. For another great chicken dish, consider trying this air fryer chicken and potatoes, which offers a different but equally delightful flavor.

Tips for success

To ensure your Firecracker Chicken turns out perfectly, here are some helpful tips. First, don’t skimp on the marinating time; even 30 minutes can make a big difference in flavor. Secondly, when making the sauce, taste as you go—this way, you can find the right balance of sweetness and heat for your palate. And finally, serve it immediately after cooking to enjoy the best texture and flavor.

Firecracker Chicken

Serving Suggestions

Firecracker Chicken is fantastic on its own, but you can elevate your meal by serving it with steamed rice or crispy fried noodles. Add a side of stir-fried vegetables or a refreshing salad for a complete dining experience. If you’re looking for more unique flavors, you might also enjoy air fryer Cajun chicken.

FAQs

1. Can I use chicken thighs instead of chicken breast?

Yes, chicken thighs work beautifully in this recipe as they tend to be juicier and will absorb the flavors well.

2. How can I adjust the spiciness of the dish?

To make your Firecracker Chicken milder, reduce the amount of sriracha or honey and add a touch more soy sauce to balance the flavors.

3. Can I prepare this dish ahead of time?

Absolutely! You can marinate the chicken in advance and store it in the refrigerator until ready to cook, making it a great make-ahead dinner option.

Firecracker Chicken

A delightful dish that bursts with flavor, featuring tender chicken coated in a spicy and sweet sauce, perfect for any gathering.

Main Ingredients

  • 1 lb chicken breast (Cut into bite-sized pieces)
  • 1/4 cup soy sauce (For marinating)
  • 2 tbsp honey (For sauce)
  • 2 tbsp sriracha (For sauce, adjust to taste)

Spices

  • 1 tsp zesty spices (Mix your favorite spices for marinating)

Preparation

  1. Gather the ingredients: chicken breast, soy sauce, honey, sriracha, and your favorite spices.
  2. Cut the chicken into bite-sized pieces and marinate them in soy sauce and your chosen spices for at least 30 minutes.

Cooking

  1. Heat a skillet and cook the marinated chicken until golden brown and cooked through.
  2. In a separate bowl, mix honey, sriracha, and any other zesty ingredients to create the sauce.
  3. Once the chicken is cooked, toss it in the sauce until each piece is evenly coated.

For the best flavor, marinate the chicken for longer if possible. Serve immediately for the best texture.

Dinner, Main Course
American, Asian
Chicken Recipe, Firecracker Chicken, Flavorful Chicken, Quick Dinner, Spicy Chicken

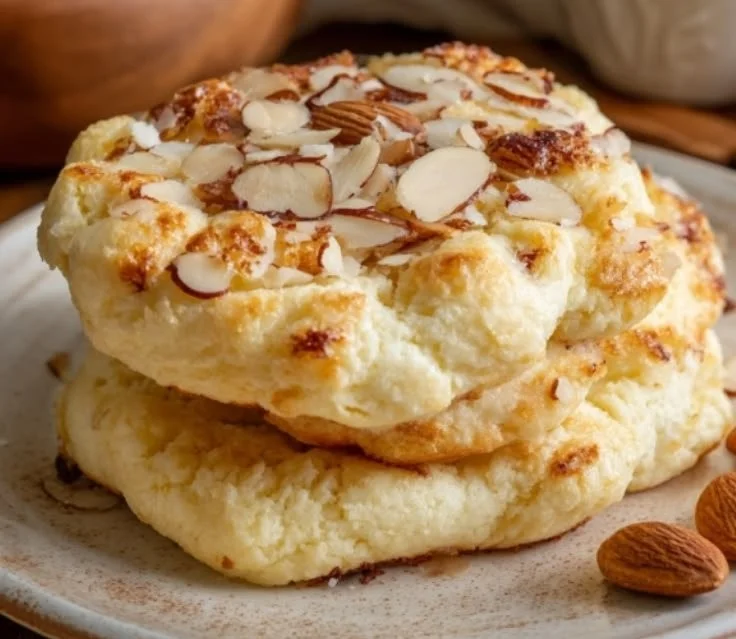
Keto Cloud Bread

Fluffy and light Keto Cloud Bread served on a plate

Keto Cloud Bread is a delightful low-carb substitute for traditional bread, making it a favorite among those following the ketogenic diet. It’s light, fluffy, and offers a satisfying texture without the carbs. This bread is made from simple ingredients, primarily eggs and cream cheese, which combine beautifully to create a bread-like goodness that everyone can enjoy. Whether you’re using it for sandwiches, a side for soups, or just spreading some butter, Keto Cloud Bread is sure to please your taste buds.

Keto Cloud Bread

To prepare this easy and delicious recipe, gather the following ingredients:

Ingredients:

  • 3 large eggs
  • 3 oz cream cheese, softened
  • 1/4 tsp cream of tartar
  • A pinch of salt

Here’s how to make Keto Cloud Bread:

Keto Cloud Bread

  1. Preheat your oven to 300°F (150°C).
  2. In a bowl, beat the egg whites and cream of tartar together until stiff peaks form.
  3. In another bowl, mix the egg yolks, softened cream cheese, and salt until smooth.
  4. Gently fold the egg whites into the egg yolk mixture until well combined, taking care not to deflate the egg whites.
  5. Line a baking sheet with parchment paper and use a spoon to dollop the mixture onto the sheet in circular shapes (about 2-3 inches wide).
  6. Bake for 25-30 minutes or until the tops are golden brown.
  7. Allow them to cool before enjoying.

{image_2}

Why You’ll Love Keto Cloud Bread

You’re going to love Keto Cloud Bread for so many reasons! First, it’s incredibly low in carbs, making it perfect for anyone on a keto or low-carb diet. Secondly, it’s super easy to whip up, and you probably already have the ingredients in your kitchen. Each bite has a light and airy texture, making it a perfect vessel for all your favorite toppings. Plus, it’s versatile! Use it for breakfast, lunch, or dinner, and enjoy its delightful taste without the guilt.

Tips for success

To make sure your Keto Cloud Bread turns out perfectly every time, here are some handy tips:

  • Beat the egg whites until stiff peaks form to ensure maximum fluffiness.
  • Make sure the cream cheese is softened for easy mixing (you can microwave it for a few seconds).
  • Don’t overmix the egg whites with the yolk mixture; fold gently to keep the airiness.
  • For added flavor, consider adding spices or herbs to the mix before baking.

{image_1}

Serving Suggestions

Keto Cloud Bread can be enjoyed in many ways. Try it as a base for your favorite sandwich fillings, use it to scoop up delicious dips, or simply enjoy it warm with a spread of butter or cream cheese. You might even want to use it for mini pizzas topped with cheese and your favorite toppings. The possibilities are endless!

FAQs

Can I store leftover Keto Cloud Bread?

Yes, you can store Keto Cloud Bread in an airtight container in the fridge for up to a week. Just reheat before serving for the best texture.

Can I freeze Keto Cloud Bread?

Absolutely! You can freeze the cloud bread for up to a month. Just make sure to stack them with parchment paper between each layer to prevent sticking.

Can I use other types of cheese instead of cream cheese?

While cream cheese is the recommended option for the best flavor and texture, you can experiment with other soft cheeses, just keep in mind that it might change the flavor and texture slightly.

Keto Cloud Bread is not just a recipe, it’s an experience waiting to happen in your kitchen. So gather your ingredients, and get ready to bake something fluffy and delightful!

Keto Cloud Bread

A delightful low-carb substitute for traditional bread, Keto Cloud Bread is light, fluffy, and perfect for those on a ketogenic diet.

Main Ingredients

  • 3 large large eggs
  • 3 oz cream cheese, softened (Make sure it is softened for easy mixing.)
  • 1/4 tsp cream of tartar
  • a pinch salt

Preparation

  1. Preheat your oven to 300°F (150°C).
  2. In a bowl, beat the egg whites and cream of tartar together until stiff peaks form.
  3. In another bowl, mix the egg yolks, softened cream cheese, and salt until smooth.
  4. Gently fold the egg whites into the egg yolk mixture until well combined.
  5. Line a baking sheet with parchment paper and dollop the mixture onto the sheet in circular shapes (about 2-3 inches wide).
  6. Bake for 25-30 minutes or until the tops are golden brown.
  7. Allow them to cool before enjoying.

For maximum fluffiness, beat the egg whites until stiff peaks form. Avoid overmixing to keep the airiness. You can add spices or herbs for additional flavor.

Bread, Snack
Keto, Low-Carb
bread substitute, Cloud Bread, Keto Cloud Bread, Keto Recipes, low-carb bread

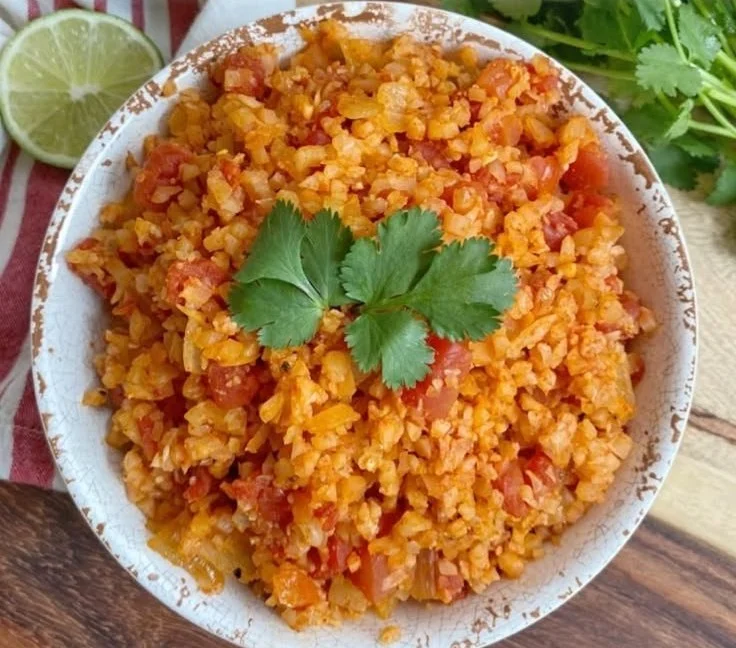
Easy Spanish Cauliflower Rice (Healthy & Low Carb)

Bowl of easy Spanish cauliflower rice with spices and vegetables

This Easy Spanish Cauliflower Rice is warm, bright, and full of flavor, yet light and low carb. It uses riced cauliflower, tomatoes, peppers, and simple spices to give you the taste of Spanish rice without the carbs. It cooks fast, it smells great while it cooks, and it fits well with a busy weeknight or a relaxed weekend meal.

If you like easy, healthy swaps, you might also enjoy a hearty slow cooker option like slow cooker lemon herb chicken with rice for another simple family meal. This cauliflower rice recipe is a crowd-pleaser, with smoky paprika, bright tomato, and soft cauliflower that soaks up flavor. Give it a try, and get ready to make it again and again, because it’s both simple and satisfying.

How to prepare Spanish Cauliflower Rice.

  • Heat 1 tablespoon olive oil in a large pan over medium heat.
  • Add 1 small chopped onion and 1 chopped red bell pepper, cook, stir for 4 minutes, until soft.
  • Add 2 cloves minced garlic, 1 teaspoon smoked paprika, 1/2 teaspoon ground cumin, and salt and pepper to taste, cook and stir for 30 seconds, until fragrant.
  • Stir in 1 cup canned diced tomatoes, drain lightly, and simmer 2 minutes.
  • Add 4 cups riced cauliflower to the pan, stir to mix with the tomato and spices.
  • Cook 5 to 7 minutes, stirring often, until cauliflower is tender but not mushy.
  • Taste and adjust salt, pepper, or a squeeze of lime if you like a bright finish.
  • Easy Spanish Cauliflower Rice (Healthy & Low Carb)

Why You’ll Love Spanish Cauliflower Rice.

  • Low carb, light, and full of flavor, so you get the Spanish rice taste without the extra carbs.
  • Quick to make, ready in about 15 to 20 minutes, great for busy nights.
  • Uses simple pantry spices like paprika and cumin, no hard-to-find items.
  • Versatile, you can add protein like chicken, shrimp, or beans to make it a full meal.

Tips for success

  • Use fresh or frozen riced cauliflower, if frozen thaw and drain excess water first.
  • Do not overcook, keep the cauliflower tender, not mushy.
  • Use smoked paprika for the best Spanish flavor, or regular paprika if needed.
  • Keep heat medium so the vegetables soften but do not burn.
  • Taste and add salt at the end, flavors blend as it cools a bit.

Serving Suggestions

  • Serve with grilled chicken, shrimp, or fish for a low carb dinner.
  • Top with fresh cilantro, chopped green onion, or a squeeze of lime.
  • Add a fried egg on top for a fast, filling meal.
  • Serve as a side for tacos, fajitas, or other Spanish style dishes.

Easy Spanish Cauliflower Rice (Healthy & Low Carb)

FAQs

Q: Is cauliflower rice a good low carb substitute for white rice? A: Yes, cauliflower rice is much lower in carbs and calories, and it soaks up flavor like rice.

Q: Can I freeze this Spanish cauliflower rice? A: You can freeze it, but texture may change slightly. Cool fully, store in a freezer bag, and reheat gently.

Q: Can I make this in advance? A: Yes, cook and cool, then store in the fridge for 3 to 4 days. Reheat in a pan or microwave.

Q: Can I add more vegetables? A: Yes, add peas, corn, or chopped zucchini for more color and texture.

Conclusion

This Easy Spanish Cauliflower Rice is a simple, healthy swap that keeps big taste and cuts carbs, perfect for quick weeknight meals or as a fresh side. For another take on Spanish inspired cauliflower rice, see the full Spanish cauliflower rice recipe at Dr. Davinah’s Eats.

Spanish Cauliflower Rice

This Easy Spanish Cauliflower Rice is warm, bright, and full of flavor, yet light and low carb. It delivers the taste of Spanish rice without the carbs, using riced cauliflower, tomatoes, and spices.

For the vegetables

  • 1 tablespoon olive oil (For cooking)
  • 1 small chopped onion
  • 1 chopped red bell pepper
  • 2 cloves minced garlic

For seasoning

  • 1 teaspoon smoked paprika (Use regular paprika if needed)
  • 1/2 teaspoon ground cumin
  • to taste salt and pepper (Adjust according to preference)

For the main ingredient

  • 1 cup canned diced tomatoes (Drain lightly)
  • 4 cups riced cauliflower (Fresh or frozen (thaw if frozen and drain excess water))

Preparation

  1. Heat olive oil in a large pan over medium heat.
  2. Add chopped onion and chopped red bell pepper, cook and stir for 4 minutes, until soft.
  3. Add minced garlic, smoked paprika, ground cumin, salt, and pepper to taste, cook and stir for 30 seconds, until fragrant.

Cooking

  1. Stir in canned diced tomatoes and simmer for 2 minutes.
  2. Add riced cauliflower to the pan, stirring to mix with the tomato and spices.
  3. Cook for 5 to 7 minutes, stirring often, until the cauliflower is tender but not mushy.
  4. Taste and adjust with salt, pepper, or a squeeze of lime for a bright finish.

Use fresh or frozen cauliflower. Do not overcook to keep cauliflower tender. Serve with grilled chicken, shrimp, or fish. Top with fresh cilantro or a squeeze of lime.

Side Dish, Vegetarian
Healthy, Spanish
Cauliflower Rice, Easy Recipe, Healthy Swap, Low Carb, Quick Dinner

Low Carb Cheesy Garlic Chicken Wraps

Low Carb Cheesy Garlic Chicken Wraps served on a plate with fresh herbs

This Low Carb Cheesy Garlic Chicken Wraps recipe feels like a warm hug on a plate. It mixes tender garlic chicken, melty cheese, and bright herbs inside a low carb wrap or big lettuce leaf. The dish makes people smile, and it fills you up without heavy carbs. It works for family dinners, quick lunches, or when you want a simple keto friendly meal, and it tastes rich and comforting. Try it once, and you will want to make it again, trust me, you will be excited to take a bite.

How to prepare Low Carb Cheesy Garlic Chicken Wraps

Ingredients

  • Cooked chicken, shredded or sliced (about 2 cups)
  • Garlic, 2 cloves, minced
  • Olive oil or butter, 1 tablespoon
  • Cream cheese or sour cream, 2 tablespoons (optional, for creaminess)
  • Shredded cheese, 1 cup (cheddar, mozzarella, or a mix)
  • Low carb tortillas or large lettuce leaves, 4
  • Salt and pepper, to taste
  • Fresh parsley or basil, chopped, 2 tablespoons
  • Optional add-ins, sliced avocado, sliced tomatoes, or hot sauce

Directions

  1. Heat oil or butter in a skillet over medium heat. Add garlic and cook 30 seconds until it smells good.
  2. Add the chicken, salt, and pepper. Stir and warm the chicken, about 2 to 3 minutes.
  3. Add cream cheese or sour cream if you use it. Stir until the chicken looks creamy and mixed.
  4. Sprinkle in the shredded cheese. Stir until the cheese melts and coats the chicken.
  5. Take the pan off the heat. Fold in chopped herbs.
  6. Warm the low carb tortillas in a dry pan or microwave for a few seconds. If you use lettuce, wash and dry the leaves.
  7. Spoon the cheesy garlic chicken onto each wrap or leaf. Add avocado or tomato if you like.
  8. Fold or roll the wrap, serve warm.

Low Carb Cheesy Garlic Chicken Wraps

Why You’ll Love Low Carb Cheesy Garlic Chicken Wraps

  • Low carb and filling, great for keto or low carb diets.
  • Cheesy garlic flavor is rich, but the meal stays light.
  • Quick to make, good for busy weeknights or meal prep.
  • Easy to change, use different cheese, herbs, or add veggies.
  • Works as a simple lunch, dinner, or party finger food.

Tips for success

  • Use warm chicken, it heats faster and stays juicy.
  • Don’t overcook garlic, it can turn bitter fast.
  • Warm the wraps before filling, they fold without cracking.
  • For a gluten free option, use large lettuce leaves or low carb tortillas labeled gluten free.
  • Add fresh herbs at the end for bright flavor.
  • If you want more sauce, add a spoon of sour cream or plain Greek yogurt.

Serving Suggestions

  • Serve with a simple green salad and a lemon vinaigrette.
  • Try cauliflower rice or roasted vegetables on the side.
  • Offer sliced avocado, pickles, or a small bowl of keto salsa for topping.
  • Cut wraps in halves and serve as appetizers for a party.
  • Pair with a light soup for a cozy meal.

Low Carb Cheesy Garlic Chicken Wraps

FAQs

Q: Are these wraps keto friendly?
A: Yes, if you use low carb tortillas or lettuce leaves, they work well for a keto plan.

Q: Can I make these ahead?
A: You can make the chicken filling ahead and store it in the fridge for 2 to 3 days. Fill and warm the wraps just before serving.

Q: Can I freeze the filling?
A: Yes, freeze the chicken filling in an airtight container for up to 2 months. Thaw in the fridge and reheat on the stove.

Q: What can I use instead of tortillas?
A: Use large romaine leaves, butter lettuce, or low carb flatbreads for a different texture.

Q: How do I keep the wraps from getting soggy?
A: Add wet ingredients like tomatoes or sauce right before eating. Keep filling and wraps separate for meal prep.

Conclusion

For another version and a printable recipe card, check this helpful guide at Cheesy Garlic Chicken Wraps – Cooked & Loved.

Low Carb Cheesy Garlic Chicken Wraps

This Low Carb Cheesy Garlic Chicken Wraps recipe mixes tender garlic chicken, melty cheese, and bright herbs inside a low carb wrap or large lettuce leaf for a rich yet light meal.

Main ingredients

  • 2 cups Cooked chicken, shredded or sliced
  • 2 cloves Garlic, minced
  • 1 tablespoon Olive oil or butter
  • 2 tablespoons Cream cheese or sour cream (optional) (For added creaminess)
  • 1 cup Shredded cheese (cheddar, mozzarella, or a mix)
  • 4 Low carb tortillas or large lettuce leaves
  • Salt and pepper, to taste
  • 2 tablespoons Fresh parsley or basil, chopped

Optional add-ins

  • Sliced avocado
  • Sliced tomatoes
  • Hot sauce

Preparation

  1. Heat oil or butter in a skillet over medium heat. Add garlic and cook for 30 seconds until fragrant.
  2. Add the chicken, salt, and pepper. Stir and warm the chicken for about 2 to 3 minutes.
  3. Add cream cheese or sour cream, if using. Stir until the chicken mixture is creamy and well combined.
  4. Sprinkle in the shredded cheese. Stir until melted and coats the chicken.
  5. Remove from heat and fold in the chopped herbs.
  6. Warm the low carb tortillas in a dry pan or microwave for a few seconds. If using lettuce, wash and dry the leaves.
  7. Spoon the cheesy garlic chicken mixture onto each wrap or lettuce leaf. Optionally add avocado or tomato.
  8. Fold or roll the wrap and serve warm.

For best results, use warm chicken to heat it faster and maintain juiciness. Avoid overcooking garlic to prevent bitterness. Warm the wraps before filling to prevent cracking. Use gluten-free labeled tortillas for a gluten-free option. Add fresh herbs at the end for added flavor.

Dinner, lunch, Main Course, Quick Meals
American, Keto, Low Carb
Cheesy Garlic Chicken, Easy Dinner, Healthy Wraps, Keto Recipes, Low Carb Chicken Wraps