Mozzarella Sticks

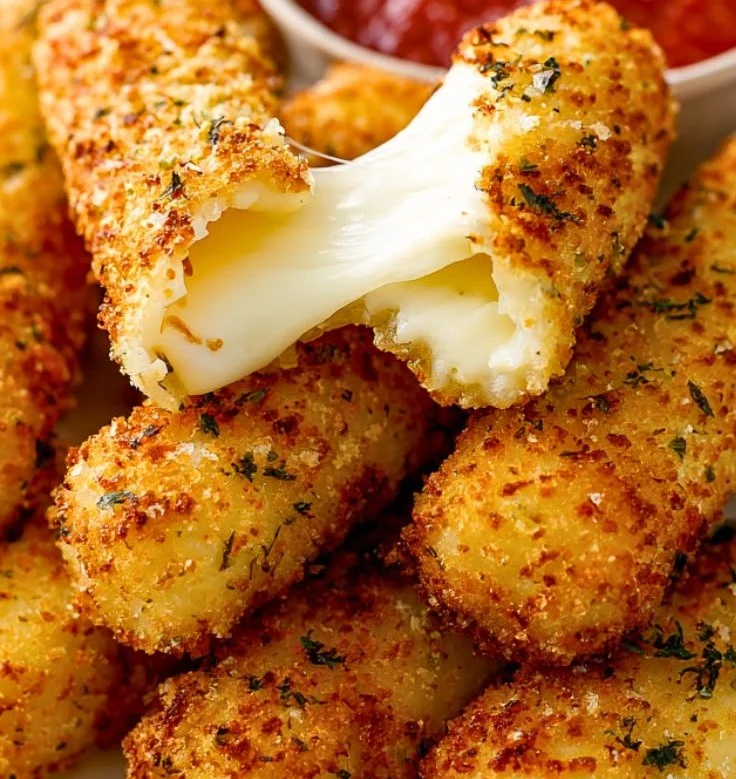
Plate of golden brown mozzarella sticks with marinara sauce

Mozzarella sticks are a simple, fun treat. They are crunchy on the outside and gooey on the inside. People love them as a snack or an appetizer at parties. This recipe for Mozzarella Sticks is a crowd-pleaser, with golden, crispy breading and melty, stretchy cheese inside. If you like fried mozzarella or breaded cheese sticks, this recipe will make you smile. If you enjoy other cheesy bites, try a similar idea like Mediterranean quesadillas with spinach, feta and mozzarella, and you will see how great melted cheese can be. Get ready to make a snack that is crunchy, cheesy, and very easy to love.

How to prepare Mozzarella Sticks

  1. Cut low-moisture mozzarella into sticks, about 3 inches long. Pat dry with a paper towel.
  2. Set up three shallow bowls, one with flour, one with beaten eggs, one with plain breadcrumbs or panko. Add salt and pepper to the flour, and a little garlic powder to the breadcrumbs if you like.
  3. Dip each cheese stick in flour, shake off extra, then dip in egg, then press into breadcrumbs. For extra crunch, repeat egg and breadcrumbs for a double coat.
  4. Place the coated sticks on a tray and freeze for at least 30 minutes, this helps the cheese stay inside when frying.
  5. Heat oil in a deep pan to about 350°F, or heat enough oil to cover the sticks. Fry a few at a time until golden brown, about 1 to 2 minutes. Do not overcrowd the pan.
  6. Remove to a paper towel to drain. Let cool for a minute, then serve with warm marinara or your favorite dipping sauce.

Mozzarella Sticks

Why You’ll Love Mozzarella Sticks

  • They are quick to make and fun to eat.
  • Crunchy outside, melty inside, a perfect contrast.
  • Great as an appetizer, party snack, or late night treat.
  • You can bake them for a lighter version, or fry for a crispier crust.
  • They go well with many dipping sauces, like marinara, ranch, or spicy mayo.

Tips for success

  • Use low-moisture mozzarella, it melts well and keeps its shape.
  • Freeze the sticks after breading, this prevents cheese leaks when frying.
  • Keep oil at a steady medium-high heat, too hot will burn the crust, too cool will make them greasy.
  • Double coat with egg and breadcrumbs for extra crunch.
  • Do not fry too many at once, give them room to brown evenly.

Serving Suggestions

  • Serve with warm marinara sauce for dipping.
  • Try ranch or garlic aioli for a different taste.
  • Pair with a simple salad to make a fuller snack or small meal.
  • Add as a side to burgers or sandwiches for a fun twist.

Mozzarella Sticks

FAQs

Q: Can I bake mozzarella sticks instead of frying them?

A: Yes, you can bake them on a lined tray at 425°F for 8 to 10 minutes, turn once, until golden and melted.

Q: How do I stop the cheese from leaking out?

A: Freeze the breaded sticks for at least 30 minutes before cooking, and make sure you use a good double coat of crumbs.

Q: What cheese is best for mozzarella sticks?

A: Low-moisture, part-skim mozzarella is best. It melts well and does not release too much liquid.

Q: Can I make them ahead and freeze?

A: Yes, freeze them on a tray until firm, then store in a sealed bag. Fry or bake from frozen, add a minute or two to the cook time.

Conclusion

These mozzarella sticks are a simple, tasty snack you can make at home for parties or a cozy night in. For a detailed step by step recipe and extra tips, check this helpful guide, Homemade Mozzarella Sticks – Sugar Spun Run.

Mozzarella Sticks
These crunchy, gooey mozzarella sticks are a simple, fun snack or appetizer perfect for any gathering.

For the mozzarella sticks

  • 1 pound low-moisture mozzarella (Cut into sticks, about 3 inches long)
  • 1 cup all-purpose flour (Mixed with salt and pepper)
  • 2 large eggs (Beaten)
  • 1 cup plain breadcrumbs or panko (You can add garlic powder for extra flavor)

Preparation

  1. Cut low-moisture mozzarella into sticks, about 3 inches long. Pat dry with a paper towel.
  2. Set up three shallow bowls: one with flour, one with beaten eggs, and one with breadcrumbs or panko. Add salt and pepper to the flour, and garlic powder to the breadcrumbs if desired.
  3. Dip each cheese stick in flour, shake off the excess, then dip into the egg, and press into breadcrumbs. For extra crunch, repeat egg and breadcrumb coating.
  4. Place the coated sticks on a tray and freeze for at least 30 minutes.

Cooking

  1. Heat oil in a deep pan to about 350°F, or enough oil to cover the sticks.
  2. Fry a few sticks at a time for about 1 to 2 minutes until golden brown. Avoid overcrowding the pan.
  3. Remove the fried sticks to a paper towel to drain and let cool for a minute before serving.

Use low-moisture mozzarella for best results. Freezing the sticks helps prevent the cheese from leaking out when frying. If you prefer a lighter version, you can bake them at 425°F for 8 to 10 minutes. Serve with dipping sauces like marinara, ranch, or garlic aioli.
Appetizer, Snack
American
Appetizers, Cheese Sticks, Fried Snacks, Mozzarella Sticks, Party Food

Prosciutto Wrapped Mozzarella Bites

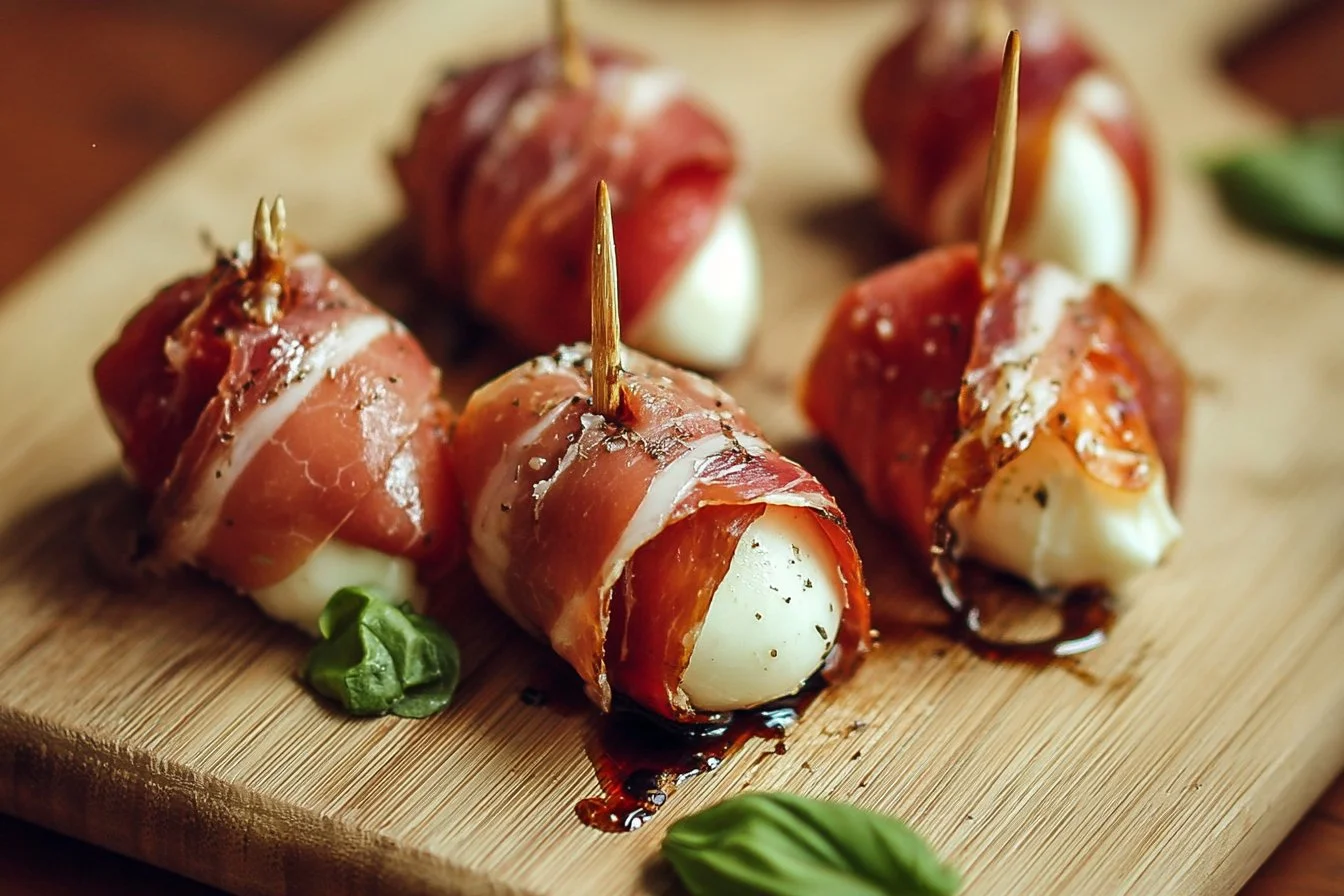
Prosciutto wrapped mozzarella bites appetizer on a serving platter

If you are looking for a delicious and easy appetizer, Prosciutto Wrapped Mozzarella Bites are your answer. These delightful little bites combine the saltiness of prosciutto and the creaminess of mozzarella to create a winning flavor. They are perfect for parties, game days, or just a cozy night in. With just a few simple ingredients, you can impress your friends and family. This recipe is a crowd-pleaser that will have everyone coming back for more, and it’s so easy to make that you might find yourself whipping it up every weekend. Ready to dive into these tasty morsels? Let’s get started!

How to prepare Prosciutto Wrapped Mozzarella Bites

To make Prosciutto Wrapped Mozzarella Bites, you will need fresh mozzarella balls, thin slices of prosciutto, and some fresh basil leaves. Start by taking a slice of prosciutto and laying it flat on a clean surface. Place a mozzarella ball at one end and add a basil leaf on top of it. Carefully roll the prosciutto around the mozzarella and basil, making sure it’s completely covered. Repeat this process until all your ingredients are used up. Once you have assembled your bites, you can either serve them fresh or consider adding a quick drizzle of balsamic vinegar for an extra flavor kick. If you want to prepare them in advance, just keep them in the fridge until you are ready to serve. It’s that simple!

Why You’ll Love Prosciutto Wrapped Mozzarella Bites

You will love Prosciutto Wrapped Mozzarella Bites because they are a perfect combination of flavors and textures. The prosciutto adds a savory touch, while the mozzarella offers a creamy and rich taste. Plus, the fresh basil brings a hint of brightness that balances everything beautifully. These bites are so easy to make that you’ll want to prepare them for all your gatherings. They not only look impressive but also disappear quickly from the snack table. Who doesn’t love a quick and tasty treat? Whether you are a fan of Italian cuisine or just looking for something delicious, these bites will be a hit!

Tips for Success

To ensure your Prosciutto Wrapped Mozzarella Bites turn out perfectly, here are some tips for success. First, use high-quality prosciutto and fresh mozzarella for the best flavor. You can find mozzarella balls in different sizes, but the smaller ones are easier to roll. Make sure the prosciutto slices are thin so they wrap easily. If you want to make this recipe ahead of time, store the bites in an airtight container in the fridge. Serve them chilled for the best taste, or let them sit at room temperature for a few minutes before enjoying them. Adding a touch of olive oil or balsamic glaze right before serving can enhance the flavor even more!

Serving Suggestions

Prosciutto Wrapped Mozzarella Bites make a fantastic appetizer on their own but can be served in many delightful ways. Pair them with a fresh salad to create a light lunch or serve them with toasted bread and olives for a Mediterranean-inspired platter. Make sure to have toothpicks handy so guests can easily grab their bites. You can also serve these tasty treats alongside a variety of dips, such as pesto or a lemony aioli, for a fun twist. For a festive vibe, present them on a beautiful serving dish with a sprinkle of fresh herbs or a drizzle of balsamic reduction to make them look extra special.

FAQs

1. Can I use other types of cheese instead of mozzarella?
Yes, you can use any cheese that you enjoy, such as goat cheese or provolone. Just make sure the cheese can be easily rolled with prosciutto.

2. How do I store leftovers?
Keep any leftovers in an airtight container in the refrigerator. They should be enjoyed within a couple of days for the best flavor.

3. Can I make these bites ahead of time?
Absolutely! You can prepare them a few hours in advance and store them in the fridge until you are ready to serve. Just keep them covered to avoid drying out.

4. What can I substitute for basil?
If you’re not a fan of basil, you can try using arugula or spinach for a different flavor.

[tasty-recipe id=”5103″]

Prosciutto Wrapped Mozzarella Bites

Delicious and easy appetizer combining salty prosciutto and creamy mozzarella, perfect for gatherings or cozy nights.

Main ingredients

  • 12 pieces fresh mozzarella balls (Use smaller mozzarella balls for easier rolling.)
  • 12 slices thin slices of prosciutto (Select high-quality prosciutto for best results.)
  • 12 leaves fresh basil leaves (Fresh basil adds brightness to the flavor.)

Preparation

  1. Lay a slice of prosciutto flat on a clean surface.
  2. Place a mozzarella ball at one end of the prosciutto slice.
  3. Add a basil leaf on top of the mozzarella ball.
  4. Carefully roll the prosciutto around the mozzarella and basil, ensuring it is fully covered.
  5. Repeat the process until all ingredients are used up.

Serving

  1. Serve the bites fresh or drizzle with balsamic vinegar for added flavor.
  2. If prepared in advance, store in the fridge until ready to serve.

For the best flavor, serve chilled or allow to sit at room temperature for a few minutes before serving. Consider adding a touch of olive oil or balsamic glaze before serving for extra flavor.

Appetizer, Snack
Italian
Appetizer, Easy Snack, Italian Cuisine, Party Food, Prosciutto Wrapped Mozzarella Bites

Pizza dillas

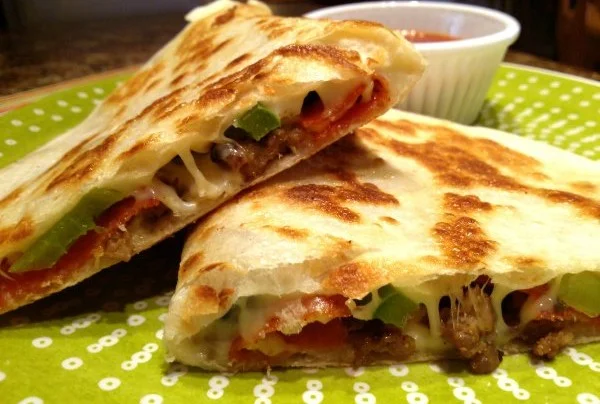
Delicious pizza dillas with melted cheese and fresh toppings

There’s something magical about combining two much-loved foods into one delightful dish, and that’s exactly what Pizza dillas do! Imagine the gooey goodness of cheesy pizza wrapped up in a crispy tortilla. It’s the ultimate comfort food that brings together flavors that everyone loves. Whether you’re making a quick weeknight meal or a fun snack for friends, Pizza dillas are sure to impress. With their crispy exterior and melty interior, these treats are not only delicious but also super easy to make. Who wouldn’t want to whip up a tasty twist on classic pizza? Let’s dive in and learn how to prepare these yummy Pizza dillas!

How to prepare Pizza dillas

  1. Ingredients:
  • 4 large flour tortillas
  • 2 cups shredded mozzarella cheese
  • 1 cup pizza sauce
  • 1 cup sliced pepperoni (or any favorite toppings)
  • Olive oil or butter for cooking
  1. Directions:
  • Heat a skillet over medium heat and lightly grease it with olive oil or butter.
  • Place a tortilla on the skillet and spread a generous amount of pizza sauce on half of it.
  • Sprinkle a layer of mozzarella cheese over the sauce, then add your chosen toppings.
  • Fold the tortilla over to create a half-moon shape.
  • Cook for about 3-4 minutes, or until the bottom is golden brown. Flip and cook for another 3-4 minutes, until both sides are crispy and the cheese is melted.
  • Remove from the skillet and let it cool for a minute before slicing into wedges.
  • Repeat with remaining tortillas and ingredients.

Pizzadillas

Why You’ll Love Pizza dillas

Pizza dillas are a fantastic way to enjoy all the flavors of pizza in a new and fun format. They’re crispy, gooey, and packed with your favorite toppings. Plus, they can be made in minutes, making them a perfect choice for busy days. With endless filling options, you can customize them to suit anyone’s taste. Kids love them, and adults do too! Plus, they make a great appetizer or party food. Once you take a bite, you’ll see why Pizza dillas are a hit on any table.

Tips for success

  • Use Fresh Ingredients: Fresh cheese and toppings enhance the flavor and texture.
  • Don’t Overfill: Keep the fillings to a moderate amount to make flipping easier.
  • Experiment with Toppings: Try vegetables, different cheeses, or even cooked meats for variety.
  • Cook at Medium Heat: This helps to ensure that the cheese melts perfectly without burning the tortilla.

Serving Suggestions

These delicious Pizza dillas can be paired with a variety of dips, like marinara sauce, ranch dressing, or sour cream. Serve them with a side salad for a balanced meal or alongside some crispy veggies for a great snack option. You can even cut them into smaller pieces for fun appetizers at gatherings!

FAQs

Can I make Pizza dillas ahead of time?

Yes, you can assemble the Pizza dillas in advance and store them in the fridge. Just cook them right before serving for the best taste.

What should I do with leftovers?

Leftover Pizza dillas can be stored in an airtight container in the fridge. Reheat them in a skillet until crispy again.

Can I freeze Pizza dillas?

Sure! You can freeze uncooked Pizza dillas. Just separate them with parchment paper and place them in a freezer bag. When ready to eat, cook them straight from frozen; it may just take a little longer.

Pizzadillas

Pizza Dillas

Combine the gooey goodness of cheesy pizza wrapped in a crispy tortilla for a fun and delicious twist on classic pizza.

Main Ingredients

  • 4 large large flour tortillas
  • 2 cups shredded mozzarella cheese (Use fresh cheese for better flavor.)
  • 1 cup pizza sauce
  • 1 cup sliced pepperoni (Or any favorite toppings.)
  • Olive oil or butter for cooking (Use for greasing the skillet.)

Cooking

  1. Heat a skillet over medium heat and lightly grease it with olive oil or butter.
  2. Place a tortilla on the skillet and spread a generous amount of pizza sauce on half of it.
  3. Sprinkle a layer of mozzarella cheese over the sauce, then add your chosen toppings.
  4. Fold the tortilla over to create a half-moon shape.
  5. Cook for about 3-4 minutes, or until the bottom is golden brown. Flip and cook for another 3-4 minutes, until both sides are crispy and the cheese is melted.
  6. Remove from the skillet and let it cool for a minute before slicing into wedges.
  7. Repeat with remaining tortillas and ingredients.

Use fresh ingredients for enhanced flavor. Don’t overfill to ensure easy flipping. Experiment with different toppings. Cook at medium heat for perfect cheese melting.

Appetizer, Snack
American, Italian
Cheesy Snacks, Comfort Food, Easy Recipes, Pizza Dillas, Tortilla Pizza

Easy Banana Bread

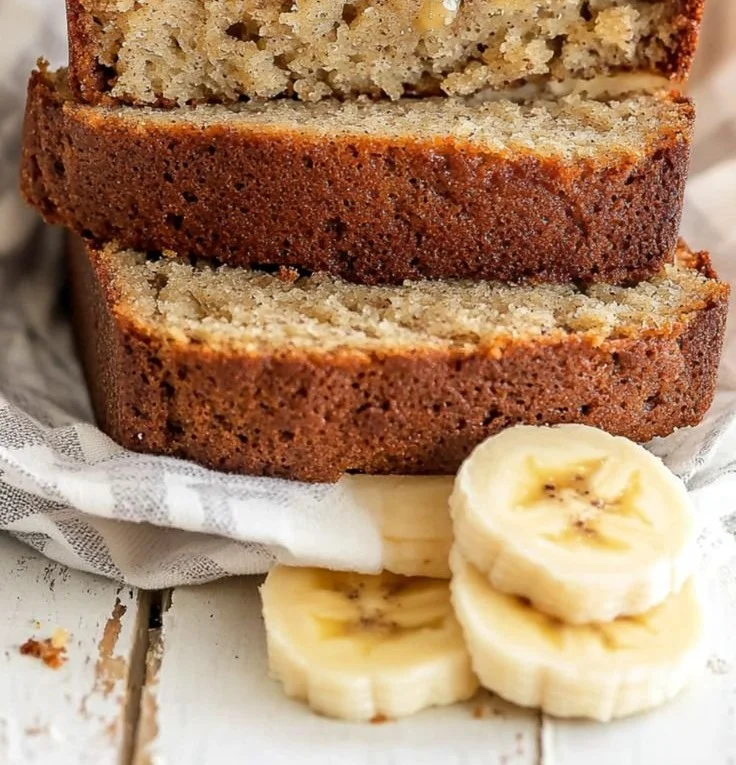
Loaf of easy banana bread with sliced pieces on a wooden table

Banana Bread is the kind of baking that feels like a hug. It uses ripe bananas, a few pantry staples, and a quick mix, so you end up with a moist, sweet loaf that fills the kitchen with a lovely smell. This crowd-pleaser is soft on the inside, lightly golden on the outside, and perfect for breakfast, snack time, or a quick dessert. If you like trying small twists, you might enjoy the banana bread cookies soft chewy easy recipe as a fun variation. Get ready to bake a simple, tasty loaf that everyone will ask for again.

how to prepare Easy Banana Bread

Ingredients

  • 3 ripe bananas, mashed
  • 1/3 cup melted butter
  • 3/4 cup sugar
  • 1 egg, beaten
  • 1 teaspoon vanilla extract
  • 1 teaspoon baking soda
  • Pinch of salt
  • 1 1/2 cups all purpose flour
  • Optional, 1/2 cup chopped nuts or chocolate chips

Directions

  1. Preheat oven to 350 F, grease a 9×5 inch loaf pan.
  2. In a bowl, mash the bananas with a fork until smooth.
  3. Stir in the melted butter, then mix in the sugar, egg, and vanilla.
  4. Sprinkle the baking soda and salt over the mix, then fold in the flour gently.
  5. Stir in nuts or chocolate chips if you use them.
  6. Pour the batter into the loaf pan and level the top.
  7. Bake for 55 to 65 minutes, or until a toothpick comes out clean.
  8. Cool in the pan for 10 minutes, then move to a rack to finish cooling.


Easy Banana Bread

Why You’ll Love Easy Banana Bread

This banana bread is very easy to make, and it uses ripe bananas so you do not waste fruit. The bread stays moist for days, and it has a warm, sweet banana taste that many people love. It works as quick bread for breakfast, a snack with coffee, or a simple dessert that kids enjoy. You can change it, add chocolate chips, or keep it plain, and it still bakes up well.

tips for success

  • Use very ripe bananas, they give the best flavor and moisture.
  • Do not overmix after you add flour, mix until just combined.
  • Check the loaf at 50 minutes, oven times can change, use a toothpick to test.
  • Let the bread cool a little before slicing, it will cut cleaner.
  • If top browns too fast, cover loosely with foil for the last 10 minutes.

Serving Suggestions

  • Slice and toast slightly, spread with butter for breakfast.
  • Serve warm with a spoon of yogurt or a scoop of vanilla ice cream for dessert.
  • Cut into squares for school snacks or to pack in a lunch.
  • Add a smear of peanut butter for a more filling treat.


Easy Banana Bread

FAQs

Q: Can I freeze banana bread? A: Yes, wrap slices or the whole loaf well in plastic and freeze up to 3 months. Thaw in the fridge or at room temperature.

Q: Can I use less sugar? A: Yes, you can reduce sugar by a little, the bananas add natural sweetness. The texture is best if you keep some sugar.

Q: What if I only have one or two bananas? A: You can make a smaller batch or add a little applesauce to make up moisture, but two bananas usually still work in a smaller pan.

Q: Can I use whole wheat flour? A: Yes, you can use part whole wheat flour, but the bread may be a bit denser. Try half all purpose and half whole wheat.

Conclusion

If you want a reliable guide and a slightly different take with a video, see the full step by step at Banana Bread Recipe (With Video).

Easy Banana Bread

A simple, moist banana bread that perfectly combines ripe bananas and pantry staples, creating a delicious loaf ideal for breakfast, snacks, or dessert.

Main Ingredients

  • 3 pieces ripe bananas, mashed (Use very ripe bananas for the best flavor.)
  • 1/3 cup melted butter
  • 3/4 cup sugar (You can reduce sugar slightly if desired.)
  • 1 piece egg, beaten
  • 1 teaspoon vanilla extract
  • 1 teaspoon baking soda
  • 1 pinch salt
  • 1 1/2 cups all purpose flour (Can substitute part with whole wheat flour.)
  • 1/2 cup chopped nuts or chocolate chips (Optional.)

Preparation

  1. Preheat oven to 350°F (175°C) and grease a 9×5 inch loaf pan.
  2. In a bowl, mash the bananas with a fork until smooth.
  3. Stir in the melted butter, then mix in the sugar, egg, and vanilla.
  4. Sprinkle the baking soda and salt over the mixture, then fold in the flour gently.
  5. Stir in nuts or chocolate chips if using.
  6. Pour the batter into the loaf pan and level the top.

Baking

  1. Bake for 55 to 65 minutes, or until a toothpick comes out clean.
  2. Cool in the pan for 10 minutes, then move to a rack to finish cooling.

Let the bread cool a little before slicing for cleaner cuts. If the top browns too fast, cover loosely with foil for the last 10 minutes.

Breakfast, Dessert, Snack
American
Baking, banana bread, Banana Recipe, Easy Banana Bread, Quick Bread

Cheese Garlic Rolls

Delicious Cheese Garlic Rolls topped with herbs and melted cheese.

Cheese Garlic Rolls are soft, warm rolls filled with melty cheese and bright garlic flavor. They make any meal feel special, and people always ask for more at parties, family dinners, or a cozy night in. This recipe is easy to follow, uses simple ingredients, and gives you golden, cheesy rolls with a crisp top and a soft, buttery inside. If you enjoy quick, tasty treats, you might also like an easy yogurt cheesecake for a simple dessert after these rolls. Ready to make a batch and see smiles all around?

how to prepare Cheese Garlic Rolls

Ingredients

  • 2 cups all purpose flour
  • 1 cup warm milk
  • 1 tablespoon sugar
  • 1 teaspoon salt
  • 1 packet (2 1/4 tsp) active dry yeast
  • 2 tablespoons butter, melted
  • 1 to 1 1/2 cups shredded mozzarella or cheddar
  • 3 cloves garlic, minced
  • 2 tablespoons chopped fresh parsley or 1 tsp dried
  • 2 tablespoons olive oil or melted butter, for brushing

Directions

  1. In a bowl, mix warm milk, sugar, and yeast. Let sit 5 to 10 minutes, until frothy.
  2. Add flour, salt, and melted butter. Stir to form a soft dough.
  3. Turn dough onto a floured surface and knead 5 to 7 minutes, until smooth and elastic.
  4. Place dough in a lightly oiled bowl, cover, and let rise 45 to 60 minutes, until doubled.
  5. Punch down dough and roll into a rectangle about 12 by 8 inches.
  6. Mix minced garlic with a little olive oil or melted butter, and spread evenly over the dough.
  7. Sprinkle shredded cheese and chopped parsley over the garlic layer.
  8. Roll dough tightly from the long side, like a log. Pinch seam to seal.
  9. Cut the log into 8 equal pieces and place each piece cut side up in a greased baking dish.
  10. Cover and let rolls rise 20 to 30 minutes, until puffy.
  11. Preheat oven to 375°F (190°C). Brush tops with olive oil or butter.
  12. Bake 18 to 22 minutes, until golden brown and cheese melts.
  13. Let cool a few minutes, then serve warm.

Cheese Garlic Rolls

Why You’ll Love Cheese Garlic Rolls

  • They are cheesy, soft, and garlicky, a simple flavor combo that pleases most people.
  • You can make them ahead, freeze, and bake later for fresh rolls whenever you want.
  • The recipe uses common pantry items and a short hands-on time.
  • They pair well with soup, salad, or as a snack for kids and guests.

tips for success

  • Use warm, not hot, milk to proof yeast, warm feels like bath water.
  • Don’t add too much flour while kneading, dough should be slightly sticky for soft rolls.
  • If you like more garlic, add an extra clove or brush with garlic butter after baking.
  • For crisp tops, brush with butter and broil 30 seconds at the end, watching closely.
  • Use fresh grated cheese for the best melt and flavor.

Serving Suggestions

  • Serve warm with marinara sauce, a green salad, or a bowl of soup.
  • Add a side of roasted vegetables for a light meal.
  • Use leftover rolls to make mini sandwiches with ham or roasted chicken.
  • Sprinkle extra parsley or grated cheese on top before serving.

Cheese Garlic Rolls

FAQs

Q: Can I use store bought dough for this recipe? A: Yes, store bought pizza or bread dough works well and saves time.

Q: How do I store leftover rolls? A: Keep cooled rolls in an airtight container in the fridge for up to 3 days. Reheat in oven or microwave.

Q: Can I freeze the rolls before baking? A: Yes, place the cut rolls in a tray, freeze until firm, then store in a freezer bag. Bake from frozen, add a few extra minutes to the bake time.

Q: What cheese is best for melting? A: Mozzarella melts well and gives stretch, cheddar adds sharp flavor. You can mix both.

Q: Are these rolls spicy? A: No, they are mild. Add red pepper flakes if you want a bit of heat.

Conclusion

If you want another take on cheesy garlic rolls with a rich cheese mix and bold garlic, see this detailed version on Sip and Feast for extra ideas and tips, Cheesy Garlic Rolls recipe on Sip and Feast.

Cheese Garlic Rolls

Soft, warm rolls filled with melty cheese and bright garlic flavor, perfect for any meal or gathering.

Dough Ingredients

  • 2 cups all purpose flour
  • 1 cup warm milk (Warm, not hot, to proof yeast)
  • 1 tablespoon sugar
  • 1 teaspoon salt
  • 1 packet (2 1/4 tsp) active dry yeast
  • 2 tablespoons butter, melted

Filling and Topping Ingredients

  • 1 to 1 1/2 cups shredded mozzarella or cheddar cheese (Use fresh grated cheese for the best melt)
  • 3 cloves garlic, minced (Add more if desired)
  • 2 tablespoons chopped fresh parsley or 1 tsp dried
  • 2 tablespoons olive oil or melted butter, for brushing

Preparation

  1. In a bowl, mix warm milk, sugar, and yeast. Let sit for 5 to 10 minutes, until frothy.
  2. Add flour, salt, and melted butter. Stir to form a soft dough.
  3. Turn dough onto a floured surface and knead for 5 to 7 minutes, until smooth and elastic.
  4. Place dough in a lightly oiled bowl, cover, and let rise for 45 to 60 minutes, until doubled.
  5. Punch down dough and roll into a rectangle about 12 by 8 inches.
  6. Mix minced garlic with a little olive oil or melted butter, and spread evenly over the dough.
  7. Sprinkle shredded cheese and chopped parsley over the garlic layer.
  8. Roll dough tightly from the long side, like a log. Pinch seam to seal.
  9. Cut the log into 8 equal pieces and place each piece cut side up in a greased baking dish.
  10. Cover and let rolls rise for 20 to 30 minutes, until puffy.

Baking

  1. Preheat oven to 375°F (190°C). Brush tops with olive oil or butter.
  2. Bake for 18 to 22 minutes, until golden brown and cheese melts.
  3. Let cool for a few minutes, then serve warm.

For crisp tops, brush with butter and broil for 30 seconds at the end, watching closely. Store cooled rolls in an airtight container in the fridge for up to 3 days.

Appetizer, Snack
American
Cheese Garlic Rolls, Cheesy Rolls, easy rolls, Garlic Rolls, Party Food