
Air Fryer Grilled Cheese Hot Dogs

grilled cheese hot dogs

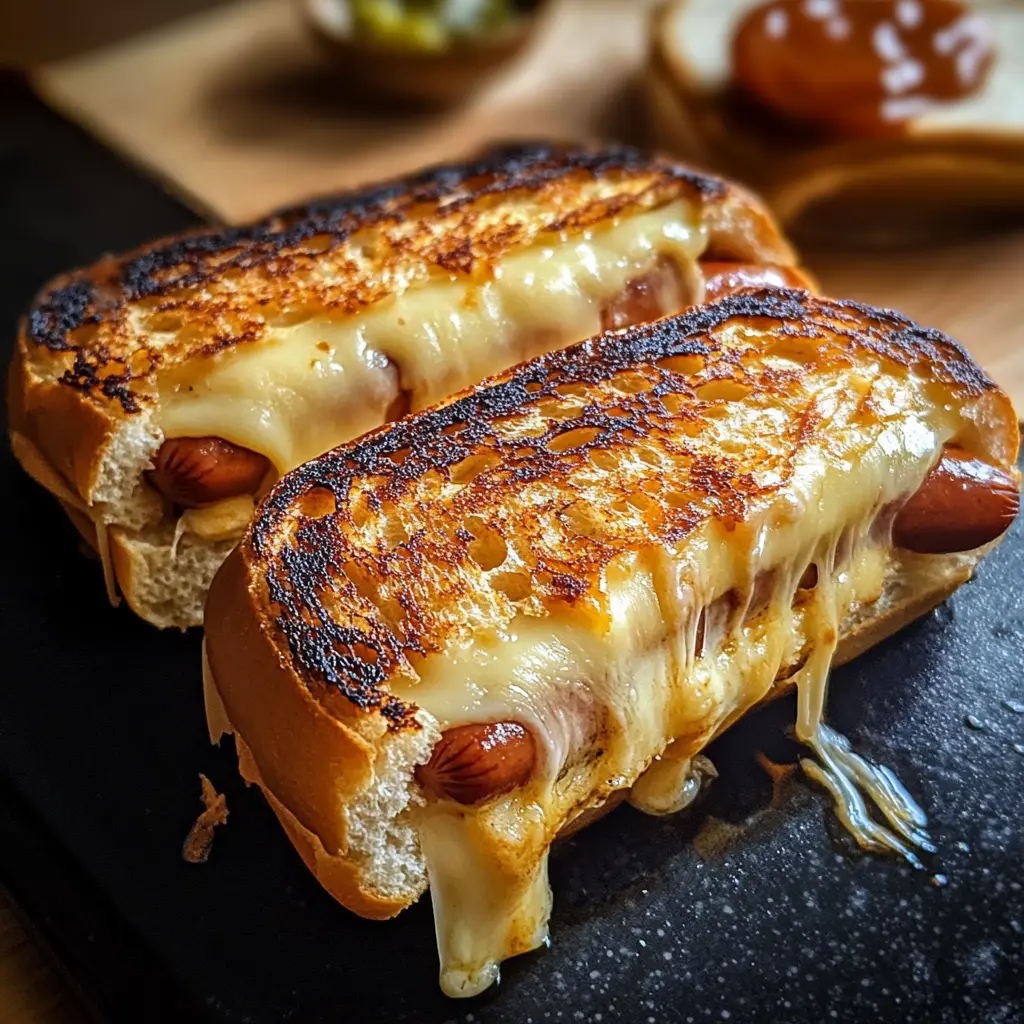
Get ready to experience the ultimate comfort food mashup that’s taking kitchens by storm, grilled cheese hot dogs that combine everything you love about two classic favorites into one irresistible bite. Imagine biting into golden, buttery bread that gives way to perfectly melted cheese and a juicy hot dog at the center, creating a harmony of textures and flavors that’s pure nostalgic bliss.

This isn’t just another hot dog recipe or a simple grilled cheese variation, it’s a game-changing fusion that elevates both dishes to new heights. The concept is beautifully simple: wrap a hot dog in cheese and bread, then cook it until the outside is perfectly crispy and the inside becomes a molten, savory paradise. It’s comfort food innovation at its finest, delivering that satisfying crunch followed by the creamy, meaty goodness that makes every bite memorable.

Whether you’re feeding hungry kids after school, looking for a quick and satisfying lunch, or wanting to add some playful creativity to dinner time, grilled cheese hot dogs offer the perfect solution. They’re easy enough for beginners yet delicious enough to impress, proving that sometimes the most brilliant culinary ideas come from combining the foods we already love most.

Why Make This Recipe

Air Fryer Grilled Cheese Hot Dogs are a fun twist on two classic favorites: grilled cheese sandwiches and hot dogs. Combining both into one delicious snack makes for a comforting meal that’s perfect for lunch, dinner, or a late-night craving. They are quick to prepare, packed with cheesy goodness, and sure to satisfy your taste buds. Plus, making them in the air fryer gives you the crispiness without all the extra oil.

How to Make Air Fryer Grilled Cheese Hot Dogs

Ingredients:

  • 4 hot dog buns
  • 4 hot dogs
  • 8 slices of cheddar cheese (or your preferred cheese)
  • 2 tablespoons butter (softened)
  • Optional: ketchup, mustard, relish, or any desired toppings

Directions:

  1. Butter the outside of each hot dog bun generously.
  2. Place one cheese slice inside each bun.
  3. Add a hot dog on top of the cheese slice.
  4. Place a second cheese slice over the hot dog to create a cheesy layer.
  5. If needed, secure the buns closed with toothpicks.
  6. Preheat the air fryer to 350°F (175°C).
  7. Cook the hot dogs in the air fryer for about 4-5 minutes, or until they turn golden brown.
  8. Once cooked, let them rest for 1 minute before serving.
  9. Serve with your favorite condiments like ketchup, mustard, or relish.

How to Serve Air Fryer Grilled Cheese Hot Dogs

You can serve Air Fryer Grilled Cheese Hot Dogs as a fun meal or snack at any time of the day. Pair them with chips, fries, or a fresh salad for a complete meal. They are also a great addition to parties or game days. Make sure to provide a selection of condiments so everyone can customize their hot dog to their taste.

How to Store Air Fryer Grilled Cheese Hot Dogs
grilled cheese hot dogs

If you have any leftovers, let them cool completely before storing. Place the grilled cheese hot dogs in an airtight container and keep them in the refrigerator for up to 3 days. To reheat, you can use the air fryer again to restore their crispiness.

Tips to Make Air Fryer Grilled Cheese Hot Dogs

  • Use your favorite cheese. While cheddar works great, you can experiment with mozzarella, pepper jack, or any cheese that melts well.
  • Don’t overstuff the buns. Keep the fillings balanced to ensure even cooking.
  • Try different toppings! Adding jalapeños, onions, or even sautéed mushrooms can elevate the flavor.

Variation

You can switch up this recipe by using sausages instead of hot dogs. Additionally, you can use different types of bread like slices of sourdough or even pretzel buns for a unique taste.

FAQs

Can I make these ahead of time?
Yes, you can prepare the hot dogs and buns ahead of time and assemble them. Then you can cook them in the air fryer just before serving.

What else can I add to my hot dogs?
Feel free to add ingredients like diced onions, pickles, or spicy sauces for extra flavor. The options are endless!

Can I freeze them?
It’s best to avoid freezing these hot dogs once cooked, as they may lose their texture. However, you can freeze the assembled un-cooked hot dogs and air fry them directly from frozen. Just increase the cooking time by a couple of minutes.

[tasty-recipe id=”4385″]

Air Fryer Grilled Cheese Hot Dogs

Experience the ultimate comfort food mashup with Air Fryer Grilled Cheese Hot Dogs, combining melted cheese and juicy hot dogs inside crispy buns for an irresistible treat.

Main Ingredients

  • 4 pieces hot dog buns
  • 4 pieces hot dogs
  • 8 slices cheddar cheese (or your preferred cheese) (You can use mozzarella, pepper jack, or any cheese that melts well.)
  • 2 tablespoons butter (softened) (Generously butter the outside of each bun.)

Optional Toppings

  • ketchup (For serving.)
  • mustard (For serving.)
  • relish (For serving.)

Preparation

  1. Butter the outside of each hot dog bun generously.
  2. Place one cheese slice inside each bun.
  3. Add a hot dog on top of the cheese slice.
  4. Place a second cheese slice over the hot dog to create a cheesy layer.
  5. If needed, secure the buns closed with toothpicks.

Cooking

  1. Preheat the air fryer to 350°F (175°C).
  2. Cook the hot dogs in the air fryer for about 4-5 minutes, or until they turn golden brown.
  3. Once cooked, let them rest for 1 minute before serving.

Serve with your favorite condiments and pair them with chips, fries, or a fresh salad. They are perfect for parties or game days. You can prepare the hot dogs and buns ahead of time and assemble them before cooking.
Dinner, lunch, Snack
American
Air Fryer Recipes, Comfort Food, Easy Snack, Grilled Cheese Hot Dogs, Hot Dog Recipe

Grinder Grilled Cheese: 7 Irresistible Ways to Indulge

Seven delicious grilled cheese recipes for a perfect indulgent meal

Grinder Grilled Cheese is a fun twist on a classic grilled cheese sandwich. It mixes the melting cheese comfort we love with the hearty feel of a grinder, or sub style bread. This recipe shows seven simple, tasty ways to enjoy that gooey, golden bite. Each version layers cheese with different fillings like meats, veggies, or sauces, so you can pick what fits your mood. It is a crowd-pleaser because it is easy, fast, and full of flavor. Warm bread, melted cheese, and tasty fillings make it hard to resist. Get ready to make a sandwich that feels both simple and special, and have fun trying each version at home.

how to prepare Grinder Grilled Cheese

Start by gathering your bread, cheese, butter, and any fillings you like. Use a sturdy grinder roll or a long sub roll, split it lengthwise but not all the way through, so the halves stay connected. For best melt, choose cheeses that melt well, such as provolone, mozzarella, cheddar, or a mix. Thinly slice any meats like ham, turkey, or roast beef, and wash and slice vegetables like peppers, onions, or tomatoes.

Butter the outside of the roll on both sides, or brush with olive oil if you prefer. Heat a large skillet or griddle over medium heat. Place the bottom half of the roll in the pan, then layer cheese first, then your chosen fillings, and finish with a final layer of cheese on top. This helps the sandwich stick together when melted. Close the roll and press gently with a spatula or a weight, like another pan, to help the cheese melt evenly.

Cook until the bread is golden and the cheese begins to melt, about 3 to 5 minutes, then carefully flip and press the other side. If the cheese needs more time, lower the heat and cover the pan with a lid for a minute to trap the heat. For a crisp outside and fully melted inside, keep the heat moderate, not too high. Remove the sandwich, let it rest a minute, then slice into portions. Serve warm so each bite is gooey and satisfying.

Why You’ll Love Grinder Grilled Cheese

You will love Grinder Grilled Cheese because it gives you the comfort of grilled cheese with more texture and flavor. The long roll holds more fillings, so you can add meats, pickles, or roasted vegetables without losing the melted cheese focus. Each bite has a crisp outside and a soft, cheesy inside, making it satisfying and filling.

This sandwich is flexible, so you can make it quick for lunch or dressed up for a party. It works with many cheeses and toppings, so picky eaters and food lovers both find a version they enjoy. It also reheats well, and the flavors often taste even better the next day. The mix of warm cheese, toasted bread, and your favorite fillings makes it an easy go-to for comfort food that still feels a bit special.

tips for success

Choose bread that is sturdy enough to hold fillings but not so thick it blocks heat. A good grinder roll or sub roll works best. Use cheeses that melt well, like provolone, mozzarella, cheddar, or fontina. Mixing two cheeses often gives better melt and richer flavor. Slice cheese thinly for even melting.

Don’t use too-high heat, it will brown the bread before the cheese melts. Cook on medium heat and cover briefly if needed to trap steam and help cheese melt. Press gently while cooking to compact the sandwich and make a neat crust. If adding wet items like tomatoes, pat them dry first, or place them between cheese layers to avoid soggy bread.

For even toasting, butter the outside evenly or brush with olive oil. If you like a crunchy top, sprinkle a little grated Parmesan on the outside before toasting. Make extras and wrap them to keep warm in foil, they hold heat well and stay soft inside. Try different fillings in small amounts first to find the combo you love.

Serving Suggestions

Serve Grinder Grilled Cheese with simple sides that balance the richness of the sandwich. A light green salad with a bright vinaigrette cuts through the cheese and adds freshness. Pickles, sliced cucumbers, or a small bowl of coleslaw give a crisp contrast to the meltiness.

For a cozy meal, pair the sandwich with a warm tomato soup, the classic match to any grilled cheese. Offer chips or fries for a more casual plate, or roasted vegetables for a heartier side. If you made a meat-heavy grinder, serve with a small fruit salad for a sweet note.

Sauces help, too, include ketchup, spicy mayo, or a mustard dip for extra flavor. For a party, slice sandwiches into smaller pieces and serve with toothpicks so guests can try different versions. Keep drinks simple, like iced tea or soda, or a light beer for adult gatherings.

FAQs

Q: Can I make these ahead and reheat them?
A: Yes, you can assemble and wrap them in foil, store in the fridge, and reheat in a low oven or a skillet. Reheat slowly so the cheese melts evenly.

Q: What cheeses work best?
A: Provolone, mozzarella, cheddar, fontina, and Swiss all melt well. Mixing a mild cheese with a sharp cheese gives good flavor and melt.

Q: Can I make a vegetarian version?
A: Absolutely, use roasted peppers, mushrooms, spinach, tomatoes, and your favorite cheese. Add a spread like pesto for extra taste.

Q: How do I keep the bread from getting soggy?
A: Place wet items like tomatoes between cheese layers or pat them dry before adding. Butter the outside of the roll, not the inside, to help crisp the bread.

Q: Can these be made in an oven or sandwich press?
A: Yes, you can bake them at 350°F until golden, or use a sandwich press for quick and even toasting.

Conclusion

Try different fillings and find your favorite Grinder Grilled Cheese twist, then enjoy it with simple sides and good company. For bread ideas, check a local bakery menu to find sturdy rolls, like those shown on Our Menu — Grand Central Bakery. If you want another hearty sandwich idea that pairs well with grinder flavors, read a tasty take on subs like the one at Indulge in the Irresistible: Savory & Tender French Dip Subs.

[tasty-recipe id=”5337″]

Grinder Grilled Cheese

Grinder Grilled Cheese is a fun twist on a classic sandwich that combines melting cheese with hearty grinder-style bread and various fillings for a delicious, satisfying meal.

Bread

  • 4 pieces Grinder rolls or sub rolls (Choose sturdy rolls that can hold fillings.)

Cheese

  • 8 oz Provolone, mozzarella, cheddar, or a mix (Use cheeses that melt well.)

Fillings

  • 4 oz Thinly sliced meats (ham, turkey, roast beef) (Choose any preferred meats.)
  • 1 cup Sliced vegetables (peppers, onions, tomatoes) (Wash and slice vegetables.)

Additional Ingredients

  • 4 tbsp Butter or olive oil (For spreading on the outside of the bread.)

Preparation

  1. Gather bread, cheese, butter, and any fillings you like.
  2. Split the grinder roll lengthwise but not all the way through.
  3. Butter the outside of the roll on both sides or brush with olive oil.

Cooking

  1. Heat a large skillet or griddle over medium heat.
  2. Place the bottom half of the roll in the pan, layer cheese first, then fillings, and finish with more cheese on top.
  3. Close the roll and press gently to help melt the cheese evenly.
  4. Cook until the bread is golden and cheese begins to melt, about 3 to 5 minutes.
  5. Carefully flip and press the other side.
  6. If cheese needs more time, lower heat and cover the pan with a lid for a minute.
  7. Once cooked, let the sandwich rest a minute, then slice into portions and serve warm.

Consider using a mix of two cheeses for better melt and richer flavor. For extra crunch, sprinkle grated Parmesan on the outside before toasting. Keep drinks simple and consider side pairings like salad or tomato soup.

lunch, Main Course
American
Comfort Food, Easy Recipes, Grilled Cheese, Quick Meals, Sandwich