Chicken Ghee Roast

Chicken Ghee Roast is a delightful dish that will take your taste buds on an exciting journey. This recipe features tender chicken pieces simmered in rich ghee, along with aromatic spices that create an unforgettable flavor. What makes this dish a real crowd-pleaser is its perfect balance of spices and the inviting aroma it brings to the kitchen. It’s not just a meal, it’s a celebration of flavors that your family and friends will adore. As you prepare to make it, you might find yourself daydreaming about how great it will taste! You may also find Autumn Chicken Dinner With Roasted Vegetables useful.

How to prepare Chicken Ghee Roast

Start by gathering your ingredients: chicken, ghee, and a mix of spices such as chili powder, turmeric, and garam masala. Marinate the chicken in spices to infuse flavor and let it sit for a bit. After marination, heat ghee in a pan, and add the marinated chicken, cooking until it’s tender and absorbs all the delicious flavors.

Chicken Ghee Roast

Why You’ll Love Chicken Ghee Roast

One bite of Chicken Ghee Roast, and you’ll understand why it’s so loved. The chicken is incredibly juicy, and the ghee gives it a rich texture that wraps around your mouth in a warm hug. If you enjoy comforting meals that are packed with flavor, this dish will quickly become a favorite. You can pair it with rice or naan for a truly satisfying meal. Plus, it’s versatile enough to serve at a casual dinner or a festive gathering. For more ideas on flavorful chicken options, check out this oven-roasted chicken thighs recipe.

Tips for success

To ensure your Chicken Ghee Roast turns out perfectly, here are a few tips. First, don’t rush the marination process—let the chicken soak up the spices for at least an hour. This step is crucial for building flavor. Second, use fresh spices whenever possible, as they can significantly enhance the taste. Lastly, be mindful not to overcook the chicken; you want it moist and tender, not dry.

Chicken Ghee Roast

Serving Suggestions

Chicken Ghee Roast pairs wonderfully with fluffy basmati rice or warm naan. You can also serve it with a side of cucumber raita to balance the spices and add a refreshing touch. For a complete meal, consider serving a simple salad alongside to lighten things up.

FAQs

1. Can I use other types of meat for this recipe?

Yes, while Chicken Ghee Roast is typically made with chicken, you can also use lamb or other meats that you prefer. Just adjust the cooking time accordingly.

2. How long should I marinate the chicken?

Marinating the chicken for at least one hour is recommended, but if you can let it sit overnight, you’ll enhance the flavors even more.

3. Is Chicken Ghee Roast spicy?

The spiciness can be adjusted to your preference. If you prefer a milder dish, reduce the amount of chili powder or use a less spicy variety.

Chicken Ghee Roast is a meal that brings comfort and joy with every bite. Dive in and enjoy the wonderful flavors you create!

Chicken Ghee Roast

Chicken Ghee Roast is a delightful dish featuring tender chicken simmered in rich ghee and aromatic spices, creating an unforgettable flavor that will please any crowd.

For the Chicken Ghee Roast

  • 500 grams chicken, cut into pieces (Use fresh chicken for better flavor.)
  • 4 tablespoons ghee (Melt before adding to the pan.)
  • 1 tablespoon chili powder (Adjust based on your spice preference.)
  • 1 teaspoon turmeric powder (Adds color and flavor.)
  • 2 teaspoons garam masala (Use fresh for best results.)

Preparation

  1. Gather all the ingredients: chicken, ghee, and spices (chili powder, turmeric, and garam masala).
  2. Marinate the chicken with the spice mix and let it sit for at least an hour to infuse the flavors.

Cooking

  1. Heat ghee in a pan over medium heat.
  2. Add the marinated chicken to the pan and cook until tender and all flavors are absorbed (approximately 30 minutes).

For optimal flavor, marinate overnight if possible. This dish pairs well with fluffy basmati rice, naan, or a side of cucumber raita. Avoid overcooking the chicken to maintain tenderness.
Dinner, Main Course
Indian
Chicken Ghee Roast, Flavorful Dinner, Ghee Chicken, Indian Chicken, Spicy Chicken Dish

Lentil Spinach Curry

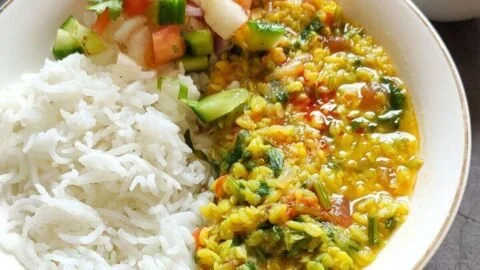
Bowl of delicious lentil spinach curry garnished with fresh herbs

I love a warm bowl of Lentil Spinach Curry on a busy night, it feels like a hug that is healthy and simple. This dal with spinach mixes soft lentils, bright greens, and gentle spices, and it cooks fast. The flavors are mild but full, the texture is creamy, and the dish works as a comfort food or a healthy weeknight meal. This Lentil Spinach Curry is a crowd-pleaser, it tastes fresh, earthy, and a little bright from tomatoes and lemon, and most people ask for seconds. Get ready, it is easy to make, and you will want to make it again and again.

How to prepare Lentil Spinach Curry

Ingredients

  • 1 cup red lentils, rinsed and drained
  • 4 cups fresh spinach, washed and chopped
  • 1 medium onion, chopped
  • 2 cloves garlic, minced
  • 1 inch ginger, grated or minced
  • 1 medium tomato, chopped, or 1/2 cup canned tomato
  • 1 tsp ground cumin
  • 1 tsp ground coriander
  • 1/2 tsp turmeric
  • 1/2 tsp chili powder, or to taste
  • 1 tsp salt, or to taste
  • 2 tbsp oil or ghee
  • 4 cups water or vegetable broth
  • Juice of 1/2 lemon, optional
  • Fresh cilantro to garnish, optional

Directions

  1. Heat oil in a pot over medium heat. Add chopped onion, cook until soft and light brown, about 5 minutes.
  2. Add garlic and ginger, stir for 1 minute until fragrant.
  3. Mix in cumin, coriander, turmeric, and chili powder. Cook spices for 30 seconds, stir so they do not burn.
  4. Add chopped tomato, cook until soft and saucy, about 3 minutes.
  5. Add rinsed lentils and water or broth. Stir, bring to a boil, then lower heat and simmer, covered, 15 to 20 minutes, until lentils are soft.
  6. Add chopped spinach, stir, and cook 2 to 4 minutes until spinach wilts and mixes into the dal.
  7. Season with salt and lemon juice, taste and adjust spices.
  8. Serve warm, garnish with cilantro if you like.

Lentil Spinach Curry

Why You’ll Love Lentil Spinach Curry

  • It is healthy and protein-rich, perfect for a vegetarian meal.
  • The spinach adds color and iron, while lentils give body and creaminess.
  • The spices are simple, they make the curry tasty without being too strong.
  • It is quick to cook, it fits well as an easy weeknight dinner or meal prep.

Tips for success

  • Rinse lentils well, this removes dust and helps them cook evenly.
  • Use red lentils for a soft, creamy texture, they break down faster.
  • If you like a smoother dal, mash some lentils with the back of a spoon.
  • Adjust water for thickness, add more for a soup feel, less for a thicker curry.
  • Cook spices gently, low heat keeps them from tasting bitter.
  • Add lemon at the end, it brightens the whole dish.

Serving Suggestions

  • Serve with steamed rice, or warm naan bread.
  • Top with plain yogurt for a cool contrast.
  • Add roasted vegetables on the side for a fuller meal.
  • Enjoy with pickles or a simple cucumber salad for freshness.

Lentil Spinach Curry

FAQs

Q: Can I use other lentils,

A: Yes, you can use brown or green lentils, they take longer to cook and stay firmer, so increase cooking time and water.

Q: Can I freeze this curry,

A: Yes, cool it fully, put in airtight containers, freeze up to 3 months, thaw and reheat gently with a splash of water.

Q: Is this spicy,

A: The base recipe is mild, you can add more chili or cayenne if you want more heat.

Q: Can I use frozen spinach,

A: Yes, add frozen spinach after the lentils cook, allow extra time for it to heat through.

Q: How long does it keep in the fridge,

A: It keeps well for 3 to 4 days in the fridge in a sealed container.

Conclusion

For a classic take on this dish and more tips, see dal palak – indian spinach and lentil curry – glebe kitchen, it has a clear recipe and helpful notes.

Lentil Spinach Curry

A warm and comforting Lentil Spinach Curry featuring soft lentils, fresh spinach, and gentle spices, perfect for busy weeknights.

Main Ingredients

  • 1 cup red lentils, rinsed and drained (Use red lentils for a soft, creamy texture.)
  • 4 cups fresh spinach, washed and chopped (Can also use frozen spinach.)
  • 1 medium onion, chopped
  • 2 cloves garlic, minced
  • 1 inch ginger, grated or minced
  • 1 medium tomato, chopped, or 1/2 cup canned tomato
  • 1 tsp ground cumin
  • 1 tsp ground coriander
  • 1/2 tsp turmeric
  • 1/2 tsp chili powder, or to taste (Adjust based on spice preference.)
  • 1 tsp salt, or to taste (Add to taste.)
  • 2 tbsp oil or ghee (Cooking fat for sautéing.)
  • 4 cups water or vegetable broth (Use broth for added flavor.)
  • 1/2 unit lemon juice, optional (Fresh lemon enhances flavor.)
  • Fresh cilantro to garnish, optional (For garnish.)

Cooking Instructions

  1. Heat oil in a pot over medium heat.
  2. Add chopped onion, cook until soft and light brown, about 5 minutes.
  3. Add garlic and ginger, stir for 1 minute until fragrant.
  4. Mix in cumin, coriander, turmeric, and chili powder. Cook spices for 30 seconds, stirring to prevent burning.
  5. Add chopped tomato, and cook until soft and saucy, about 3 minutes.
  6. Add rinsed lentils and water or broth. Stir, bring to a boil, then lower heat and simmer, covered, for 15 to 20 minutes until lentils are soft.
  7. Add chopped spinach, stir, and cook for 2 to 4 minutes until spinach wilts and mixes into the dal.
  8. Season with salt and lemon juice, taste and adjust spices as necessary.
  9. Serve warm, garnished with cilantro if desired.

Rinse lentils well to remove dust and help them cook evenly. Adjust water for thickness; add more for soup, less for thicker curry. Cook spices gently to avoid bitterness. Add lemon juice at the end for brightness.

Dinner, Main Course
Indian, Vegetarian
Comfort Food, Easy Recipe, Healthy Dinner, Lentil Spinach Curry, Vegetarian Curry

Crispy Dosa

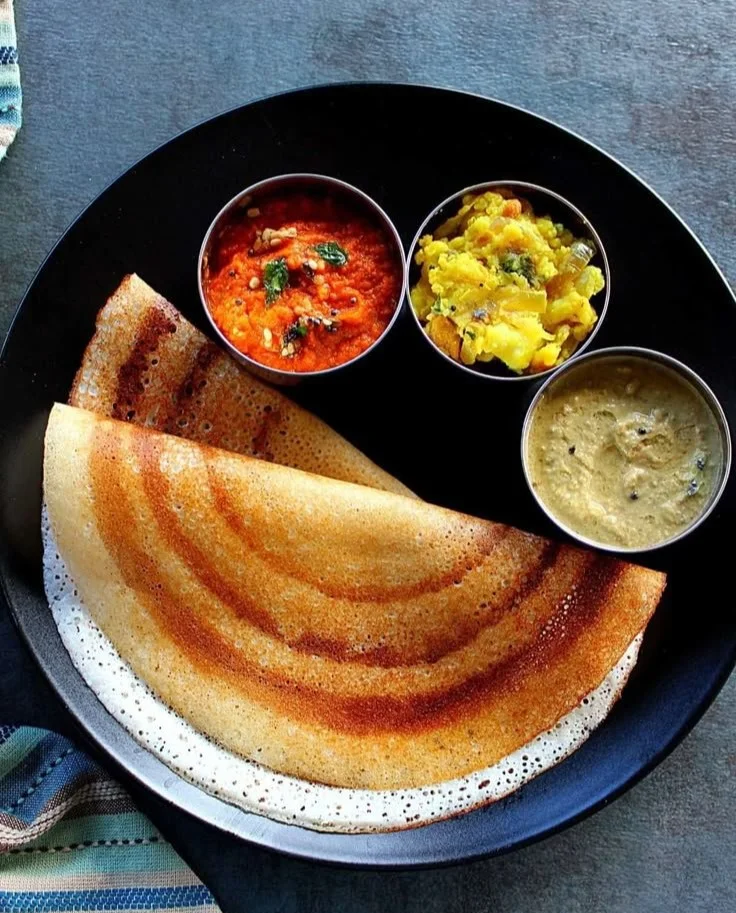
Golden brown crispy dosa served with chutney and sambar on a plate

Dosa is a simple, tasty food from South India. Crispy dosa is thin, light, and crunchy. It has a mild fermented flavor from rice and urad dal batter. This recipe makes a dosa that is golden and crisp on the edges, soft in some places, and full of comfort. It is a crowd-pleaser for breakfast, dinner, or a snack. The taste is warm, slightly tangy, and very satisfying. Get ready to make a crispy dosa that your family will ask for again and again, and enjoy the fun of spreading the batter on the hot pan.

How to prepare Crispy Dosa

Ingredients

  • 2 cups raw rice (idli or regular rice)
  • 1/2 cup urad dal (split black gram)
  • 2 tablespoons cooked rice or poha, optional
  • 1/2 teaspoon fenugreek seeds, optional
  • Salt to taste
  • Water as needed
  • Oil or ghee for cooking

Directions

  1. Rinse rice and urad dal well. Soak rice and fenugreek in one bowl, urad dal in another, for 4 to 6 hours.
  2. Drain. Grind urad dal with a little water to a smooth, fluffy batter. Grind rice to a slightly grainy paste. Add cooked rice or poha if using, this helps crispness.
  3. Mix both batters in a large bowl. Add salt. Cover and keep in a warm place to ferment 8 to 12 hours, until it rises and looks airy.
  4. Stir batter gently. It should be pourable, like a thick pancake batter. Add a little water if too thick.
  5. Heat a nonstick or cast iron tawa, wipe with oil. Pour a ladle of batter in the center. Spread quickly in a circular motion to make a thin crepe.
  6. Drizzle oil or ghee around the edges and on top. Cook on medium-high heat until the dosa turns golden and crisp. If you like it extra crisp, press edges with a spatula and cook a bit longer.
  7. Fold and serve hot with potato masala, coconut chutney, or sambar.

Crispy Dosa

Why You’ll Love Crispy Dosa

  • It is crispy and light, a great texture contrast with soft fillings.
  • The batter is simple, made from rice and urad dal, common pantry items.
  • You can make plain dosa or fill it with potato masala to make a masala dosa.
  • It is quick to cook once the batter is ready, perfect for busy mornings or a quick dinner.
  • Crispy dosa pairs well with many chutneys and sambar, so you get many flavor options.

Tips for success

  • Ferment batter in a warm place, it helps dosa get a mild tang and good airiness.
  • Batter consistency matters, make it pourable but not too thin, like heavy cream.
  • Use a well-heated pan and medium-high heat for crisp edges.
  • Add a little cooked rice or poha to the batter for extra crispness.
  • Use oil or ghee around the edges, this helps make the dosa golden and crunchy.
  • Clean the pan well between dosas if residue builds up, a clean hot surface spreads batter thin and cooks evenly.

Serving Suggestions

  • Serve with coconut chutney and hot sambar for a classic meal.
  • Add potato masala inside to make a masala dosa, a favorite South Indian street food.
  • Try tomato chutney or peanut chutney for a change in flavor.
  • Serve with a cup of filter coffee or hot tea for a full, cozy meal.

Crispy Dosa

FAQs

Q: How long should I ferment dosa batter? A: Ferment 8 to 12 hours in a warm place. Shorter in hot weather, longer in cool weather.

Q: Can I make dosa batter without a grinder? A: Yes, use a high-speed blender. Grind urad dal until fluffy, rice until slightly grainy.

Q: How do I make dosa extra crispy? A: Spread batter thin, use a hot pan, add a little cooked rice or poha to batter, and cook on medium-high heat with oil at the edges.

Q: Can I make batter ahead and store it? A: Yes, keep fermented batter in the fridge for 2 to 3 days. Stir before using and adjust water if thick.

Q: Can I use only rice or only urad dal? A: No, dosa needs both for the right texture. A common mix is 4 parts rice to 1 part urad dal.

Conclusion

If you want a step-by-step visual guide or a related masala dosa twist, check this detailed recipe, Crispy Masala Dosa – Cook With Manali. Try this simple crispy dosa at home and enjoy the warm, crunchy taste with your favorite chutney.

Crispy Dosa

A simple, tasty South Indian dish that features crispy, golden dosas made from fermented rice and urad dal batter, perfect for breakfast or as a snack.

Main Ingredients

  • 2 cups raw rice (idli or regular rice)
  • 1/2 cup urad dal (split black gram)
  • 2 tablespoons cooked rice or poha (optional, helps crispness)
  • 1/2 teaspoon fenugreek seeds (optional)
  • to taste Salt
  • Water (as needed)
  • Oil or ghee (for cooking)

Preparation

  1. Rinse the raw rice and urad dal well.
  2. Soak the rice and fenugreek in one bowl and urad dal in another for 4 to 6 hours.
  3. Drain the soaked ingredients.
  4. Grind urad dal with a little water to make a smooth, fluffy batter.
  5. Grind the rice into a slightly grainy paste.
  6. If using, add cooked rice or poha to the rice batter to help with crispness.
  7. Mix both batters in a large bowl and add salt.
  8. Cover and keep in a warm place to ferment for 8 to 12 hours until it rises and appears airy.

Cooking

  1. Stir the batter gently; it should be pourable like thick pancake batter. Add a little water if too thick.
  2. Heat a nonstick or cast iron tawa and wipe with oil.
  3. Pour a ladle of batter in the center and spread quickly in a circular motion to make a thin crepe.
  4. Drizzle oil or ghee around the edges and on top.
  5. Cook on medium-high heat until the dosa turns golden and crisp. For extra crispiness, press the edges with a spatula and cook a bit longer.
  6. Fold and serve hot with potato masala, coconut chutney, or sambar.

Ferment the batter in a warm place for best results, as it helps achieve the right tangy flavor and airy texture. Ensure the batter is pourable but not too thin, similar to heavy cream. A clean, well-heated pan is crucial for achieving crisp edges.

Breakfast, Snack
Indian, South Indian
Crispy Dosa, Fermented Batter, Gluten-Free, Indian Pancake, Quick Meal