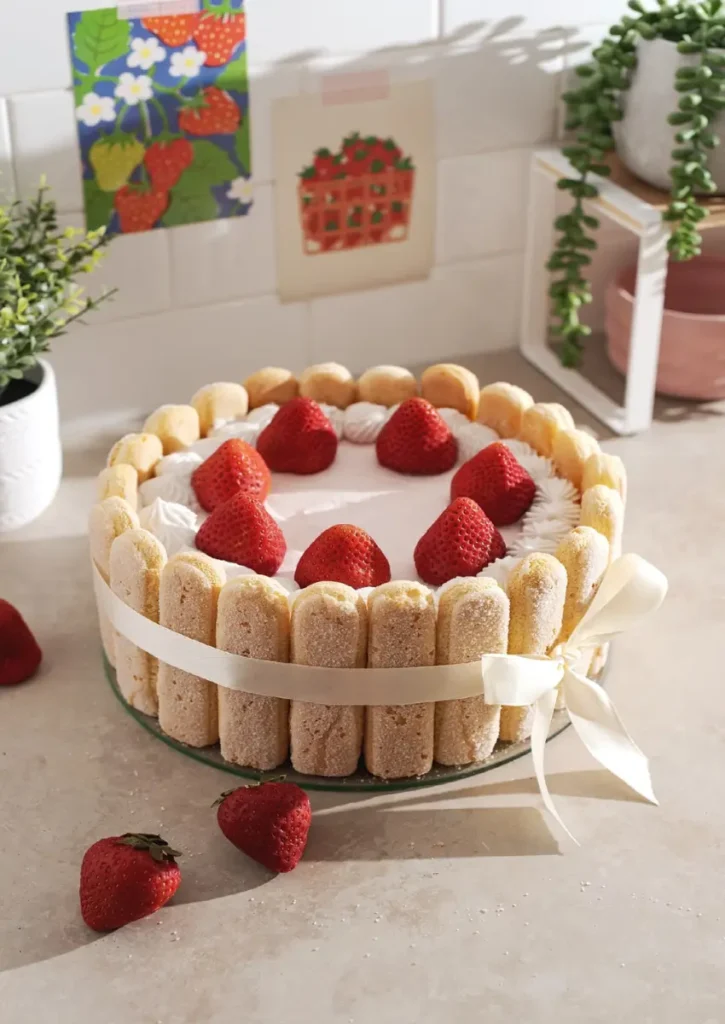
Welcome to the definitive guide to creating one of the most elegant and delicious French desserts: the Strawberry Charlotte Cake, or Charlotte aux Fraises. This show-stopping creation, with its beautiful wall of soft ladyfinger biscuits encasing a heart of luscious, creamy filling and fresh, juicy strawberries, is more than just a cake, it’s an experience. It evokes images of Parisian patisseries and sunny spring afternoons.
Many bakers are intimidated by its sophisticated appearance, but the secret is that it’s surprisingly achievable for home bakers. This is a no-bake dessert (if you opt for store-bought ladyfingers), making it a perfect project for any time of year, especially when strawberries are at their peak.
In this blog I will cover:
- What a Charlotte Cake truly is.
- Detailed ingredient notes to ensure you select the best components.
- A complete guide to making your own fluffy, homemade ladyfingers.
- The secret to a silky, rich Crème Mousseline filling.
- A step-by-step assembly process for a flawless finish.
- Pro tips and tricks to guarantee success every time.
What is a Strawberry Charlotte Cake?
A Charlotte is a classic European molded dessert that traditionally features a “wall” of bread, sponge cake, or biscuits, filled with a rich fruit puree or a creamy custard. The Strawberry Charlotte, or Charlotte aux Fraises, is arguably the most famous version.
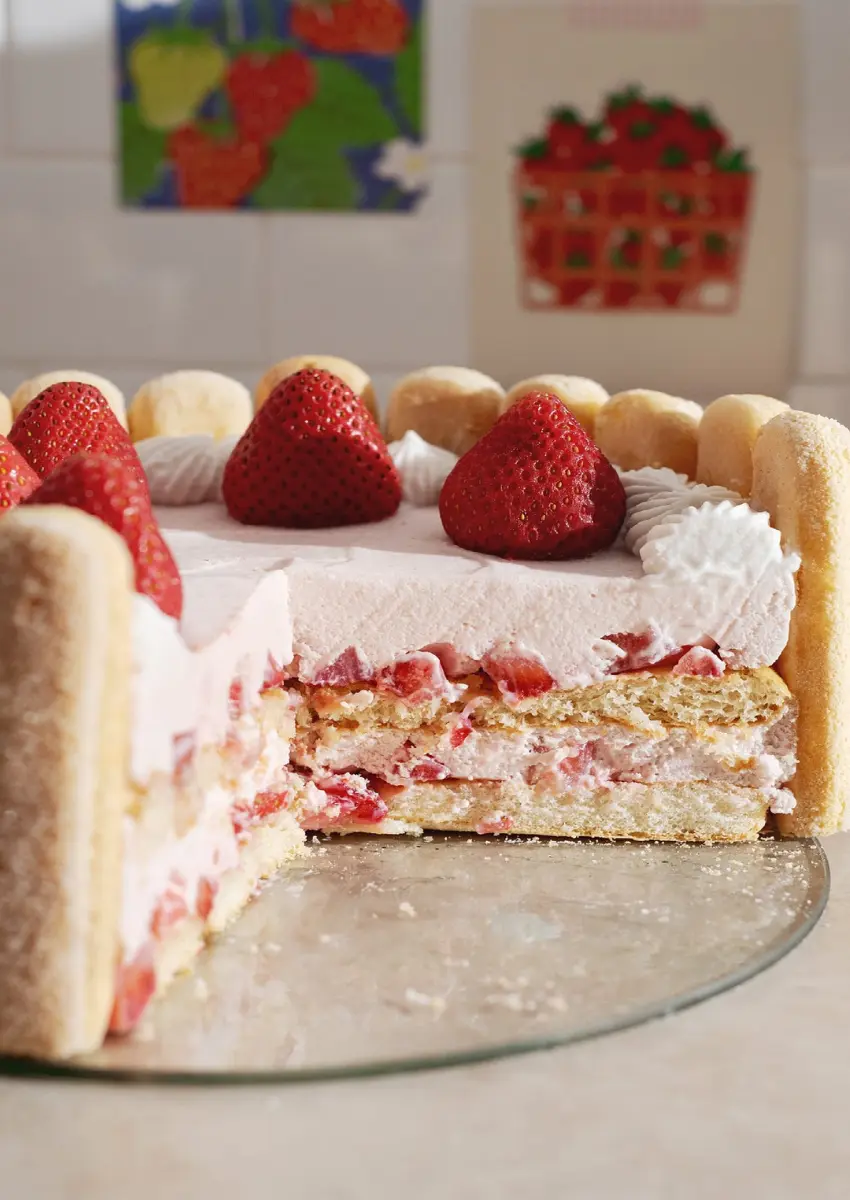
It consists of three main elements working in perfect harmony:
- The Ladyfingers (Biscuits à la Cuillère): These light, dry, egg-based sponge biscuits form the cake’s distinctive border and base. Their absorbency is key, as they soak up the moisture and flavor from the filling, softening to a perfect cake-like texture. You can make them from scratch for a truly artisanal touch or use high-quality store-bought ones to save time.
- The Filling: While variations exist, our recipe features a Crème Mousseline. This is a luxurious, classic French pastry cream that has been enriched with a generous amount of whipped butter. It’s silkier and more stable than simple whipped cream and richer than a standard Bavarian cream, providing a decadent flavor and a texture that holds its shape beautifully.
- The Fruit: Fresh strawberries are the star. They are used in two ways: cooked down into a vibrant strawberry coulis to add a concentrated burst of flavor, and layered fresh within the cake and piled on top for decoration. This dual use provides both a deep, jammy sweetness and a bright, fresh tartness.
Why You Will Fall in Love with This Recipe
- Stunningly Beautiful: This cake has an undeniable “wow” factor. The tidy rows of ladyfingers and the vibrant red strawberries make it a centerpiece dessert.
- Incredibly Delicious: The combination of soft sponge, silky vanilla cream, and fresh, sweet strawberries is a classic pairing for a reason. It’s light yet satisfying.
- Surprisingly Simple: Despite its intricate appearance, the steps are straightforward. It’s a project of assembly and patience, not complex baking techniques.
- Perfect for Any Occasion: From birthdays and anniversaries to spring holidays like Easter or Mother’s Day, this cake is guaranteed to make any event feel more special.
- No-Bake (Optional): If you use store-bought ladyfingers, you don’t even need to turn on your oven, making this an ideal dessert for warmer months.
A Deep Dive into the Ingredients
The quality of your Charlotte Cake lies in the quality of its components. Here’s what you need to know:
- For the Ladyfingers:
- Eggs: The foundation of ladyfingers. You will need to separate them. The whipped egg whites provide the airy, light structure, while the yolks add richness and color.
- Sugar: Simple granulated sugar works perfectly. It’s used to stabilize the egg whites and sweeten the egg yolks, creating a stable meringue-like base.
- Flour & Cornstarch: I use a combination of pastry flour (or all-purpose) and cornstarch. The cornstarch lowers the protein content of the flour, resulting in a more tender, delicate crumb—the signature of a perfect ladyfinger. Always sift your dry ingredients to avoid lumps.
- For the Crème Mousseline:
- Whole Milk: Do not substitute for low-fat milk. The high-fat content is crucial for a rich, creamy, and stable pastry cream.
- Egg Yolks: For the most luxurious flavor and texture, use only egg yolks. They are a natural emulsifier and provide that beautiful pale yellow color.
- Vanilla: This is a key flavor. A vanilla bean paste will give you the most intense flavor and those beautiful black specks. A high-quality vanilla extract is a good substitute.
- Butter: Use good-quality unsalted butter. It needs to be at room temperature to properly incorporate into the pastry cream, creating the “mousseline” texture.
- For the Strawberry Coulis:
- Strawberries: You can use fresh or frozen strawberries for the coulis. If using fresh, choose ripe, fragrant berries for the best flavor.
- Lemon Juice: This is not just for flavor. A small amount of freshly squeezed lemon juice brightens the strawberry flavor and helps balance the sweetness.
Essential Equipment
- Adjustable Cake Ring or Springform Pan: An 18cm (7-inch) ring is ideal. This gives you perfectly straight sides.
- Acetate Cake Collar: This is a professional secret for an ultra-clean finish. Lining your cake ring with an acetate collar ensures the sides of your cake are smooth when you unmold it.
- Piping Bag and Round Tip: Essential for piping uniform ladyfingers and for neatly assembling the filling.
- Stand Mixer or Electric Hand Mixer: Crucial for whipping the egg whites to stiff peaks and for creating a smooth Crème Mousseline.
- Digital Scale: For baking, precision is key. A digital scale ensures your measurements are accurate.
How to Make Strawberry Charlotte Cake

Part 1: Crafting Homemade Ladyfingers
- Prepare: Preheat your oven to 180°C (350°F). Line two baking sheets with parchment paper. For perfectly uniform biscuits, you can draw 10cm (4-inch) guidelines on the paper.
- Whip Egg Whites: In a large, impeccably clean bowl, beat the egg whites with a pinch of salt until they become frothy. Gradually add half of the sugar and continue to beat on high speed until you have a thick, glossy meringue with stiff peaks.
- Whip Egg Yolks: In a separate bowl, beat the egg yolks with the remaining sugar until the mixture is pale, thick, and has tripled in volume. This step incorporates air and dissolves the sugar.
- Combine: Gently fold the yolk mixture into the whipped egg whites using a spatula. Fold until just combined—you want to maintain as much air as possible.
- Add Dry Ingredients: Sift the flour and cornstarch over the egg mixture. Gently fold them in until no streaks of flour remain. Stop as soon as the batter is homogenous.
- Pipe and Bake: Transfer the batter to a piping bag fitted with a large round tip. Pipe 10cm (4-inch) fingers onto your prepared sheets. Bake for 12-15 minutes, until golden and firm. Let them cool completely on a wire rack.
Part 2: Making the Fillings
Strawberry Coulis:
In a small saucepan, combine the strawberry puree, sugar, and lemon juice. Bring to a simmer over medium heat and cook for 3-5 minutes until slightly thickened. Set aside to cool to room temperature.
Crème Mousseline:
- Make Pastry Cream: In a bowl, whisk egg yolks and sugar until pale. Whisk in the cornstarch and flour until smooth. Meanwhile, heat the milk in a saucepan until it simmers.
- Temper the Eggs: Slowly pour the hot milk into the egg yolk mixture while whisking constantly. This gently raises the temperature of the eggs without scrambling them.
- Cook the Cream: Pour the mixture back into the saucepan. Cook over medium heat, whisking vigorously and constantly, until it thickens to a pudding consistency.
- Finish the Pastry Cream: Remove from the heat and immediately stir in the vanilla and half of the butter until smooth. Transfer to a bowl, cover the surface with plastic wrap to prevent a skin from forming, and let it cool completely to room temperature.
- Make the Mousseline: In a large bowl, whip the remaining softened butter until light and creamy. Gradually add the cooled pastry cream, one spoonful at a time, whipping until the mixture is perfectly smooth, light, and airy.
Part 3: Assembling Your Masterpiece
- Prepare Your Mold: Set your 18cm (7-inch) cake ring on a serving plate. Line the inside with an acetate collar.
- The Wall and Base: Trim one end of about 20-22 ladyfingers to create a flat base. Arrange them, standing up, tightly against the inside of the ring with the rounded side facing out. Line the bottom of the ring with more ladyfingers to create a solid base.
- First Layer: Gently drizzle some of the cooled strawberry coulis over the ladyfinger base.
- Second Layer: Pipe or spoon half of the Crème Mousseline into the cake and spread it evenly.
- Third Layer: Arrange a layer of fresh, sliced strawberries over the cream.
- Fourth Layer: Place another layer of ladyfingers over the strawberries. Drizzle with the remaining coulis.
- Final Layer: Top with the rest of the Crème Mousseline and smooth the surface with an offset spatula.
- Chill (The Most Important Step!): Refrigerate the cake for at least 6 hours, but preferably overnight. This time allows the filling to set firmly and the ladyfingers to soften into a cake-like texture. Do not rush this step!
Pro Tips for a Perfect Charlotte
- Temperature is Key: For the smoothest Crème Mousseline, ensure both your pastry cream and your whipped butter are at the same room temperature before combining.
- Work Quickly and Gently: When folding ingredients for the ladyfingers and the mousse, be gentle to retain as much air as possible for a light texture.
- Don’t Over-Soak: When drizzling the coulis, be mindful not to make the ladyfingers too soggy. A light drizzle is all that’s needed.
- A Snug Fit: Pack the ladyfingers tightly together for the walls and base. This provides structure and prevents the filling from leaking out.
Decorating and Serving
Once your cake has fully set, it’s time for the final flourish. Carefully remove the cake ring and peel away the acetate collar to reveal the beautiful, clean sides.
Decorate the top with a generous pile of fresh strawberries. You can use whole berries, halves, or slices. A few fresh mint leaves add a lovely touch of green. For a final patisserie-style touch, tie a beautiful ribbon around the cake.
Serve the cake chilled. The combination of cold, creamy filling and soft sponge is simply divine.
Storage Instructions
Store your Strawberry Charlotte Cake in the refrigerator. It is best enjoyed within 2 days, as the ladyfingers will continue to soften over time.
Enjoy the process of creating this timeless dessert. Happy baking.
Print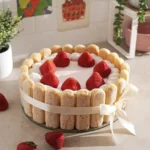
Strawberry Charlotte Cake
- Total Time: 6 hours 30 minutes
- Yield: 10-12 servings 1x
- Diet: Halal
Description
A classic and elegant no-bake dessert, this Strawberry Charlotte Cake features a beautiful border of ladyfingers filled with a light and airy strawberry mousse and fresh, diced strawberries. It’s a perfect dessert for special occasions, showcasing the fresh flavor of strawberries in a stunning presentation.
Ingredients
- 60 g cold water
- 1 tablespoon gelatin powder
- 40 ladyfingers
- 450 g whipping cream
- 40 g powdered sugar
- 1 teaspoon vanilla extract
- 700 g strawberries, finely diced
- 8 strawberries, whole, for topping
Instructions
- Fill a small bowl with 60g of cold water. Sprinkle gelatin powder over the water. Let this sit for at least 10 minutes to bloom the gelatin (it will become a firm gel puck).
- Line the sides of a 9″ springform pan with parchment paper or clear acetate.
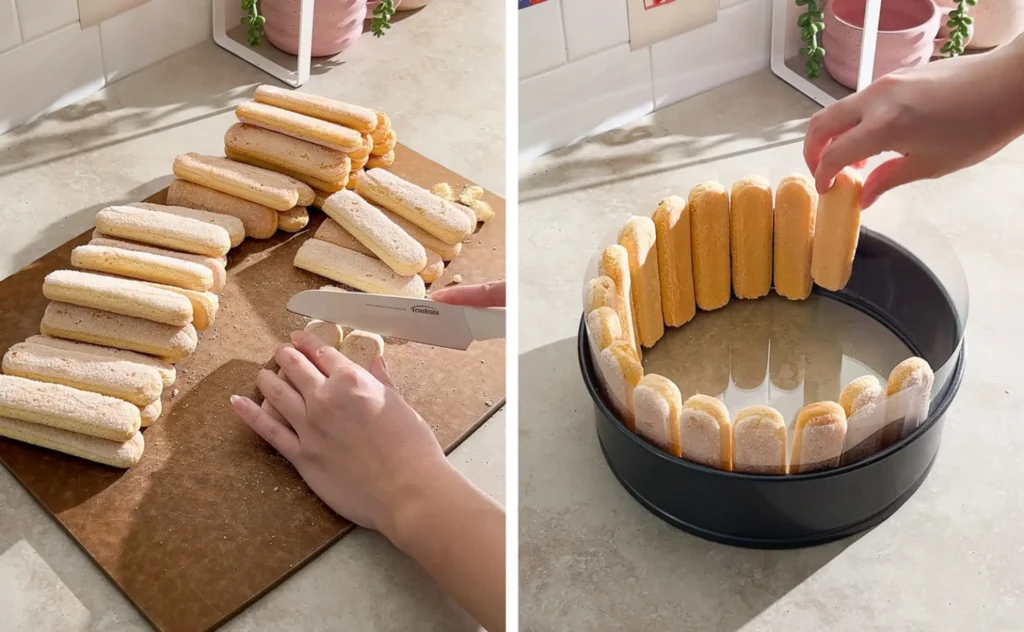
- Cut about ¼” off one end of the ladyfingers that will be going around the side of the pan (about 23 ladyfingers) so that they can stand up vertically. Arrange them in a ring around the pan.
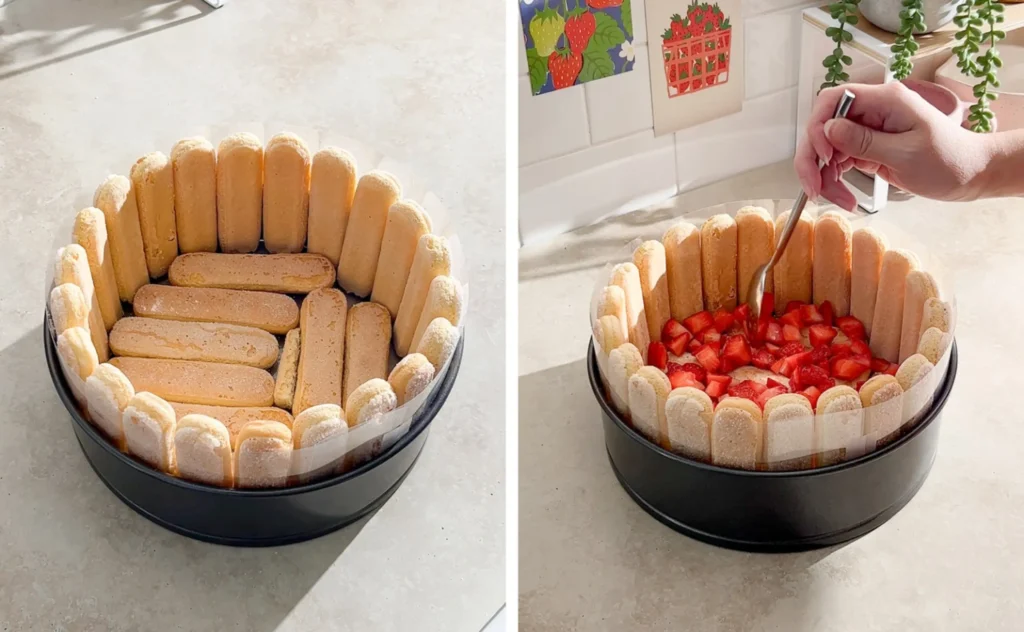
- Arrange a layer of ladyfingers on the bottom of the pan, cutting them smaller where needed to fill in any gaps. Add an even layer of about 200g of the diced strawberries on top of the ladyfingers. Set aside.
- In a large mixing bowl, add the whipping cream, powdered sugar, and vanilla extract. Use an electric hand mixer fitted with a whisk attachment to beat the cream until it becomes firm peaks. Separate out about 100g of whipped cream into a piping bag fitted with a piping tip of your choice for the topping. Set both aside.
- To a blender, add 250g of the diced strawberries. Microwave your small bowl of bloomed gelatin for about 15 seconds until it has melted into a liquid. Add this to the blender. Blend until the strawberries have been pureed.
- Pour the pureed strawberry mixture into the bowl of whipped cream. Fold them together with a spatula until no streaks remain.
- Add about half of this strawberry mousse mixture into the pan on top of the strawberry layer. Smooth into a flat layer with a spatula.
- Arrange another layer of ladyfingers on top. Add the rest of the diced strawberries on top. Finally, add the rest of the mousse mixture on top and smooth the top with a spatula.
- Pipe a ring of whipped cream on top of the cake. Arrange strawberries on top as decoration.
- Chill the cake in the fridge for at least 6 hours or preferably overnight for the mousse to firm up and the ladyfingers to soften. Release the cake from the pan and tie a ribbon around the cake before serving.
Notes
- Ensure the gelatin is fully bloomed and then melted to a liquid before adding it to the strawberry puree for a smooth mousse.
- The chilling time is crucial for the cake to set properly and for the ladyfingers to soften to a cake-like texture.
- Using a springform pan makes it much easier to release the cake without damaging the ladyfinger border.
- Tie a ribbon around the cake for a classic, decorative touch and to help hold the ladyfingers in place.
- Prep Time: 30 minutes
- Cook Time: 0 minutes
- Category: Dessert
- Method: No-Bake
- Cuisine: French
Nutrition
- Serving Size: 1 slice (approx. 1/12th of the cake)
- Calories: 350
- Sugar: 25g
- Sodium: 85mg
- Fat: 22g
- Saturated Fat: 14g
- Unsaturated Fat: 8g
- Trans Fat: 0g
- Carbohydrates: 34g
- Fiber: 2g
- Protein: 4g
- Cholesterol: 80mg
Keywords: Strawberry Charlotte Cake, No-Bake Dessert, Strawberry Mousse, Ladyfingers, Summer Dessert, French Dessert