# Elevate Your Palate: A Guide to Crafting the Perfect Egg Salad


Introduction

Egg salad, a beloved staple in many households, has stood the test of time as a go-to sandwich filling and a versatile ingredient in various dishes. Its creamy texture, mild flavor, and ease of preparation have made it a favorite among home cooks and professional chefs alike. In this comprehensive guide, we’ll delve into the art of crafting the perfect egg salad, exploring the secrets to its success and offering tips to elevate this humble dish to new levels of deliciousness.

The Significance of Fresh Ingredients

The quality of your egg salad begins with the quality of your ingredients. Fresh, high-quality eggs are the cornerstone of this dish. Opt for organic or free-range eggs, as they tend to have richer, more vibrant yolks, adding depth and a luxurious texture to your egg salad. The difference in taste and appearance is noticeable, making your egg salad a cut above the rest.

Mastering the Art of Hard-Boiled Eggs

The foundation of any great egg salad is, without a doubt, the hard-boiled eggs themselves. Here’s a detailed guide to achieving the perfect hard-boiled eggs:

Select and Prepare Eggs: Choose fresh, room-temperature eggs for the best results. Place them in a single layer in a saucepan, ensuring they have enough space to move freely.

Fill with Water: Cover the eggs with cold water, ensuring they are submerged by about an inch. This extra space allows for gentle cooking and prevents cracking.

Bring to a Boil: Turn on the heat to high and bring the water to a rolling boil. This rapid heating ensures even cooking.

Time for Perfection: Once the water is boiling vigorously, cover the saucepan and remove it from the heat. Let the eggs sit in the hot water for a precise amount of time: 12 minutes for medium-set yolks and 15 minutes for fully set, firm yolks.

Cool and Peel: After cooking, transfer the eggs to a bowl of ice water to stop the cooking process and make peeling easier. This rapid cooling also helps prevent a greenish ring from forming around the yolks.

Crafting the Ultimate Egg Salad

With your perfectly cooked eggs in hand, it’s time to create the star of the show:

Chop with Precision: Peel the eggs and chop them into small, uniform pieces. This ensures a smooth and consistent texture throughout your salad.

Mayonnaise Magic: Add a generous amount of mayonnaise to bind the ingredients together. Opt for a high-quality, full-fat mayonnaise for the richest, creamiest results.

Season with Care: Sprinkle salt and freshly ground black pepper to taste. Be mindful of the salt, as mayonnaise can already be quite salty. Adjust the seasoning as needed, tasting as you go.

Garnish and Flavor Boost: Elevate your egg salad with a variety of flavorful additions. Chopped celery adds a crisp, refreshing element, while green onions bring a subtle onion flavor. Fresh herbs like dill or chives offer a burst of aroma and taste. A squeeze of lemon juice brightens the flavors and adds a tangy twist.

Personalize Your Creation: Feel free to experiment with different ingredients to make your egg salad unique. Some enthusiasts add a touch of Dijon mustard for a spicy kick, while others prefer a pinch of paprika for a subtle warmth. Get creative and find your perfect combination!

Versatile Serving Suggestions

Egg salad’s versatility knows no bounds, and it can be enjoyed in countless ways:

Classic Sandwich: Spread a generous amount of egg salad on toasted bread, add some crisp lettuce and ripe tomato slices, and enjoy a classic lunch.

Wrap It Up: For a portable option, use a soft tortilla wrap or a flatbread to create a delicious egg salad wrap. Add some baby spinach and sliced avocado for an extra nutritious boost.

Dip Delight: Serve egg salad as a dip with a variety of crackers, vegetable sticks, or even potato chips for a satisfying snack.

Salad Sensation: Transform your egg salad into a hearty salad by adding it to a bed of mixed greens. Top with cherry tomatoes, cucumber slices, and a drizzle of balsamic vinaigrette for a complete meal.

Storage and Safety Tips

Egg salad, like any dish containing mayonnaise, requires proper storage to ensure food safety:

Chill It: Always store your egg salad in the refrigerator. It can be kept for up to 3-4 days when properly chilled.

Avoid Cross-Contamination: Use clean utensils and avoid double-dipping to prevent the growth of bacteria. Serve egg salad with disposable utensils or transfer it to individual portions to avoid contamination.

Leftovers: If you have leftovers, it’s best to consume them within 24 hours for optimal quality and safety. Egg salad should not be kept at room temperature for extended periods.

Conclusion

Egg salad is a timeless classic that, with a few simple techniques and fresh ingredients, can be transformed into a culinary masterpiece. Whether you’re preparing it for a quick lunch, a special picnic, or a sophisticated appetizer, this versatile dish is sure to impress. So, embrace the art of egg salad and let your creativity shine!

A St. Patrick’s Day Delight: Corned Beef and Cabbage – A Hearty and Traditional Meal

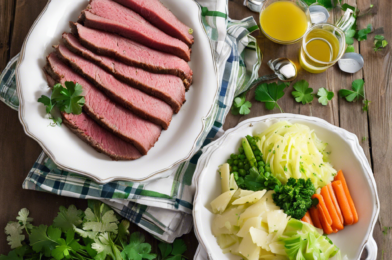
St. Patrick’s Day is a celebration that brings people together, and what better way to enjoy this festive day than with a delicious, hearty meal that honors tradition? Corned beef and cabbage is a classic dish that has become synonymous with St. Patrick’s Day celebrations across the globe. This mouth-watering combination not only satisfies your taste buds but also provides a warm, comforting dining experience. It’s a perfect excuse to gather friends and family for a memorable feast.

This traditional meal has its roots in Irish history. During the early 20th century, Irish-American immigrants often opted for corned beef as a more affordable alternative to bacon, which was pricier. The pairing of cabbage with corned beef became a customary dish, especially on St. Patrick’s Day, as it offered a taste of home for those far from Ireland.
## A Hearty Feast

Corned beef and cabbage is not just a meal; it’s a culinary adventure. The process starts with preparing the corned beef, which is typically brine-cured and seasoned with a mixture of spices, including peppercorns, mustard seeds, bay leaves, and more. This curing process gives the beef its distinct flavor and tender texture.

When it comes to cooking, the beef is simmered for hours, allowing the spices and flavors to meld together beautifully. The cabbage, often accompanied by potatoes and carrots, is added towards the end, absorbing the rich broth and creating a truly satisfying side dish. The result is a fork-tender corned beef with a slightly salty, peppery taste, accompanied by sweet, tender cabbage—a flavor profile that will leave you wanting more.

## A Festive Tradition

St. Patrick’s Day celebrations would be incomplete without this iconic dish. Whether you’re hosting a grand feast or enjoying a cozy dinner at home, corned beef and cabbage adds a special touch. Its robust flavors and comforting nature make it a perfect centerpiece for any festive gathering.

Many families have incorporated this meal into their St. Patrick’s Day rituals, passing down recipes and cooking techniques from generation to generation. It’s a wonderful way to connect with family history and Irish heritage while creating new memories.

## A Versatile Dish

The beauty of corned beef and cabbage lies in its versatility. This dish is not limited to St. Patrick’s Day alone; it can be enjoyed throughout the year. Consider experimenting with different recipes and cooking methods to keep things exciting.

For a modern twist, you can try adding a tangy sauce or experimenting with various spices. Some even venture into the realms of corned beef hash or corned beef sandwiches, ensuring that you can savor this delightful meal in numerous ways.

As you prepare to celebrate St. Patrick’s Day, consider making corned beef and cabbage the star of your menu. It’s a delightful culinary journey that will leave a lasting impression, bringing a taste of tradition to your table. Happy St. Patrick’s Day!

Slow-Cooked Delights: A Guide to Hearty and Tasty Crock Pot Meals

Slow cooking is an age-old method that transforms simple ingredients into mouth-watering meals, and the Crock Pot is a modern-day hero for busy home cooks. This trusty kitchen appliance allows you to create delicious, hearty dishes with minimal effort and maximum flavor. Get ready to dive into a world of slow-cooked delights that will warm your soul and satisfy your taste buds!

Imagine coming home to the enticing aroma of a perfectly cooked meal after a long day. The Crock Pot does the hard work for you, gently simmering ingredients to create tender meats, rich sauces, and flavorful stews. It’s like having your very own personal chef, ensuring you and your family can enjoy nutritious and satisfying meals every day. From classic comfort food to adventurous global cuisine, the possibilities are endless with this versatile cooking tool.
**Comforting Classics:**
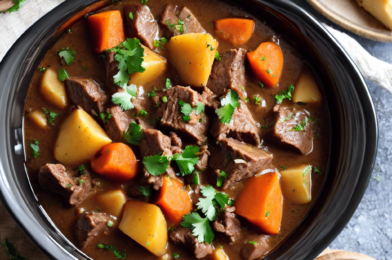
A Crock Pot is ideal for timeless favorites like hearty beef stew, creamy chicken and dumplings, and melt-in-your-mouth pulled pork. These dishes benefit from slow cooking, resulting in tender textures and rich flavors that will have you licking your lips. Imagine spooning into a bowl of chunky beef stew, where the meat falls apart at the touch of your fork, and the sauce coats your palate with its savory goodness.

**Global Cuisine:**
Take your taste buds on a world tour with international dishes like Indian butter chicken, Mexican carnitas, or French coq au vin. Slow cooking infuses these dishes with deep, complex flavors, making them an adventure for your palate. Imagine serving authentic, aromatic butter chicken, its vibrant colors and fragrant spices transporting you to the bustling streets of Delhi.

For a successful Crock Pot experience, remember these tips: cut ingredients into uniform sizes for even cooking, brown meats beforehand for richer flavor, and avoid over-filling the pot to ensure proper cooking and reduce the risk of spillage.

ndulge in the Classic Charm: A Recipe for Delicious Peanut Butter Cookies

The aroma of freshly baked cookies wafting through your kitchen is a timeless delight. And when it comes to classic treats, peanut butter cookies always hit the spot! With their melt-in-your-mouth texture and rich, nutty flavor, they’ve become a beloved favorite across generations. In this simple recipe, we’ll guide you through creating these delightful treats, ensuring they become a go-to comfort food in your household.

**Ingredients:**
– 1 cup creamy peanut butter
– 1 cup brown sugar
– 1 large egg
– 1 teaspoon baking soda
– A pinch of salt (optional)

**Instructions:**
1. Preheat your oven to 350°F (180°C). This temperature ensures your cookies bake evenly and develop the perfect texture.

2. In a medium-sized mixing bowl, combine the creamy peanut butter and brown sugar. The secret to these cookies’ irresistible flavor lies in the blend of these two ingredients. Use a wooden spoon or an electric mixer to ensure a smooth, lump-free consistency.

3. Add the egg to the mixture and beat until fully incorporated. The egg acts as a binding agent, giving your cookies the right texture.

4. Sprinkle in the baking soda and salt (if using). These ingredients are crucial for leavening and bringing out the flavors.

5. Mix until you have a soft, slightly sticky dough. The dough should be easy to handle; if it’s too sticky, add a little more peanut butter, and if it’s too dry, add a tiny bit of water.

Stay tuned for the next steps to ensure your cookies turn out perfectly!

Spice Up Your Holidays: A Recipe for Traditional Gingerbread Cookies

The holiday season is upon us, and what better way to embrace the festivities than by indulging in some classic holiday baking? Gingerbread cookies are a timeless treat that not only delights our taste buds but also fills our homes with the warm and fragrant spices of the season. This easy-to-follow recipe will guide you through creating delicious, crispy-edged gingerbread cookies that will become a family favorite.

Gather your ingredients to embark on this delightful baking journey. You’ll need butter, brown sugar, molasses, an egg, all-purpose flour, baking soda, ground ginger, cinnamon, cloves, and salt. These simple ingredients come together to create a flavor profile that is both comforting and festive.

Start by creaming the butter and sugar until light and fluffy, then add the molasses and egg, ensuring they are well combined. In a separate bowl, whisk together the dry ingredients. Gradually blend the dry ingredients into the wet mixture until a soft dough forms. The dough will be slightly sticky, which is perfect for rolling and cutting into fun shapes.

Chill the dough for an hour to make it easier to handle. Then, on a floured surface, roll it out to about 1/4 inch thickness. Now comes the fun part—choose your favorite holiday cookie cutters to create an assortment of festive shapes. From gingerbread men and women to snowflakes and trees, let your creativity shine!

Once your cookies are cut, arrange them on a baking sheet lined with parchment paper. Bake in a preheated oven until the edges are set and slightly darker than the centers. Allow the cookies to cool on the baking sheet for a few minutes before transferring them to a wire rack to cool completely.

As the tantalizing aroma of ginger, cinnamon, and cloves fills your home, you’ll find yourself eager to sample these treats. Decorate your cookies with colorful icing and candies, or simply enjoy their natural beauty. These gingerbread cookies make perfect gifts for friends and family, or you can savor them alongside a warm cup of cocoa on a chilly evening.

This holiday season, baking traditional gingerbread cookies is an excellent way to connect with loved ones and create lasting memories. It’s a delicious tradition that will leave your kitchen filled with the sweet smells of the season and your heart filled with joy. So, gather your ingredients, put on some festive music, and let the baking begin! Your taste buds and loved ones will thank you.

Sweet Indulgence: A Classic Sugar Cookie Recipe for All Occasions

Freshly baked cookies bring warmth to any gathering, and few treats are as universally adored as the classic sugar cookie. With its delicate texture, subtle sweetness, and endless customization options, this timeless recipe is a true crowd-pleaser. Whether you’re hosting a holiday party, celebrating a birthday, or simply craving a sweet treat, homemade sugar cookies are the perfect companion for any occasion. So, let’s dive into the art of creating these delightful confections and explore why they remain a beloved favorite.

In the world of baking, sugar cookies hold a special place. Their simplicity is their strength, allowing bakers of all skill levels to master the recipe with ease. The key to the perfect sugar cookie lies in achieving a balanced ratio of ingredients. Soft and buttery, yet sturdy enough to hold its shape, this cookie is a blank canvas waiting to be decorated and personalized. The beauty of this recipe is its versatility—you can add a hint of lemon zest for a refreshing twist or sprinkle in some cinnamon for a cozy, warm flavor.

Gathering your ingredients is the first step to cookie bliss. Butter, sugar, eggs, vanilla extract, flour, baking powder, and salt are the staples that form the foundation of this delicious treat. Softening the butter beforehand ensures a smooth, creamy dough that’s easy to work with. Once combined, the dough will be soft, slightly sticky, and oh-so-tempting to sample! But resist the urge to taste, as the real magic happens in the oven.

When it comes to shaping your cookies, get creative! Roll the dough into small balls and flatten them on the baking sheet, or use cookie cutters to create fun shapes. If you’re feeling extra festive, involve the whole family and make it a group activity—a fun tradition to start during the holidays. Remember to leave some space between each cookie to allow for spreading during baking.

As the cookies bake, your kitchen will fill with the irresistible aroma of fresh-baked goodness. Keep a close eye on them, as the ideal cookie is golden around the edges but still soft in the middle. Once they’ve cooled down, it’s time for the best part: decorating!

Sizzling Delights: A Guide to Perfectly Grilled Chicken Breasts

Sizzling, juicy, and perfectly charred—a grilled chicken breast is a summer delight that tantalizes the taste buds and elevates any outdoor dining experience. But achieving that coveted, mouth-watering perfection can be a challenge for even the most seasoned grill masters. Worry not, as this comprehensive guide will lead you through the process, ensuring your chicken breasts emerge from the grill as a masterpiece every time.

First, let’s talk about preparation. Start by selecting boneless and skinless chicken breasts of uniform thickness. This ensures even cooking, preventing some pieces from drying out while others remain undercooked. A good tip is to gently pound thicker areas with a meat mallet to achieve consistency. Then, a quick brine or marinade can work wonders to keep the meat moist and infuse it with flavor. A simple brine of water, salt, sugar, and perhaps some garlic and herbs can do the trick. Alternatively, marinate the chicken in your favorite blend of olive oil, lemon juice, herbs, and spices for at least 30 minutes to a few hours.

Now, let’s fire up the grill! You’ll want to start with a clean, well-oiled grill grate. Preheat your grill to medium-high heat, aiming for a temperature of around 400°F to 450°F. This heat level is crucial to getting those beautiful grill marks and locking in the juices. When you place the chicken breasts on the grill, you should hear a satisfying sizzle.

Grill the chicken breasts for about 5-7 minutes on the first side. This will create those coveted grill marks and allow the chicken to release from the grate easily when it’s time to flip. After the initial sear, flip the chicken and continue cooking for another 5-7 minutes or until the internal temperature reaches 165°F.

A Veggie Lover’s Guide: Delicious and Low-Carb Vegetarian Dinner Ideas

Welcome to the world of vegetarian dining, where plant-based meals take center stage and delight your taste buds! If you’re a veggie lover seeking delicious and low-carb dinner options, look no further. This guide will take you on a culinary journey through some mouthwatering vegetarian dishes that will leave you satisfied and energized. Say goodbye to boring meals and hello to a flavor-packed adventure!

**Embrace the Versatility of Vegetables**

Vegetarian dinners are all about celebrating the vibrant flavors and versatility of vegetables. From crisp salads to hearty stews, the possibilities are endless. Start your culinary adventure with a refreshing take on the classic Greek salad. Chop up ripe tomatoes, crisp cucumbers, and crunchy bell peppers. Toss them with Kalamata olives, feta cheese, and a zesty vinaigrette dressing. This salad is not only refreshing but also packed with flavors that will transport you to the Mediterranean.

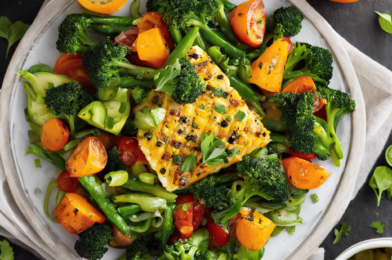
For a heartier option, try a roasted vegetable medley. Chop up colorful veggies like zucchini, eggplant, and red onions, and toss them with olive oil, garlic, and your favorite herbs. Pop them in the oven and let the magic happen. The roasting process brings out the natural sweetness of the vegetables, creating a warm and satisfying dish.

**Explore the World of Plant-Based Proteins**

When it comes to low-carb vegetarian meals, plant-based proteins are your allies. Tofu, tempeh, and seitan offer versatility and nutrition. Marinate tofu in a tangy teriyaki sauce and grill it to perfection. Serve it with a side of steamed broccoli and brown rice for a satisfying Asian-inspired meal. Tempeh, made from fermented soybeans, adds a nutty flavor and chewy texture to dishes. Crumble it into a veggie-loaded chili for a protein boost.

**Get Creative with Meat Alternatives**

Thanks to the culinary creativity of today’s food scene, there’s a myriad of meat alternatives available. From plant-based burgers that sizzle on the grill to vegan sausage that adds a kick to pasta dishes, the options are endless. These innovative products mimic the texture and taste of meat, making them an excellent choice for vegetarians and flexitarians alike. Experiment with these alternatives in your favorite recipes, and you’ll be amazed at how they elevate your veggie-centric meals.

**Nourish Your Body with Hearty Stews and Curries**

Nothing warms the soul like a comforting stew or a flavorful curry on a chilly evening. Whip up a batch of lentil stew, packed with protein-rich lentils, carrots, celery, and herbs. The lentils provide a satisfying texture, and the vegetables add a burst of vitamins and minerals. For a spicy kick, try an Indian-inspired chickpea curry. The combination of chickpeas, tomatoes, and aromatic spices like cumin and turmeric creates a vibrant and nourishing dish.

**Master the Art of Veggie-Packed Pasta Dishes**

Who says pasta can’t be part of a low-carb vegetarian diet? It’s all about choosing the right type of pasta and loading it with veggies. Opt for whole wheat or legume-based pasta for added fiber and nutrients. Create a vibrant primavera pasta by sautéing a rainbow of vegetables like asparagus, yellow squash, and cherry tomatoes. Toss them with your favorite pasta and a light garlic and olive oil sauce. Your taste buds will thank you!

In the world of vegetarian dining, the possibilities are endless. From vibrant salads to hearty stews and creative meat alternatives, plant-based meals offer a delightful culinary experience. Embrace the abundance of vegetables and discover the joy of cooking and savoring flavorful, low-carb vegetarian dinners. Your taste buds and your body will embrace the veggie-lover’s lifestyle!

The Ultimate Comfort Food: Slow Cooker Beef Stew


There’s nothing quite like a hearty beef stew to warm you up on a chilly day. And when it’s made in a slow cooker, achieving that perfect melt-in-your-mouth texture for the beef becomes effortless. This easy-to-follow recipe will guide you through creating a delicious, comforting beef stew that will make your home smell divine and your taste buds sing. The best part? It’s a one-pot wonder, making both the cooking and cleanup a breeze!

In the realm of comfort food, a well-made beef stew holds a special place. The tender chunks of beef, the rich gravy, and the assortment of vegetables create a symphony of flavors and textures that satisfy the soul. Using a slow cooker allows the flavors to meld and intensify over time, creating a depth of taste that is truly remarkable.

Preparing this dish is a simple process. You start by seasoning the beef with a blend of aromatic spices, searing it to lock in the juices, and then transferring it to the slow cooker. A rich sauce base is created by cooking down vegetables and aromatics, which is then poured over the beef. The slow cooker does the rest, gently simmering the stew for hours, allowing the beef to become incredibly tender.

The beauty of this recipe is its versatility. You can customize the vegetables according to your taste or what’s in season. Carrots, potatoes, and onions are classic choices, but feel free to add celery, mushrooms, or even a splash of red wine for an extra layer of flavor. The slow cooker transforms these simple ingredients into a mouthwatering meal.

For those who crave variety, this stew lends itself well to experimentation. You might try adding a handful of pearl barley or beans for a heartier texture, or a dollop of tomato paste to enhance the sauce’s richness. Each addition offers a unique twist on the classic comfort food.

In the world of slow-cooked meals, beef stew is an enduring favorite. It’s a dish that nourishes both the body and the soul, perfect for family dinners, casual get-togethers, or simply treating yourself after a long day. The tantalizing aroma that fills your home while it cooks is an added bonus.

One-Pot Pasta with Sausage and Spinach” – This easy and flavorful dish

The idea of throwing all your ingredients into one pot and letting them work their magic is a convenient and delicious way to prepare a weeknight dinner. And when it comes to one-pot pasta dishes, this Sausage and Spinach creation takes the cake, or should I say, the pasta! It’s a complete meal, full of savory flavors and nutritious goodness, all cooked together in a single pot. What could be better?

The beauty of this dish lies in its simplicity. You don’t need fancy equipment or complicated techniques; just gather your ingredients, toss them into a pot, and let the stovetop do the rest. The pasta cooks directly in the pot, absorbing the flavors of the sausage, spinach, garlic, and tomatoes. This method creates a rich, flavorful sauce that perfectly coats each noodle.
teak
For those who crave variety, this recipe is incredibly versatile. You can experiment with different types of pasta, spices, and even switch up the vegetables and proteins to suit your taste or use what’s in your fridge. It’s a great way to get creative in the kitchen without adding extra steps to your cooking routine.

The sausage adds a hearty, savory element to the dish. You can use your favorite type, whether it’s spicy Italian sausage, mild chicken sausage, or even a vegetarian option. The spinach provides a healthy dose of vitamins and minerals, and its delicate flavor blends seamlessly with the other ingredients.

Preparing this meal is as easy as chopping your ingredients, browning the sausage, and then adding everything else into the pot. As the pasta cooks, the flavors meld together beautifully, creating a satisfying and tasty dish that will have your family asking for seconds.

This One-Pot Pasta is not only convenient but also incredibly tasty, making it the perfect solution for busy weeknights. So, the next time you’re looking for a simple yet flavorful dinner idea, give this recipe a try and enjoy the ease and satisfaction of a one-pot wonder. Bon appétit!